Gateway E-2100 E-2100 User's Guide - Page 10
Component, Description, Checking Out Your Gateway E-2100 Computer
 |
View all Gateway E-2100 manuals
Add to My Manuals
Save this manual to your list of manuals |
Page 10 highlights
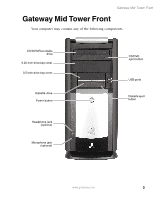
Chapter 1: Checking Out Your Gateway E-2100 Computer Component Icon Description CD/DVD/Recordable drive Use this drive to listen to audio CDs, install games and programs, watch DVDs, and store large files onto recordable CDs and DVDs (depending on drive type). For more information, see "Using the CD or DVD drive" on page 42. This drive may be a CD, CD-RW, DVD, DVD+RW, or DVD-RAM/-RW/CD-RW drive. To identify your drive type and for more information about your drive, see "Identifying drive types" on page 42. 5.25-inch drive bay cover Remove this cover to install an additional 5.25-inch drive. 3.5-inch drive bay cover Remove this cover to install an additional 3.5-inch drive. Diskette drive Use this drive to store smaller files on diskettes. For more information, see "Using the diskette drive" on page 40. Power button Press this button to turn the power on or off. You can also configure the power button to operate in Standby/Resume mode or Hibernate mode. For more information on changing the power button setting, see "Changing power settings" on page 79. Headphone jack (optional) Plug headphones into this jack. This jack is color-coded lime green. Microphone jack (optional) Plug a microphone into this jack. This jack is color-coded red or pink. CD/DVD eject button Press this button to open the CD or DVD drive tray. For more information, see "Using the CD or DVD drive" on page 42. USB ports USB v2.0 Plug USB (Universal Serial Bus) devices (such as a digital camera) into these ports. Diskette eject button Press this button to eject an inserted diskette. For more information, see "Using the diskette drive" on page 40. 4 www.gateway.com
-
 1
1 -
2
-
3
-
4
-
 5
5 -
 6
6 -
 7
7 -
 8
8 -
 9
9 -
 10
10 -
 11
11 -
 12
12 -
 13
13 -
 14
14 -
 15
15 -
16
-
17
-
18
-
19
-
20
-
21
-
22
-
23
-
24
-
25
-
26
-
27
-
28
-
29
-
30
-
31
-
32
-
33
-
34
-
35
-
36
-
37
-
38
-
39
-
40
-
41
-
42
-
43
-
44
-
45
-
46
-
47
-
48
-
49
-
50
-
51
-
52
-
53
-
54
-
55
-
56
-
57
-
58
-
59
-
60
-
61
-
62
-
63
-
64
-
65
-
66
-
67
-
68
-
69
-
70
-
71
-
72
-
73
-
74
-
75
-
76
-
77
-
78
-
79
-
80
-
81
-
82
-
83
-
84
-
85
-
86
-
87
-
88
-
89
-
90
-
91
-
92
-
93
-
94
-
95
-
96
-
97
-
98
-
99
-
100
-
101
-
102
-
103
-
104
-
105
-
106
-
107
-
108
-
109
-
110
-
111
-
112
-
113
-
114
-
115
-
116
-
117
-
118
-
119
-
120
-
121
-
122
-
123
-
124
-
125
-
126
-
127
-
128
-
129
-
130
-
131
-
132
-
133
-
134
-
135
-
136
-
137
-
138
-
139
-
140
-
141
-
142
-
143
-
144
-
145
-
146
-
147
-
148
-
149
-
150
-
151
-
152
-
153
-
154
-
155
-
156
-
157
-
158
-
159
-
160
-
161
-
162
-
163
-
164
-
165
-
166
-
167
-
168
-
169
-
170
-
171
-
172
-
173
-
174
-
175
-
176
-
177
-
178
-
179
-
180
-
181
-
182
-
183
-
184
-
185
-
186
-
187
-
188
-
189
-
190
-
191
-
192
-
193
-
194
-
195
-
196
-
197
-
198
-
199
-
200
-
201
-
202
-
203
-
204
-
205
-
206
-
207
-
208
-
209
-
210
-
211
-
212
-
213
 |
 |
