Gateway E-2100 E-2100 User's Guide - Page 144
To replace a power supply, Open the case by following the instructions
 |
View all Gateway E-2100 manuals
Add to My Manuals
Save this manual to your list of manuals |
Page 144 highlights
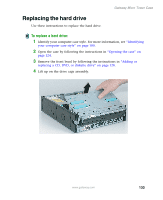
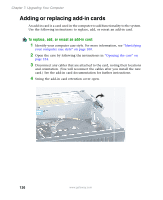
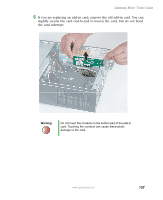
Chapter 7: Upgrading Your Computer 6 Install the new card into the add-in slot. You can slightly seesaw the card end-to-end to help insert the card, but do not bend the card sideways. 7 Push the add-in card retention cover inward. 8 If you disconnected any cables, reconnect the add-in card cables using your notes from Step 3. See the add-in card documentation for further instructions. 9 Close the case by following the instructions in "Closing the case" on page 127. 10 See the documentation that came with the card for any special software installation instructions. Replacing the power supply To replace a power supply: 1 Identify your computer case style. For more information, see "Identifying your computer case style" on page 100. 2 Open the case by following the instructions in "Opening the case" on page 124. 3 Remove the front bezel by following the instructions in "Adding or replacing a CD, DVD, or diskette drive" on page 128. 4 Disconnect the power supply cables from all components (such as, hard drives, CD/DVD/Recordable drives, and the system board), noting their locations and orientation. (You will reconnect the cables after you install the new power supply.) 138 www.gateway.com
-
 1
1 -
2
-
3
-
4
-
5
-
6
-
7
-
8
-
9
-
10
-
11
-
12
-
13
-
14
-
15
-
16
-
17
-
18
-
19
-
20
-
21
-
22
-
23
-
24
-
25
-
26
-
27
-
28
-
29
-
30
-
31
-
32
-
33
-
34
-
35
-
36
-
37
-
38
-
39
-
40
-
41
-
42
-
43
-
44
-
45
-
46
-
47
-
48
-
49
-
50
-
51
-
52
-
53
-
54
-
55
-
56
-
57
-
58
-
59
-
60
-
61
-
62
-
63
-
64
-
65
-
66
-
67
-
68
-
69
-
70
-
71
-
72
-
73
-
74
-
75
-
76
-
77
-
78
-
79
-
80
-
81
-
82
-
83
-
84
-
85
-
86
-
87
-
88
-
89
-
90
-
91
-
92
-
93
-
94
-
95
-
96
-
97
-
98
-
99
-
100
-
101
-
102
-
103
-
104
-
105
-
106
-
107
-
108
-
109
-
110
-
111
-
112
-
113
-
114
-
115
-
116
-
117
-
118
-
119
-
120
-
121
-
122
-
123
-
124
-
125
-
126
-
127
-
128
-
129
-
130
-
131
-
132
-
133
-
134
-
135
-
136
-
137
-
138
-
 139
139 -
 140
140 -
 141
141 -
 142
142 -
 143
143 -
 144
144 -
 145
145 -
 146
146 -
 147
147 -
 148
148 -
 149
149 -
150
-
151
-
152
-
153
-
154
-
155
-
156
-
157
-
158
-
159
-
160
-
161
-
162
-
163
-
164
-
165
-
166
-
167
-
168
-
169
-
170
-
171
-
172
-
173
-
174
-
175
-
176
-
177
-
178
-
179
-
180
-
181
-
182
-
183
-
184
-
185
-
186
-
187
-
188
-
189
-
190
-
191
-
192
-
193
-
194
-
195
-
196
-
197
-
198
-
199
-
200
-
201
-
202
-
203
-
204
-
205
-
206
-
207
-
208
-
209
-
210
-
211
-
212
-
213
 |
 |