Gateway E-2100 E-2100 User's Guide - Page 153
In Windows XP, click, Start, Control Panel, Performance and, Maintenance, System
 |
View all Gateway E-2100 manuals
Add to My Manuals
Save this manual to your list of manuals |
Page 153 highlights
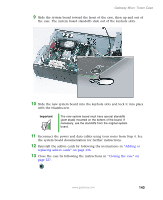
Installing memory 5 If you are removing a DIMM from the memory module bank, gently pull the plastic tabs away from the sides of the memory module and remove it. - OR - If you are adding a DIMM to an empty memory module bank, gently pull the plastic tabs away from the sides of the memory module bank. 6 Align the notches on the new DIMM with the notches on the memory module bank and press the module firmly into the bank. The tabs on the sides of the memory module should secure the memory module automatically. When the module is secure, you hear a click. 7 Close the case by following the instructions for your case style. 8 Reconnect the cables and the power cord. 9 Turn on your computer. Windows starts and the Windows desktop appears. 10 In Windows XP, click Start, Control Panel, then click Performance and Maintenance (if in Category view). Click/Double-click System. The amount of memory in your computer is shown at the bottom of the System Properties dialog box in the General tab. - OR - www.gateway.com 147
-
 1
1 -
2
-
3
-
4
-
5
-
6
-
7
-
8
-
9
-
10
-
11
-
12
-
13
-
14
-
15
-
16
-
17
-
18
-
19
-
20
-
21
-
22
-
23
-
24
-
25
-
26
-
27
-
28
-
29
-
30
-
31
-
32
-
33
-
34
-
35
-
36
-
37
-
38
-
39
-
40
-
41
-
42
-
43
-
44
-
45
-
46
-
47
-
48
-
49
-
50
-
51
-
52
-
53
-
54
-
55
-
56
-
57
-
58
-
59
-
60
-
61
-
62
-
63
-
64
-
65
-
66
-
67
-
68
-
69
-
70
-
71
-
72
-
73
-
74
-
75
-
76
-
77
-
78
-
79
-
80
-
81
-
82
-
83
-
84
-
85
-
86
-
87
-
88
-
89
-
90
-
91
-
92
-
93
-
94
-
95
-
96
-
97
-
98
-
99
-
100
-
101
-
102
-
103
-
104
-
105
-
106
-
107
-
108
-
109
-
110
-
111
-
112
-
113
-
114
-
115
-
116
-
117
-
118
-
119
-
120
-
121
-
122
-
123
-
124
-
125
-
126
-
127
-
128
-
129
-
130
-
131
-
132
-
133
-
134
-
135
-
136
-
137
-
138
-
139
-
140
-
141
-
142
-
143
-
144
-
145
-
146
-
147
-
 148
148 -
 149
149 -
 150
150 -
 151
151 -
 152
152 -
 153
153 -
 154
154 -
 155
155 -
 156
156 -
 157
157 -
 158
158 -
159
-
160
-
161
-
162
-
163
-
164
-
165
-
166
-
167
-
168
-
169
-
170
-
171
-
172
-
173
-
174
-
175
-
176
-
177
-
178
-
179
-
180
-
181
-
182
-
183
-
184
-
185
-
186
-
187
-
188
-
189
-
190
-
191
-
192
-
193
-
194
-
195
-
196
-
197
-
198
-
199
-
200
-
201
-
202
-
203
-
204
-
205
-
206
-
207
-
208
-
209
-
210
-
211
-
212
-
213
 |
 |
