HP 2420 HP LaserJet 2400 Series - User Guide - Page 190
Diagnostics menu, Values, Explanation, PRINT EVENT LOG, SHOW EVENT, PAPER PATH TEST, PRINT TEST
 |
UPC - 829160289205
View all HP 2420 manuals
Add to My Manuals
Save this manual to your list of manuals |
Page 190 highlights
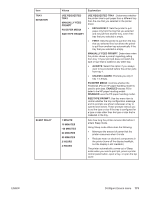
Diagnostics menu Administrators can use this submenu to isolate parts and to troubleshoot jam and printquality issues. The following table lists the settings and possible values. In the Values column, the default value for each setting is the one that has an asterisk (*) next to it. Item PRINT EVENT LOG Values There is no value to select. SHOW EVENT LOG There is no value to select. PAPER PATH TEST PRINT TEST PAGE SOURCE DESTINATION DUPLEX COPIES Explanation Press (SELECT button) to generate a list of the 50 most recent entries in the event log. The printed event log shows error number, page count, error code, and description or personality. Press (SELECT button) to scroll through the contents of the event log at the printer control panel, which lists up to the 50 most recent events. Use (UP button) or (DOWN button) to scroll through the event log contents. Generates a test page that is useful for testing the paper-handling features of the printer. PRINT TEST PAGE: Press (SELECT button) to start the paper-path test using the source (tray), destination (output bin), duplex, and number of copies settings that you set in the other items on the Paper Path Test menu. Set the other items before selecting PRINT TEST PAGE. SOURCE: Select the tray that uses the paper path that you want to test. You can select any tray that is installed. Select ALL TRAYS to test all paper paths. (Paper must be loaded in the selected trays.) DESTINATION: Select the output bin that uses the paper path that you want to test. You can select any output bin that is installed. Select ALL BINS to test all paper paths. DUPLEX: Determine whether the paper goes through the duplexer during the paper-path test. The menu item appears only if the printer includes a built-in duplexer . COPIES: Set how many sheets of paper are used from each tray during the paper-path test. 178 Appendix B Control panel menus ENWW
-
 1
1 -
2
-
3
-
4
-
5
-
6
-
7
-
8
-
9
-
10
-
11
-
12
-
13
-
14
-
15
-
16
-
17
-
18
-
19
-
20
-
21
-
22
-
23
-
24
-
25
-
26
-
27
-
28
-
29
-
30
-
31
-
32
-
33
-
34
-
35
-
36
-
37
-
38
-
39
-
40
-
41
-
42
-
43
-
44
-
45
-
46
-
47
-
48
-
49
-
50
-
51
-
52
-
53
-
54
-
55
-
56
-
57
-
58
-
59
-
60
-
61
-
62
-
63
-
64
-
65
-
66
-
67
-
68
-
69
-
70
-
71
-
72
-
73
-
74
-
75
-
76
-
77
-
78
-
79
-
80
-
81
-
82
-
83
-
84
-
85
-
86
-
87
-
88
-
89
-
90
-
91
-
92
-
93
-
94
-
95
-
96
-
97
-
98
-
99
-
100
-
101
-
102
-
103
-
104
-
105
-
106
-
107
-
108
-
109
-
110
-
111
-
112
-
113
-
114
-
115
-
116
-
117
-
118
-
119
-
120
-
121
-
122
-
123
-
124
-
125
-
126
-
127
-
128
-
129
-
130
-
131
-
132
-
133
-
134
-
135
-
136
-
137
-
138
-
139
-
140
-
141
-
142
-
143
-
144
-
145
-
146
-
147
-
148
-
149
-
150
-
151
-
152
-
153
-
154
-
155
-
156
-
157
-
158
-
159
-
160
-
161
-
162
-
163
-
164
-
165
-
166
-
167
-
168
-
169
-
170
-
171
-
172
-
173
-
174
-
175
-
176
-
177
-
178
-
179
-
180
-
181
-
182
-
183
-
184
-
 185
185 -
 186
186 -
 187
187 -
 188
188 -
 189
189 -
 190
190 -
 191
191 -
 192
192 -
 193
193 -
 194
194 -
 195
195 -
196
-
197
-
198
-
199
-
200
-
201
-
202
-
203
-
204
-
205
-
206
-
207
-
208
-
209
-
210
-
211
-
212
-
213
-
214
-
215
-
216
-
217
-
218
-
219
-
220
-
221
-
222
-
223
-
224
-
225
-
226
-
227
-
228
-
229
-
230
-
231
-
232
-
233
-
234
-
235
-
236
-
237
-
238
-
239
-
240
-
241
-
242
-
243
-
244
-
245
-
246
-
247
-
248
-
249
-
250
-
251
-
252
 |
 |
