HP 2420 HP LaserJet 2400 Series - User Guide - Page 212
Installing an EIO card
 |
UPC - 829160289205
View all HP 2420 manuals
Add to My Manuals
Save this manual to your list of manuals |
Page 212 highlights
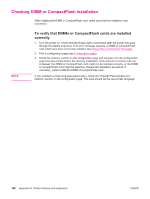
Installing an EIO card Follow this procedure to install an EIO card. To install an EIO card 1. Turn the printer power off. 2. Remove the two screws and cover plate from the EIO slot on the back of the printer. NOTE Do not discard the screws or the cover plate. Save them for future use if you remove the EIO card. 3. Install the EIO card in the EIO slot and tighten the screws. NOTE 4. Turn the printer power on and print a configuration page to verify that the new EIO device is recognized. (See Configuration page.) When you print a configuration page, an HP Jetdirect Configuration page that contains network configuration and status information also prints. 200 Appendix D Printer memory and expansion ENWW
-
 1
1 -
2
-
3
-
4
-
5
-
6
-
7
-
8
-
9
-
10
-
11
-
12
-
13
-
14
-
15
-
16
-
17
-
18
-
19
-
20
-
21
-
22
-
23
-
24
-
25
-
26
-
27
-
28
-
29
-
30
-
31
-
32
-
33
-
34
-
35
-
36
-
37
-
38
-
39
-
40
-
41
-
42
-
43
-
44
-
45
-
46
-
47
-
48
-
49
-
50
-
51
-
52
-
53
-
54
-
55
-
56
-
57
-
58
-
59
-
60
-
61
-
62
-
63
-
64
-
65
-
66
-
67
-
68
-
69
-
70
-
71
-
72
-
73
-
74
-
75
-
76
-
77
-
78
-
79
-
80
-
81
-
82
-
83
-
84
-
85
-
86
-
87
-
88
-
89
-
90
-
91
-
92
-
93
-
94
-
95
-
96
-
97
-
98
-
99
-
100
-
101
-
102
-
103
-
104
-
105
-
106
-
107
-
108
-
109
-
110
-
111
-
112
-
113
-
114
-
115
-
116
-
117
-
118
-
119
-
120
-
121
-
122
-
123
-
124
-
125
-
126
-
127
-
128
-
129
-
130
-
131
-
132
-
133
-
134
-
135
-
136
-
137
-
138
-
139
-
140
-
141
-
142
-
143
-
144
-
145
-
146
-
147
-
148
-
149
-
150
-
151
-
152
-
153
-
154
-
155
-
156
-
157
-
158
-
159
-
160
-
161
-
162
-
163
-
164
-
165
-
166
-
167
-
168
-
169
-
170
-
171
-
172
-
173
-
174
-
175
-
176
-
177
-
178
-
179
-
180
-
181
-
182
-
183
-
184
-
185
-
186
-
187
-
188
-
189
-
190
-
191
-
192
-
193
-
194
-
195
-
196
-
197
-
198
-
199
-
200
-
201
-
202
-
203
-
204
-
205
-
206
-
 207
207 -
 208
208 -
 209
209 -
 210
210 -
 211
211 -
 212
212 -
 213
213 -
 214
214 -
 215
215 -
 216
216 -
 217
217 -
218
-
219
-
220
-
221
-
222
-
223
-
224
-
225
-
226
-
227
-
228
-
229
-
230
-
231
-
232
-
233
-
234
-
235
-
236
-
237
-
238
-
239
-
240
-
241
-
242
-
243
-
244
-
245
-
246
-
247
-
248
-
249
-
250
-
251
-
252
 |
 |

Installing an EIO card
Follow this procedure to install an EIO card.
To install an EIO card
1.
Turn the printer power off.
2.
Remove the two screws and cover plate from the EIO slot on the back of the printer.
NOTE
Do not discard the screws or the cover plate. Save them for future use if you remove the EIO
card.
3.
Install the EIO card in the EIO slot and tighten the screws.
4.
Turn the printer power on and print a configuration page to verify that the new EIO
device is recognized. (See
Configuration
page
.)
NOTE
When you print a configuration page, an HP Jetdirect Configuration page that contains
network configuration and status information also prints.
200
Appendix D
Printer memory and expansion
ENWW