HP 2420 HP LaserJet 2400 Series - User Guide - Page 208
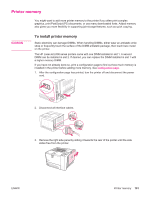
To replace the right side panel, line up the alignment arrows and slide the panel toward
 |
UPC - 829160289205
View all HP 2420 manuals
Add to My Manuals
Save this manual to your list of manuals |
Page 208 highlights
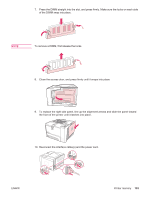
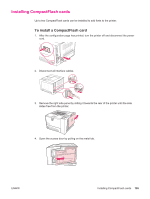
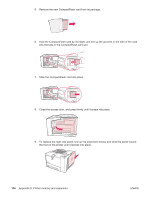
5. Remove the new CompactFlash card from its package. 6. Hold the CompactFlash card by its edges and line up the grooves in the side of the card with the tabs in the CompactFlash card slot. 7. Slide the CompactFlash card into place. 8. Close the access door, and press firmly until it snaps into place. 9. To replace the right side panel, line up the alignment arrows and slide the panel toward the front of the printer until it latches into place. 196 Appendix D Printer memory and expansion ENWW
-
 1
1 -
2
-
3
-
4
-
5
-
6
-
7
-
8
-
9
-
10
-
11
-
12
-
13
-
14
-
15
-
16
-
17
-
18
-
19
-
20
-
21
-
22
-
23
-
24
-
25
-
26
-
27
-
28
-
29
-
30
-
31
-
32
-
33
-
34
-
35
-
36
-
37
-
38
-
39
-
40
-
41
-
42
-
43
-
44
-
45
-
46
-
47
-
48
-
49
-
50
-
51
-
52
-
53
-
54
-
55
-
56
-
57
-
58
-
59
-
60
-
61
-
62
-
63
-
64
-
65
-
66
-
67
-
68
-
69
-
70
-
71
-
72
-
73
-
74
-
75
-
76
-
77
-
78
-
79
-
80
-
81
-
82
-
83
-
84
-
85
-
86
-
87
-
88
-
89
-
90
-
91
-
92
-
93
-
94
-
95
-
96
-
97
-
98
-
99
-
100
-
101
-
102
-
103
-
104
-
105
-
106
-
107
-
108
-
109
-
110
-
111
-
112
-
113
-
114
-
115
-
116
-
117
-
118
-
119
-
120
-
121
-
122
-
123
-
124
-
125
-
126
-
127
-
128
-
129
-
130
-
131
-
132
-
133
-
134
-
135
-
136
-
137
-
138
-
139
-
140
-
141
-
142
-
143
-
144
-
145
-
146
-
147
-
148
-
149
-
150
-
151
-
152
-
153
-
154
-
155
-
156
-
157
-
158
-
159
-
160
-
161
-
162
-
163
-
164
-
165
-
166
-
167
-
168
-
169
-
170
-
171
-
172
-
173
-
174
-
175
-
176
-
177
-
178
-
179
-
180
-
181
-
182
-
183
-
184
-
185
-
186
-
187
-
188
-
189
-
190
-
191
-
192
-
193
-
194
-
195
-
196
-
197
-
198
-
199
-
200
-
201
-
202
-
 203
203 -
 204
204 -
 205
205 -
 206
206 -
 207
207 -
 208
208 -
 209
209 -
 210
210 -
 211
211 -
 212
212 -
 213
213 -
214
-
215
-
216
-
217
-
218
-
219
-
220
-
221
-
222
-
223
-
224
-
225
-
226
-
227
-
228
-
229
-
230
-
231
-
232
-
233
-
234
-
235
-
236
-
237
-
238
-
239
-
240
-
241
-
242
-
243
-
244
-
245
-
246
-
247
-
248
-
249
-
250
-
251
-
252
 |
 |

5.
Remove the new CompactFlash card from its package.
6.
Hold the CompactFlash card by its edges and line up the grooves in the side of the card
with the tabs in the CompactFlash card slot.
7.
Slide the CompactFlash card into place.
8.
Close the access door, and press firmly until it snaps into place.
9.
To replace the right side panel, line up the alignment arrows and slide the panel toward
the front of the printer until it latches into place.
196
Appendix D
Printer memory and expansion
ENWW