HP 4100mfp HP LaserJet 4100mfp -User Guide - Page 101
Toner smear, Loose toner, Repeating defects, If paper is heavy or rough
 |
UPC - 725184896392
View all HP 4100mfp manuals
Add to My Manuals
Save this manual to your list of manuals |
Page 101 highlights
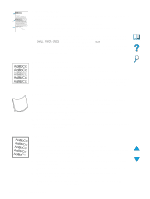
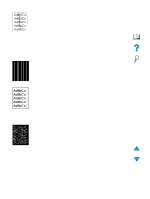
Toner smear See also "Loose toner" on page 99. 1 Print a few more pages to see if the problem corrects itself. 2 Try using a different type of paper. 3 Make sure that the environmental specifications for the product are being met (see "General specifications" on page 124). 4 Clean the inside of the product (see "Cleaning the product" on page 71) and run a manual cleaning page to clean the fuser (see "Cleaning the fuser" on page 73). 5 Maintenance might be due. Check this by printing a copy of the supplies status page (see "Information menu" on page 37). If maintenance is due, order and install the printer maintenance kit (see "Performing preventative maintenance" on page 76). 6 Replace the toner cartridge. Loose toner Loose toner, in this context, is defined as toner that can be rubbed off the page. 1 If paper is heavy or rough, try using a high fuser mode so that toner fuses more completely onto the paper. 2 If your paper has a rougher texture on one side, try printing on the smoother side. 3 Make sure that the environmental specifications for the product are met (see "Product specifications" on page 122). 4 Make sure that paper type and quality meet HP specifications (see "Paper specifications" on page 113). 5 Maintenance might be due. Check this by printing a copy of the supplies status page (see "Information menu" on page 37). If maintenance is due, order and install the printer maintenance kit (see "Performing preventative maintenance" on page 76). Repeating defects See also "Repeating image" on page 100. 1 Print a few more pages to see if the problem corrects itself. 2 If the distance between defects is 38.00 mm (1.50 inches) or 94.00 mm (3.76 inches), the toner cartridge might need to be replaced. 3 Clean the inside of the product (see "Cleaning the product" on page 71) and run a manual cleaning page to clean the fuser (see "Cleaning the fuser" on page 73). 4 Maintenance might be due. Check this by printing a copy of the supplies status page (see "Information menu" on page 37). If maintenance is due, order and install the printer maintenance kit (see "Performing preventative maintenance" on page 76). Correcting output quality problems 99
-
 1
1 -
2
-
3
-
4
-
5
-
6
-
7
-
8
-
9
-
10
-
11
-
12
-
13
-
14
-
15
-
16
-
17
-
18
-
19
-
20
-
21
-
22
-
23
-
24
-
25
-
26
-
27
-
28
-
29
-
30
-
31
-
32
-
33
-
34
-
35
-
36
-
37
-
38
-
39
-
40
-
41
-
42
-
43
-
44
-
45
-
46
-
47
-
48
-
49
-
50
-
51
-
52
-
53
-
54
-
55
-
56
-
57
-
58
-
59
-
60
-
61
-
62
-
63
-
64
-
65
-
66
-
67
-
68
-
69
-
70
-
71
-
72
-
73
-
74
-
75
-
76
-
77
-
78
-
79
-
80
-
81
-
82
-
83
-
84
-
85
-
86
-
87
-
88
-
89
-
90
-
91
-
92
-
93
-
94
-
95
-
 96
96 -
 97
97 -
 98
98 -
 99
99 -
 100
100 -
 101
101 -
 102
102 -
 103
103 -
 104
104 -
 105
105 -
 106
106 -
107
-
108
-
109
-
110
-
111
-
112
-
113
-
114
-
115
-
116
-
117
-
118
-
119
-
120
-
121
-
122
-
123
-
124
-
125
-
126
-
127
-
128
-
129
-
130
-
131
-
132
-
133
-
134
-
135
-
136
-
137
-
138
-
139
-
140
-
141
-
142
-
143
-
144
-
145
-
146
-
147
-
148
-
149
-
150
-
151
-
152
-
153
-
154
-
155
-
156
-
157
-
158
-
159
-
160
-
161
-
162
-
163
-
164
 |
 |
