HP 4100mfp HP LaserJet 4100mfp -User Guide - Page 33
Layout options for duplexing, Flip s Up, Flipped
 |
UPC - 725184896392
View all HP 4100mfp manuals
Add to My Manuals
Save this manual to your list of manuals |
Page 33 highlights
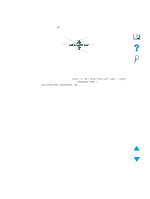
Layout options for duplexing The four available duplexing orientation options are shown below. These options can be selected in the printer driver, through the Copy Settings screen, or by selecting the BINDING option from the Printing menu at the control panel. 1. Long-edge portrait 2. Long-edge landscape* Note 4. Short-edge landscape 3. Short-edge portrait* 1 Long-edge portrait 2 Long-edge landscape 3 Short-edge portrait 4 Short-edge landscape This is the default product setting and the most common layout used. Every printed image is oriented right-side up. Facing pages are read from top to bottom on the left page, then from top to bottom on the right page. This layout is often used in accounting, data processing, and spreadsheet programs. Every other image is oriented upside down. Facing pages are read continuously from top to bottom. This layout is often used with clipboards. Every other printed image is oriented upside down. Facing pages are read continuously from top to bottom. Each printed image is oriented right-side up. Facing pages are read from top to bottom on the left page, then from top to bottom on the right page. For the binding options designated with an asterisk (*) in the diagram above: When using Windows drivers, select Flip Pages Up. When making copies, select the 2 - Flipped option on the Copy Settings screen. Duplex copying and printing 31
-
 1
1 -
2
-
3
-
4
-
5
-
6
-
7
-
8
-
9
-
10
-
11
-
12
-
13
-
14
-
15
-
16
-
17
-
18
-
19
-
20
-
21
-
22
-
23
-
24
-
25
-
26
-
27
-
 28
28 -
 29
29 -
 30
30 -
 31
31 -
 32
32 -
 33
33 -
 34
34 -
 35
35 -
 36
36 -
 37
37 -
 38
38 -
39
-
40
-
41
-
42
-
43
-
44
-
45
-
46
-
47
-
48
-
49
-
50
-
51
-
52
-
53
-
54
-
55
-
56
-
57
-
58
-
59
-
60
-
61
-
62
-
63
-
64
-
65
-
66
-
67
-
68
-
69
-
70
-
71
-
72
-
73
-
74
-
75
-
76
-
77
-
78
-
79
-
80
-
81
-
82
-
83
-
84
-
85
-
86
-
87
-
88
-
89
-
90
-
91
-
92
-
93
-
94
-
95
-
96
-
97
-
98
-
99
-
100
-
101
-
102
-
103
-
104
-
105
-
106
-
107
-
108
-
109
-
110
-
111
-
112
-
113
-
114
-
115
-
116
-
117
-
118
-
119
-
120
-
121
-
122
-
123
-
124
-
125
-
126
-
127
-
128
-
129
-
130
-
131
-
132
-
133
-
134
-
135
-
136
-
137
-
138
-
139
-
140
-
141
-
142
-
143
-
144
-
145
-
146
-
147
-
148
-
149
-
150
-
151
-
152
-
153
-
154
-
155
-
156
-
157
-
158
-
159
-
160
-
161
-
162
-
163
-
164
 |
 |
