HP 4100mfp HP LaserJet 4100mfp -User Guide - Page 80
Clearing jams, Jam locations
 |
UPC - 725184896392
View all HP 4100mfp manuals
Add to My Manuals
Save this manual to your list of manuals |
Page 80 highlights
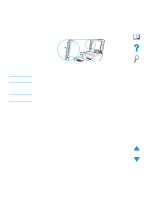
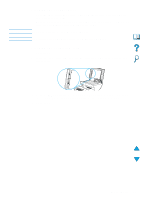
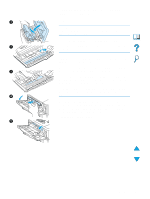
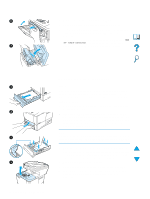
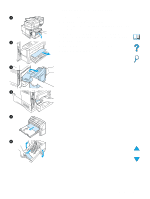
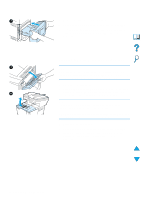
Clearing jams Note If the control panel display shows a jam message, look for media in the locations indicated in the figure on the next page, and then see the procedure for clearing the jam. You might need to look for media in locations other than those indicated in the jam message. If the location of the jam is not obvious, look first in the top cover area underneath the toner cartridge. When clearing jams, be very careful not to tear the media. If a small piece of media remains in the product, it could cause additional jams. If jams are a recurring problem, see "Solving repeated jams" on page 85. The top cover of the product must be opened and then closed to clear a jam message. If a jam occurs in the optional power envelope feeder, see the installation and use documentation that accompanied the product. Jam locations Front 7 Back 1 5 6 5 4 2 3 Note 1 Top cover and toner cartridge area 2 Optional power envelope feeder 3 Input tray areas 4 Optional duplex printing accessory 5 Output bins (top and rear) 6 Fuser area 7 ADF Loose toner might remain in the product after a jam and cause output quality problems. These should clear up within a few pages. 78 Chapter 8 - Problem solving EN
-
 1
1 -
2
-
3
-
4
-
5
-
6
-
7
-
8
-
9
-
10
-
11
-
12
-
13
-
14
-
15
-
16
-
17
-
18
-
19
-
20
-
21
-
22
-
23
-
24
-
25
-
26
-
27
-
28
-
29
-
30
-
31
-
32
-
33
-
34
-
35
-
36
-
37
-
38
-
39
-
40
-
41
-
42
-
43
-
44
-
45
-
46
-
47
-
48
-
49
-
50
-
51
-
52
-
53
-
54
-
55
-
56
-
57
-
58
-
59
-
60
-
61
-
62
-
63
-
64
-
65
-
66
-
67
-
68
-
69
-
70
-
71
-
72
-
73
-
74
-
 75
75 -
 76
76 -
 77
77 -
 78
78 -
 79
79 -
 80
80 -
 81
81 -
 82
82 -
 83
83 -
 84
84 -
 85
85 -
86
-
87
-
88
-
89
-
90
-
91
-
92
-
93
-
94
-
95
-
96
-
97
-
98
-
99
-
100
-
101
-
102
-
103
-
104
-
105
-
106
-
107
-
108
-
109
-
110
-
111
-
112
-
113
-
114
-
115
-
116
-
117
-
118
-
119
-
120
-
121
-
122
-
123
-
124
-
125
-
126
-
127
-
128
-
129
-
130
-
131
-
132
-
133
-
134
-
135
-
136
-
137
-
138
-
139
-
140
-
141
-
142
-
143
-
144
-
145
-
146
-
147
-
148
-
149
-
150
-
151
-
152
-
153
-
154
-
155
-
156
-
157
-
158
-
159
-
160
-
161
-
162
-
163
-
164
 |
 |
