HP 4100mfp HP LaserJet 4100mfp -User Guide - Page 147
Installing a DIMM, INFORMATION, PRINT MENU MAP
 |
UPC - 725184896392
View all HP 4100mfp manuals
Add to My Manuals
Save this manual to your list of manuals |
Page 147 highlights
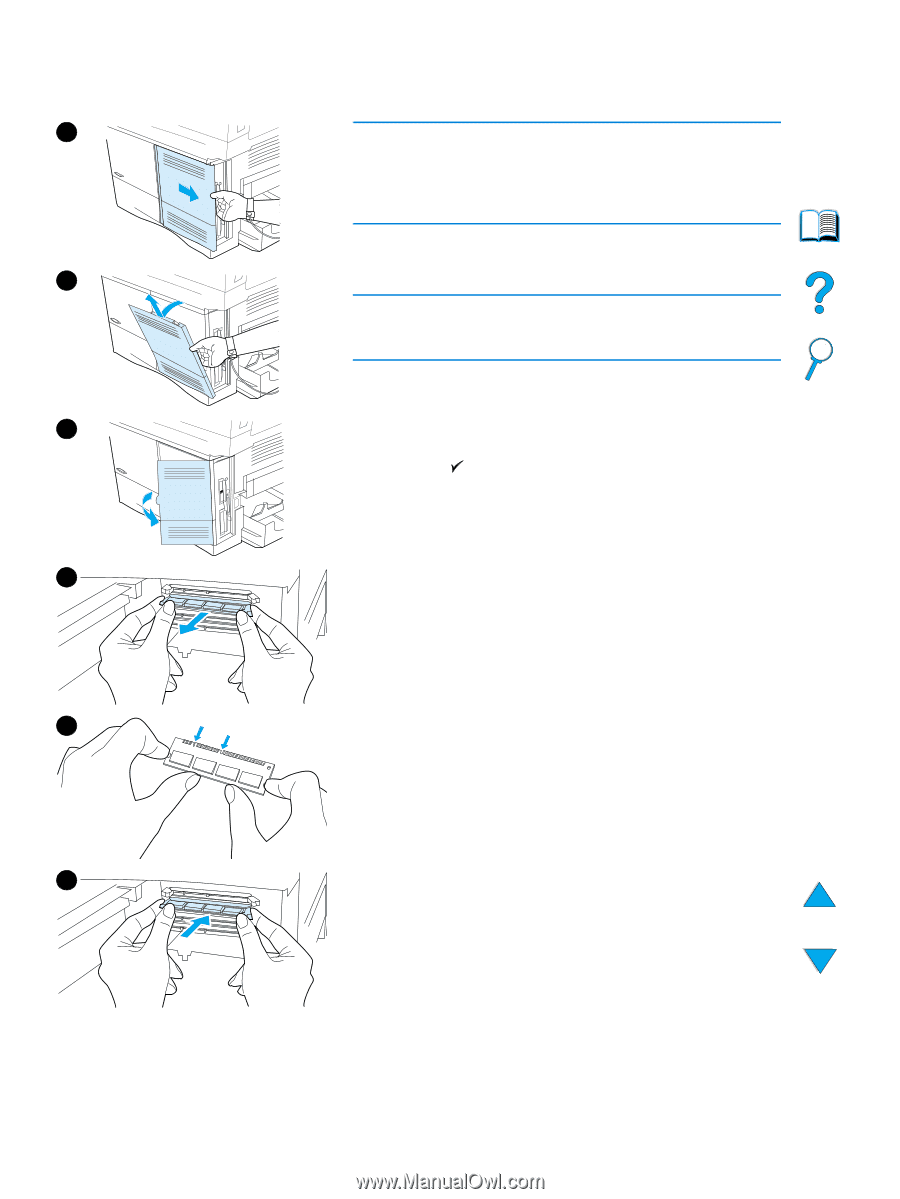
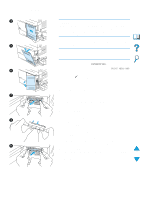
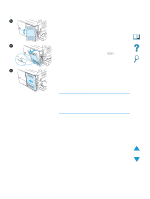
Installing a DIMM 4 5 6 7 8 9 CAUTION Static electricity can damage DIMMs. When handling DIMMs, either wear an antistatic wrist strap or frequently touch the surface of the DIMM's antistatic package, and then touch bare metal on the product. 1 Print a menu map and configuration page before starting this procedure. Note This information will be used after installation to ensure that all stored values remain intact. q Press MENU until the INFORMATION menu appears. q Press the Down navigation button until PRINT MENU MAP appears. q Press to print the page. q Repeat these steps to select and print the configuration page. 2 Turn the product off. 3 Unplug the power cord and disconnect any cables. 4 Remove the formatter cover by pulling it firmly toward the back of the product until the cover stops. 5 Remove the cover from the product. 6 Open the DIMM access door by pulling on the large metal tab. 7 If you are installing a new firmware DIMM, open the bottom DIMM slot, release the locks and remove the existing firmware DIMM. If you are adding a new font or memory DIMM, open any of the three upper DIMM slots. 8 Remove the new DIMM from the antistatic package. Hold the DIMM with your fingers against the side edges and your thumbs against the back edge. Align the notches on the DIMM with the DIMM slot. (Make sure that the locks on each side of the DIMM are open, or outward.) 9 Press the DIMM straight into the appropriate slot. Press firmly. Make sure that the locks on each side of the DIMM snap inward into place. Continued on the next page. Installing a DIMM 145
-
 1
1 -
2
-
3
-
4
-
5
-
6
-
7
-
8
-
9
-
10
-
11
-
12
-
13
-
14
-
15
-
16
-
17
-
18
-
19
-
20
-
21
-
22
-
23
-
24
-
25
-
26
-
27
-
28
-
29
-
30
-
31
-
32
-
33
-
34
-
35
-
36
-
37
-
38
-
39
-
40
-
41
-
42
-
43
-
44
-
45
-
46
-
47
-
48
-
49
-
50
-
51
-
52
-
53
-
54
-
55
-
56
-
57
-
58
-
59
-
60
-
61
-
62
-
63
-
64
-
65
-
66
-
67
-
68
-
69
-
70
-
71
-
72
-
73
-
74
-
75
-
76
-
77
-
78
-
79
-
80
-
81
-
82
-
83
-
84
-
85
-
86
-
87
-
88
-
89
-
90
-
91
-
92
-
93
-
94
-
95
-
96
-
97
-
98
-
99
-
100
-
101
-
102
-
103
-
104
-
105
-
106
-
107
-
108
-
109
-
110
-
111
-
112
-
113
-
114
-
115
-
116
-
117
-
118
-
119
-
120
-
121
-
122
-
123
-
124
-
125
-
126
-
127
-
128
-
129
-
130
-
131
-
132
-
133
-
134
-
135
-
136
-
137
-
138
-
139
-
140
-
141
-
 142
142 -
 143
143 -
 144
144 -
 145
145 -
 146
146 -
 147
147 -
 148
148 -
 149
149 -
 150
150 -
 151
151 -
 152
152 -
153
-
154
-
155
-
156
-
157
-
158
-
159
-
160
-
161
-
162
-
163
-
164
 |
 |