HP 4100mfp HP LaserJet 4100mfp -User Guide - Page 47
User-defined copy settings, Using the Describe Original screen
 |
UPC - 725184896392
View all HP 4100mfp manuals
Add to My Manuals
Save this manual to your list of manuals |
Page 47 highlights
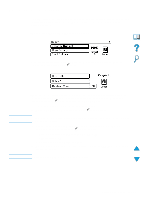
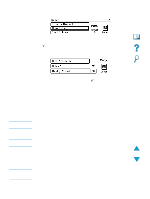
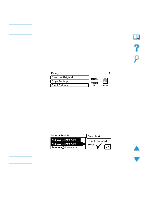
User-defined copy settings To make copies at settings other than the system defaults, navigate through the Describe Original and Copy Settings screens. The use of these screens is explained in the following sections. Using the Describe Original screen From the top-level screen, enter the Describe Original screen by clicking Describe Original and then pressing the button. Note Note To change the description of your original, use the up and down navigation buttons to move through the Describe Original screen to the desired setting box. Confirm your choices by pressing when the correct setting is highlighted. 1 Place the original in the ADF or on the scanner glass. 2 While in the Describe Original screen, press to view options. If the original is Letter-size or A4-size and you plan to use the copier defaults, simply press START to make a copy. 3 Review the options by using the navigation buttons and select the items that describe your original by pressing . The options are: • Size: select Letter, Legal, Executive, A4, A5, or B5 • Sides: select 1 or 2 • Content: select Text, Mixed or Photo 4 When you have made your selections, navigate to and click OK. This returns you to the top-level screen. Changes made are reflected in the "original" graphic. User-defined copy settings 45
-
 1
1 -
2
-
3
-
4
-
5
-
6
-
7
-
8
-
9
-
10
-
11
-
12
-
13
-
14
-
15
-
16
-
17
-
18
-
19
-
20
-
21
-
22
-
23
-
24
-
25
-
26
-
27
-
28
-
29
-
30
-
31
-
32
-
33
-
34
-
35
-
36
-
37
-
38
-
39
-
40
-
41
-
 42
42 -
 43
43 -
 44
44 -
 45
45 -
 46
46 -
 47
47 -
 48
48 -
 49
49 -
 50
50 -
 51
51 -
 52
52 -
53
-
54
-
55
-
56
-
57
-
58
-
59
-
60
-
61
-
62
-
63
-
64
-
65
-
66
-
67
-
68
-
69
-
70
-
71
-
72
-
73
-
74
-
75
-
76
-
77
-
78
-
79
-
80
-
81
-
82
-
83
-
84
-
85
-
86
-
87
-
88
-
89
-
90
-
91
-
92
-
93
-
94
-
95
-
96
-
97
-
98
-
99
-
100
-
101
-
102
-
103
-
104
-
105
-
106
-
107
-
108
-
109
-
110
-
111
-
112
-
113
-
114
-
115
-
116
-
117
-
118
-
119
-
120
-
121
-
122
-
123
-
124
-
125
-
126
-
127
-
128
-
129
-
130
-
131
-
132
-
133
-
134
-
135
-
136
-
137
-
138
-
139
-
140
-
141
-
142
-
143
-
144
-
145
-
146
-
147
-
148
-
149
-
150
-
151
-
152
-
153
-
154
-
155
-
156
-
157
-
158
-
159
-
160
-
161
-
162
-
163
-
164
 |
 |
