HP 4100mfp HP LaserJet 4100mfp -User Guide - Page 82
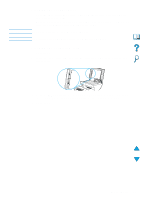
Clearing jams from input trays, Tray 1
 |
UPC - 725184896392
View all HP 4100mfp manuals
Add to My Manuals
Save this manual to your list of manuals |
Page 82 highlights
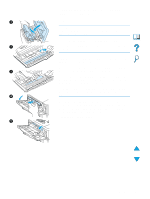
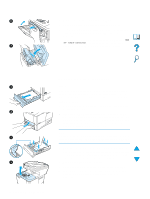
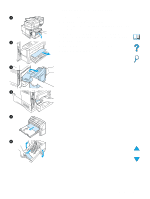
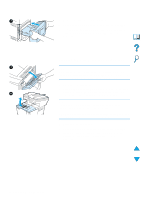
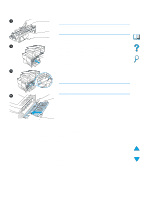
6 6 Replace the entrance cover and close Tray 1. 7 Reinstall the toner cartridge and close the top cover. 8 If a jam message persists, there is still media in the product. Look for media in another location (see "Jam locations" on page 78). If you are using a non-HP toner cartridge, the message NON HP TONER DETECTED might appear on the control panel 7 display. Press START to continue printing or copying. 1 2 3 5 80 Chapter 8 - Problem solving Clearing jams from input trays Tray 1 Slowly pull out the paper tray. If part of the media has already been pulled into the product, follow the steps under "Clearing jams from the top cover and toner cartridge area" on page 79. Trays 2, 3, and 4 1 Slide the tray out of the product, and remove any damaged media from the tray. 2 If the edge of the media is visible in the feed area, slowly pull the media down and out of the product. (Do not pull the media straight out or it will tear.) If media is not visible, look in the top cover area (see "Clearing jams from the top cover and toner cartridge area" on page 79). Note Do not force the media if it does not move easily. If the media is stuck in a tray, try removing it through the tray above or through the top cover area. 3 Make sure the media lies flat in the tray at all four corners and is tucked below the front and back tabs. Make sure that all three paper size adjustments are correct (see "Loading Tray 2 and optional Trays 3 and 4" on page 24). 4 Slide the tray back into the product. 5 Open and close the top cover to clear the jam message. 6 If the jam message persists, media remains in the product. Look for media in another location (see "Jam locations" on page 78). EN
-
 1
1 -
2
-
3
-
4
-
5
-
6
-
7
-
8
-
9
-
10
-
11
-
12
-
13
-
14
-
15
-
16
-
17
-
18
-
19
-
20
-
21
-
22
-
23
-
24
-
25
-
26
-
27
-
28
-
29
-
30
-
31
-
32
-
33
-
34
-
35
-
36
-
37
-
38
-
39
-
40
-
41
-
42
-
43
-
44
-
45
-
46
-
47
-
48
-
49
-
50
-
51
-
52
-
53
-
54
-
55
-
56
-
57
-
58
-
59
-
60
-
61
-
62
-
63
-
64
-
65
-
66
-
67
-
68
-
69
-
70
-
71
-
72
-
73
-
74
-
75
-
76
-
 77
77 -
 78
78 -
 79
79 -
 80
80 -
 81
81 -
 82
82 -
 83
83 -
 84
84 -
 85
85 -
 86
86 -
 87
87 -
88
-
89
-
90
-
91
-
92
-
93
-
94
-
95
-
96
-
97
-
98
-
99
-
100
-
101
-
102
-
103
-
104
-
105
-
106
-
107
-
108
-
109
-
110
-
111
-
112
-
113
-
114
-
115
-
116
-
117
-
118
-
119
-
120
-
121
-
122
-
123
-
124
-
125
-
126
-
127
-
128
-
129
-
130
-
131
-
132
-
133
-
134
-
135
-
136
-
137
-
138
-
139
-
140
-
141
-
142
-
143
-
144
-
145
-
146
-
147
-
148
-
149
-
150
-
151
-
152
-
153
-
154
-
155
-
156
-
157
-
158
-
159
-
160
-
161
-
162
-
163
-
164
 |
 |
