HP 4100n HP LaserJet 4100 series printers - Getting Started Guide - Page 18
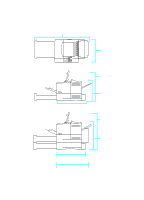
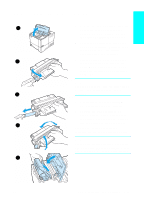
Step 6: Install the toner cartridge, shown with the arrow pointing into
 |
View all HP 4100n manuals
Add to My Manuals
Save this manual to your list of manuals |
Page 18 highlights
English Step 6: Install the toner cartridge 1 Remove the toner cartridge from its 1 packaging (save packaging for possible cartridge storage). Open the printer by lifting the top cover. 2 Locate the sealing tape tab on the end of the cartridge. Carefully bend the tab back and forth until it separates from the cartridge. 3 Firmly pull the tab straight out from 2 the toner cartridge to remove the entire length of tape (56 cm, or 22 in). Avoid touching any black toner on the tape. Note If the tab separates from the tape, grasp the tape and pull it out of the toner 3 cartridge. 4 Gently shake the toner cartridge when installing it for the first time. 5 Position the toner cartridge as shown with the arrow pointing into the printer. Slide the toner cartridge into the printer as far as it will go. 4 If the toner cartridge is installed correctly, the top cover will close easily. Note If toner gets on your clothing, wipe it off with a dry cloth and wash clothing in cold water. (Hot water sets toner into fabric.) 5 EN Step 6: Install the toner cartridge 1-17
-
 1
1 -
2
-
3
-
4
-
5
-
6
-
7
-
8
-
9
-
10
-
11
-
12
-
 13
13 -
 14
14 -
 15
15 -
 16
16 -
 17
17 -
 18
18 -
 19
19 -
 20
20 -
 21
21 -
 22
22 -
 23
23 -
24
-
25
-
26
-
27
-
28
-
29
-
30
-
31
-
32
-
33
-
34
-
35
-
36
-
37
-
38
-
39
-
40
-
41
-
42
-
43
-
44
-
45
-
46
-
47
-
48
-
49
-
50
-
51
-
52
-
53
-
54
-
55
-
56
-
57
-
58
-
59
-
60
-
61
-
62
-
63
-
64
-
65
-
66
-
67
-
68
-
69
-
70
-
71
-
72
-
73
-
74
 |
 |
