HP 4100n HP LaserJet 4100 series printers - Getting Started Guide - Page 22
Step 8: Attach the power cord
 |
View all HP 4100n manuals
Add to My Manuals
Save this manual to your list of manuals |
Page 22 highlights
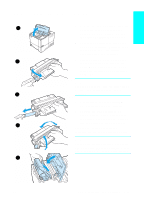
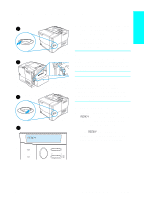
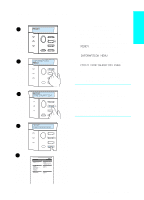
English Step 8: Attach the power cord 1 2 3 4 READY 1 Locate the power switch on the right side of the printer. Make sure the printer is switched off. 2 Connect the power cord to the printer and a grounded power strip or an AC outlet. WARNING! To prevent electric shock, connect the power cord only to a grounded outlet. Only use the power cord that came with the printer. Note If you have installed the optional duplexer, it will need to be pulled outward in order to connect the power cord. Push the duplexer back in before switching the printer on. 3 Switch the printer on. 4 After the printer warms up, the READY message should be visible on the control panel display and the READY light will remain on. If the READY message does not appear, go to the problem-solving chapter in the online user guide. EN Step 8: Attach the power cord 1-21
-
 1
1 -
2
-
3
-
4
-
5
-
6
-
7
-
8
-
9
-
10
-
11
-
12
-
13
-
14
-
15
-
16
-
 17
17 -
 18
18 -
 19
19 -
 20
20 -
 21
21 -
 22
22 -
 23
23 -
 24
24 -
 25
25 -
 26
26 -
 27
27 -
28
-
29
-
30
-
31
-
32
-
33
-
34
-
35
-
36
-
37
-
38
-
39
-
40
-
41
-
42
-
43
-
44
-
45
-
46
-
47
-
48
-
49
-
50
-
51
-
52
-
53
-
54
-
55
-
56
-
57
-
58
-
59
-
60
-
61
-
62
-
63
-
64
-
65
-
66
-
67
-
68
-
69
-
70
-
71
-
72
-
73
-
74
 |
 |
