HP 4100n HP LaserJet 4100 series printers - Getting Started Guide - Page 29
Windows 95, Windows NT 4.0, and, Windows 2000, Single user, Network administrator, Start
 |
View all HP 4100n manuals
Add to My Manuals
Save this manual to your list of manuals |
Page 29 highlights
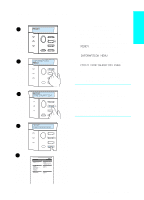
Note Note 1 Single user: Log onto the computer that is connected to the printer. 2 Network administrator: Depending on your environment, log onto the network administrator workstation or onto the server with supervisor or administrative privileges. Follow the steps below to install your printer software. Windows 95, Windows 98, Windows NT 4.0, and Windows 2000 1 Close all running applications. 2 Insert the CD into the CD drive. If your computer is not configured to automatically start the CD, click Start, and then Run. Type D:\Setup.exe at the prompt and click OK. 3 Follow the instructions on the computer screen. Windows 3.1x Install both drivers and fonts from your CD. 1 Close all running applications. 2 Insert the CD into the CD drive. 3 From the Program Manager, select Main, select Control Panel, select Printers, and then select Install. 4 Follow the instructions on the screen to add a printer. 5 To install fonts, locate the appropriate font installer on the CD for your system and run it. For latest or additional drivers, go to http://www.hp.com/support/lj4100 on the World Wide Web. 1-28 Getting Started EN
-
 1
1 -
2
-
3
-
4
-
5
-
6
-
7
-
8
-
9
-
10
-
11
-
12
-
13
-
14
-
15
-
16
-
17
-
18
-
19
-
20
-
21
-
22
-
23
-
 24
24 -
 25
25 -
 26
26 -
 27
27 -
 28
28 -
 29
29 -
 30
30 -
 31
31 -
 32
32 -
 33
33 -
 34
34 -
35
-
36
-
37
-
38
-
39
-
40
-
41
-
42
-
43
-
44
-
45
-
46
-
47
-
48
-
49
-
50
-
51
-
52
-
53
-
54
-
55
-
56
-
57
-
58
-
59
-
60
-
61
-
62
-
63
-
64
-
65
-
66
-
67
-
68
-
69
-
70
-
71
-
72
-
73
-
74
 |
 |
