HP 5500hdn HP Color LaserJet 5500 series printer - User Guide - Page 192
on the bottom of the DIMM are aligned with the bars in the slot. If the DIMM still does, not go
 |
View all HP 5500hdn manuals
Add to My Manuals
Save this manual to your list of manuals |
Page 192 highlights
6. Release the locks on each side of the DIMM slot. 7. Remove the DIMM from the antistatic package. Locate the alignment notches on the bottom edge of the DIMM. 8. Holding the DIMM by the edges, align the notches on the DIMM with the bars in the DIMM slot. Note If you have difficulty inserting the DIMM or closing the latches, make sure the notches on the bottom of the DIMM are aligned with the bars in the slot. If the DIMM still does not go in, make sure you are using the correct type of DIMM. 182 Appendix A Working with memory and print server cards EN_WW
-
 1
1 -
2
-
3
-
4
-
5
-
6
-
7
-
8
-
9
-
10
-
11
-
12
-
13
-
14
-
15
-
16
-
17
-
18
-
19
-
20
-
21
-
22
-
23
-
24
-
25
-
26
-
27
-
28
-
29
-
30
-
31
-
32
-
33
-
34
-
35
-
36
-
37
-
38
-
39
-
40
-
41
-
42
-
43
-
44
-
45
-
46
-
47
-
48
-
49
-
50
-
51
-
52
-
53
-
54
-
55
-
56
-
57
-
58
-
59
-
60
-
61
-
62
-
63
-
64
-
65
-
66
-
67
-
68
-
69
-
70
-
71
-
72
-
73
-
74
-
75
-
76
-
77
-
78
-
79
-
80
-
81
-
82
-
83
-
84
-
85
-
86
-
87
-
88
-
89
-
90
-
91
-
92
-
93
-
94
-
95
-
96
-
97
-
98
-
99
-
100
-
101
-
102
-
103
-
104
-
105
-
106
-
107
-
108
-
109
-
110
-
111
-
112
-
113
-
114
-
115
-
116
-
117
-
118
-
119
-
120
-
121
-
122
-
123
-
124
-
125
-
126
-
127
-
128
-
129
-
130
-
131
-
132
-
133
-
134
-
135
-
136
-
137
-
138
-
139
-
140
-
141
-
142
-
143
-
144
-
145
-
146
-
147
-
148
-
149
-
150
-
151
-
152
-
153
-
154
-
155
-
156
-
157
-
158
-
159
-
160
-
161
-
162
-
163
-
164
-
165
-
166
-
167
-
168
-
169
-
170
-
171
-
172
-
173
-
174
-
175
-
176
-
177
-
178
-
179
-
180
-
181
-
182
-
183
-
184
-
185
-
186
-
 187
187 -
 188
188 -
 189
189 -
 190
190 -
 191
191 -
 192
192 -
 193
193 -
 194
194 -
 195
195 -
 196
196 -
 197
197 -
198
-
199
-
200
-
201
-
202
-
203
-
204
-
205
-
206
-
207
-
208
-
209
-
210
-
211
-
212
-
213
-
214
-
215
-
216
-
217
-
218
-
219
-
220
-
221
-
222
-
223
-
224
 |
 |

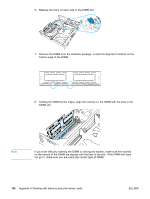
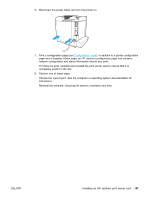
6.
Release the locks on each side of the DIMM slot.
7.
Remove the DIMM from the antistatic package. Locate the alignment notches on the
bottom edge of the DIMM.
8.
Holding the DIMM by the edges, align the notches on the DIMM with the bars in the
DIMM slot.
Note
If you have difficulty inserting the DIMM or closing the latches, make sure the notches
on the bottom of the DIMM are aligned with the bars in the slot. If the DIMM still does
not go in, make sure you are using the correct type of DIMM.
182
Appendix A Working with memory and print server cards
EN_WW