HP 5500hdn HP Color LaserJet 5500 series printer - User Guide - Page 193
Enabling memory, font DIMM, go
 |
View all HP 5500hdn manuals
Add to My Manuals
Save this manual to your list of manuals |
Page 193 highlights
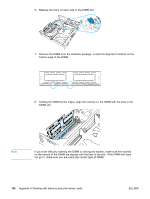
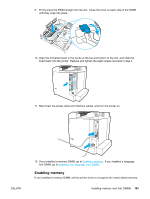
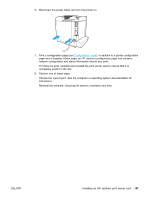
9. Firmly press the DIMM straight into the slot. Close the locks on each side of the DIMM until they snap into place. 10. Align the formatter board in the tracks at the top and bottom of the slot, and slide the board back into the printer. Replace and tighten the eight screws removed in step 4. 11. Reconnect the power cable and interface cables, and turn the printer on. EN_WW 12. If you installed a memory DIMM, go to Enabling memory. If you installed a language font DIMM, go to Enabling the language font DIMM. Enabling memory If you installed a memory DIMM, set the printer driver to recognize the newly added memory. Installing memory and font DIMMs 183
-
 1
1 -
2
-
3
-
4
-
5
-
6
-
7
-
8
-
9
-
10
-
11
-
12
-
13
-
14
-
15
-
16
-
17
-
18
-
19
-
20
-
21
-
22
-
23
-
24
-
25
-
26
-
27
-
28
-
29
-
30
-
31
-
32
-
33
-
34
-
35
-
36
-
37
-
38
-
39
-
40
-
41
-
42
-
43
-
44
-
45
-
46
-
47
-
48
-
49
-
50
-
51
-
52
-
53
-
54
-
55
-
56
-
57
-
58
-
59
-
60
-
61
-
62
-
63
-
64
-
65
-
66
-
67
-
68
-
69
-
70
-
71
-
72
-
73
-
74
-
75
-
76
-
77
-
78
-
79
-
80
-
81
-
82
-
83
-
84
-
85
-
86
-
87
-
88
-
89
-
90
-
91
-
92
-
93
-
94
-
95
-
96
-
97
-
98
-
99
-
100
-
101
-
102
-
103
-
104
-
105
-
106
-
107
-
108
-
109
-
110
-
111
-
112
-
113
-
114
-
115
-
116
-
117
-
118
-
119
-
120
-
121
-
122
-
123
-
124
-
125
-
126
-
127
-
128
-
129
-
130
-
131
-
132
-
133
-
134
-
135
-
136
-
137
-
138
-
139
-
140
-
141
-
142
-
143
-
144
-
145
-
146
-
147
-
148
-
149
-
150
-
151
-
152
-
153
-
154
-
155
-
156
-
157
-
158
-
159
-
160
-
161
-
162
-
163
-
164
-
165
-
166
-
167
-
168
-
169
-
170
-
171
-
172
-
173
-
174
-
175
-
176
-
177
-
178
-
179
-
180
-
181
-
182
-
183
-
184
-
185
-
186
-
187
-
 188
188 -
 189
189 -
 190
190 -
 191
191 -
 192
192 -
 193
193 -
 194
194 -
 195
195 -
 196
196 -
 197
197 -
 198
198 -
199
-
200
-
201
-
202
-
203
-
204
-
205
-
206
-
207
-
208
-
209
-
210
-
211
-
212
-
213
-
214
-
215
-
216
-
217
-
218
-
219
-
220
-
221
-
222
-
223
-
224
 |
 |

9.
Firmly press the DIMM straight into the slot. Close the locks on each side of the DIMM
until they snap into place.
10. Align the formatter board in the tracks at the top and bottom of the slot, and slide the
board back into the printer. Replace and tighten the eight screws removed in step 4.
11. Reconnect the power cable and interface cables, and turn the printer on.
12. If you installed a memory DIMM, go to
E
n
a
b
l
i
n
g
m
e
m
o
r
y
. If you installed a language
font DIMM, go to
E
n
a
b
l
i
n
g
t
h
e
l
a
n
g
u
a
g
e
f
o
n
t
D
I
M
M
.
Enabling memory
If you installed a memory DIMM, set the printer driver to recognize the newly added memory.
EN_WW
Installing memory and font DIMMs
183