HP 5500hdn HP Color LaserJet 5500 series printer - User Guide - Page 99
Print quality troubleshooting s, MENUS, DIAGNOSTICS, PQ TROUBLESHOOTING, Ready
 |
View all HP 5500hdn manuals
Add to My Manuals
Save this manual to your list of manuals |
Page 99 highlights
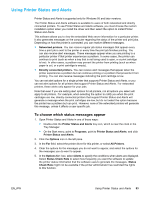
Print quality troubleshooting pages The print quality troubleshooting pages provide information on aspects of the printer that affect print quality. 1. Press to enter the MENUS. 2. Press to highlight DIAGNOSTICS. 3. Press to select DIAGNOSTICS. 4. Press to highlight PQ TROUBLESHOOTING. 5. Press to select PQ TROUBLESHOOTING. The message PRINTING... PQ TROUBLESHOOTING appears on the display until the printer finishes printing the print quality troubleshooting information. The printer returns to the Ready state after printing the print quality troubleshooting information. The print quality troubleshooting information includes one page for each color (cyan, magenta, yellow, and black), printer statistics related to print quality, instructions on interpreting the information, and procedures to solve print quality problems. If following the procedures recommended by the print quality troubleshooting pages does not improve print quality, go to http://www.hp.com/support/lj5500. EN_WW Printer information pages 89
-
 1
1 -
2
-
3
-
4
-
5
-
6
-
7
-
8
-
9
-
10
-
11
-
12
-
13
-
14
-
15
-
16
-
17
-
18
-
19
-
20
-
21
-
22
-
23
-
24
-
25
-
26
-
27
-
28
-
29
-
30
-
31
-
32
-
33
-
34
-
35
-
36
-
37
-
38
-
39
-
40
-
41
-
42
-
43
-
44
-
45
-
46
-
47
-
48
-
49
-
50
-
51
-
52
-
53
-
54
-
55
-
56
-
57
-
58
-
59
-
60
-
61
-
62
-
63
-
64
-
65
-
66
-
67
-
68
-
69
-
70
-
71
-
72
-
73
-
74
-
75
-
76
-
77
-
78
-
79
-
80
-
81
-
82
-
83
-
84
-
85
-
86
-
87
-
88
-
89
-
90
-
91
-
92
-
93
-
 94
94 -
 95
95 -
 96
96 -
 97
97 -
 98
98 -
 99
99 -
 100
100 -
 101
101 -
 102
102 -
 103
103 -
 104
104 -
105
-
106
-
107
-
108
-
109
-
110
-
111
-
112
-
113
-
114
-
115
-
116
-
117
-
118
-
119
-
120
-
121
-
122
-
123
-
124
-
125
-
126
-
127
-
128
-
129
-
130
-
131
-
132
-
133
-
134
-
135
-
136
-
137
-
138
-
139
-
140
-
141
-
142
-
143
-
144
-
145
-
146
-
147
-
148
-
149
-
150
-
151
-
152
-
153
-
154
-
155
-
156
-
157
-
158
-
159
-
160
-
161
-
162
-
163
-
164
-
165
-
166
-
167
-
168
-
169
-
170
-
171
-
172
-
173
-
174
-
175
-
176
-
177
-
178
-
179
-
180
-
181
-
182
-
183
-
184
-
185
-
186
-
187
-
188
-
189
-
190
-
191
-
192
-
193
-
194
-
195
-
196
-
197
-
198
-
199
-
200
-
201
-
202
-
203
-
204
-
205
-
206
-
207
-
208
-
209
-
210
-
211
-
212
-
213
-
214
-
215
-
216
-
217
-
218
-
219
-
220
-
221
-
222
-
223
-
224
 |
 |
