HP Brio 81XX hp brio 81xx, advanced setup guide - Page 77
Recording Your Voice
 |
View all HP Brio 81XX manuals
Add to My Manuals
Save this manual to your list of manuals |
Page 77 highlights
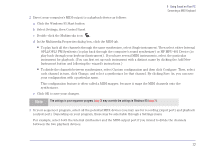
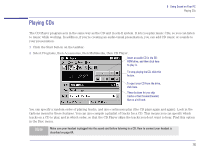
5 Using Sound on Your PC Recording Your Voice Recording Your Voice By creating your own sound recordings, you can customize your computer sounds, embed speech in documents, or create a sound track for a presentation. The programs you use, for example to create a presentation, will give you detailed instructions in how to use the recordings. You can record a portion of speech as follows: 1 Click the Start button on the taskbar. 2 Select Programs, then Accessories, then Multimedia, then Sound Recorder. You can apply some simple effects-reverse and echo-to your wave file. Use the playback buttons and the slider to play any part of the file. You can record through your microphone, from a MIDI file (play using Media Player), or from another source such as a CD (use CD Player). 3 To begin recording through the microphone in your headset, click the record button stop button . . To finish recording, click the 4 To adjust the recording level, double-click the speaker symbol in the taskbar. This displays the Volume Control program. Now, in Volume Control, select Properties from the Options menu, then click Recording instead of Playback. Adjust the recording level by moving the slider labeled Microphone. 5 You can choose the optimum recording level by selecting automatic gain control ("AGC"). This is available by clicking the Advanced button by the Microphone slider. 6 To save the file, select Save from the Sound Recorder's File menu and enter a file location and name. Save the file as a wave file (*.wav). 77
-
 1
1 -
2
-
3
-
4
-
5
-
6
-
7
-
8
-
9
-
10
-
11
-
12
-
13
-
14
-
15
-
16
-
17
-
18
-
19
-
20
-
21
-
22
-
23
-
24
-
25
-
26
-
27
-
28
-
29
-
30
-
31
-
32
-
33
-
34
-
35
-
36
-
37
-
38
-
39
-
40
-
41
-
42
-
43
-
44
-
45
-
46
-
47
-
48
-
49
-
50
-
51
-
52
-
53
-
54
-
55
-
56
-
57
-
58
-
59
-
60
-
61
-
62
-
63
-
64
-
65
-
66
-
67
-
68
-
69
-
70
-
71
-
 72
72 -
 73
73 -
 74
74 -
 75
75 -
 76
76 -
 77
77 -
 78
78 -
 79
79 -
 80
80 -
 81
81 -
 82
82 -
83
-
84
-
85
-
86
-
87
-
88
-
89
-
90
-
91
-
92
-
93
-
94
-
95
-
96
-
97
-
98
-
99
-
100
-
101
-
102
-
103
-
104
-
105
-
106
-
107
-
108
-
109
-
110
-
111
-
112
 |
 |
