HP Integrity BL870c HP Integrity iLO 2 Operations Guide, Eleventh Edition - Page 149
BL c-Class, Table 8-31 SNMP Settings Description, Onboard Administrator
 |
View all HP Integrity BL870c manuals
Add to My Manuals
Save this manual to your list of manuals |
Page 149 highlights
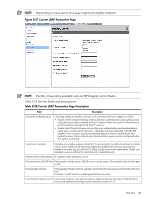
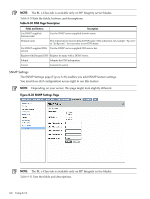
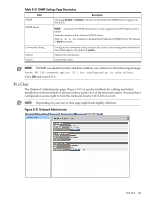
Table 8-31 SNMP Settings Page Description SNMP Field SNMP Alerts Description Choosing Enable or Disable, activates or deactivates the SNMP feature support on this iLO 2. NOTE: Currently, the SNMP alert feature is only supported on HP Integrity server blades. Enter E to enable or D to disable all SNMP alerts. Enter 1, 2, 3, 4 to configure a destination IP address for SNMP alerts. The default is blank (unused). Community String Submit Cancel Configure the community string to secure the access to the management information base (MIB) objects. The default is public. Submits the information. Cancels the action. NOTE: If SNMP was disabled earlier and then enabled, you will receive the following message: Reset MP (XD command option 'R') for configuration to take effect. Click OK and reset iLO 2. BL c-Class The Onboard Administrator page (Figure 8-31) is used to facilitate the cabling and initial installation of servers blade. It also provides a quick view of the enclosure status. You must have configuration access right to turn the enclosure locator UID LED on or off. NOTE: Depending on your server, this page might look slightly different. Figure 8-31 Onboard Administrator Web GUI 149
-
 1
1 -
2
-
3
-
4
-
5
-
6
-
7
-
8
-
9
-
10
-
11
-
12
-
13
-
14
-
15
-
16
-
17
-
18
-
19
-
20
-
21
-
22
-
23
-
24
-
25
-
26
-
27
-
28
-
29
-
30
-
31
-
32
-
33
-
34
-
35
-
36
-
37
-
38
-
39
-
40
-
41
-
42
-
43
-
44
-
45
-
46
-
47
-
48
-
49
-
50
-
51
-
52
-
53
-
54
-
55
-
56
-
57
-
58
-
59
-
60
-
61
-
62
-
63
-
64
-
65
-
66
-
67
-
68
-
69
-
70
-
71
-
72
-
73
-
74
-
75
-
76
-
77
-
78
-
79
-
80
-
81
-
82
-
83
-
84
-
85
-
86
-
87
-
88
-
89
-
90
-
91
-
92
-
93
-
94
-
95
-
96
-
97
-
98
-
99
-
100
-
101
-
102
-
103
-
104
-
105
-
106
-
107
-
108
-
109
-
110
-
111
-
112
-
113
-
114
-
115
-
116
-
117
-
118
-
119
-
120
-
121
-
122
-
123
-
124
-
125
-
126
-
127
-
128
-
129
-
130
-
131
-
132
-
133
-
134
-
135
-
136
-
137
-
138
-
139
-
140
-
141
-
142
-
143
-
 144
144 -
 145
145 -
 146
146 -
 147
147 -
 148
148 -
 149
149 -
 150
150 -
 151
151 -
 152
152 -
 153
153 -
 154
154 -
155
-
156
-
157
-
158
-
159
-
160
-
161
-
162
-
163
-
164
-
165
-
166
-
167
-
168
-
169
-
170
-
171
-
172
-
173
-
174
-
175
-
176
-
177
-
178
-
179
-
180
-
181
-
182
-
183
-
184
-
185
-
186
-
187
-
188
-
189
-
190
-
191
-
192
-
193
-
194
-
195
-
196
-
197
-
198
-
199
-
200
-
201
-
202
-
203
-
204
-
205
-
206
-
207
-
208
-
209
-
210
-
211
-
212
-
213
-
214
-
215
-
216
-
217
-
218
-
219
-
220
-
221
-
222
-
223
-
224
-
225
-
226
-
227
-
228
-
229
 |
 |
