HP Integrity BL870c HP Integrity iLO 2 Operations Guide, Eleventh Edition - Page 48
Connecting the Server Blade To iLO 2 Using the Onboard Administrator, Blade or Port Info
 |
View all HP Integrity BL870c manuals
Add to My Manuals
Save this manual to your list of manuals |
Page 48 highlights
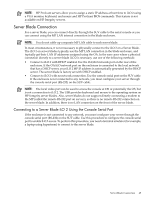
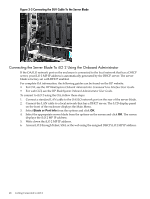
Figure 3-3 Connecting the SUV Cable To the Server Blade Connecting the Server Blade To iLO 2 Using the Onboard Administrator If the OA/iLO network port on the enclosure is connected to the local network that has a DHCP server, your iLO 2 MP IP address is automatically generated by the DHCP server. The server blade is factory set with DHCP enabled. For complete OA information, the following guides can be found on the HP website: • For CLI, see the HP BladeSystem Onboard Administrator Command Line Interface User Guide. • For web GUI, see the HP BladeSystem Onboard Administrator User Guide. To connect to iLO 2 using the OA, follow these steps: 1. Connect a standard LAN cable to the OA/iLO network port on the rear of the server blade. 2. Connect the LAN cable to a local network that has a DHCP server. The LCD display panel on the front of the enclosure displays the Main Menu. 3. Select Blade or Port Info from the options and click OK. 4. Select the appropriate server blade from the options on the screen and click OK. The screen displays the iLO 2 MP IP address. 5. Write down the iLO 2 MP IP address. 6. Access iLO 2 through Telnet, SSH, or the web using the assigned DHCP iLO 2 MP IP address. 48 Getting Connected to iLO 2
-
 1
1 -
2
-
3
-
4
-
5
-
6
-
7
-
8
-
9
-
10
-
11
-
12
-
13
-
14
-
15
-
16
-
17
-
18
-
19
-
20
-
21
-
22
-
23
-
24
-
25
-
26
-
27
-
28
-
29
-
30
-
31
-
32
-
33
-
34
-
35
-
36
-
37
-
38
-
39
-
40
-
41
-
42
-
 43
43 -
 44
44 -
 45
45 -
 46
46 -
 47
47 -
 48
48 -
 49
49 -
 50
50 -
 51
51 -
 52
52 -
 53
53 -
54
-
55
-
56
-
57
-
58
-
59
-
60
-
61
-
62
-
63
-
64
-
65
-
66
-
67
-
68
-
69
-
70
-
71
-
72
-
73
-
74
-
75
-
76
-
77
-
78
-
79
-
80
-
81
-
82
-
83
-
84
-
85
-
86
-
87
-
88
-
89
-
90
-
91
-
92
-
93
-
94
-
95
-
96
-
97
-
98
-
99
-
100
-
101
-
102
-
103
-
104
-
105
-
106
-
107
-
108
-
109
-
110
-
111
-
112
-
113
-
114
-
115
-
116
-
117
-
118
-
119
-
120
-
121
-
122
-
123
-
124
-
125
-
126
-
127
-
128
-
129
-
130
-
131
-
132
-
133
-
134
-
135
-
136
-
137
-
138
-
139
-
140
-
141
-
142
-
143
-
144
-
145
-
146
-
147
-
148
-
149
-
150
-
151
-
152
-
153
-
154
-
155
-
156
-
157
-
158
-
159
-
160
-
161
-
162
-
163
-
164
-
165
-
166
-
167
-
168
-
169
-
170
-
171
-
172
-
173
-
174
-
175
-
176
-
177
-
178
-
179
-
180
-
181
-
182
-
183
-
184
-
185
-
186
-
187
-
188
-
189
-
190
-
191
-
192
-
193
-
194
-
195
-
196
-
197
-
198
-
199
-
200
-
201
-
202
-
203
-
204
-
205
-
206
-
207
-
208
-
209
-
210
-
211
-
212
-
213
-
214
-
215
-
216
-
217
-
218
-
219
-
220
-
221
-
222
-
223
-
224
-
225
-
226
-
227
-
228
-
229
 |
 |
