HP ML115 HP ProLiant ML115 Generation 5 Server Maintenance and Service Guide - Page 30
Front bezel
 |
UPC - 884962252765
View all HP ML115 manuals
Add to My Manuals
Save this manual to your list of manuals |
Page 30 highlights
Figure 2 Installing the access panel Front bezel CAUTION: You must remove the front bezel to access the hard drives and optical drives. To remove the front bezel: 1. Press in the three bottom tabs on the side of the bezel to release them from the chassis. 2. Rotate the bezel out slightly. 3. Pull the bezel away from the front panel. Figure 3 Removing the front bezel To replace the front bezel: 1. Insert the two hooks on the right side of the bezel into the rectangular holes on the chassis. 2. Rotate the bezel into place so that the three tabs on the left side of the bezel snap into the slots on the chassis. Removal and Replacement Procedures 30
-
 1
1 -
2
-
3
-
4
-
5
-
6
-
7
-
8
-
9
-
10
-
11
-
12
-
13
-
14
-
15
-
16
-
17
-
18
-
19
-
20
-
21
-
22
-
23
-
24
-
 25
25 -
 26
26 -
 27
27 -
 28
28 -
 29
29 -
 30
30 -
 31
31 -
 32
32 -
 33
33 -
 34
34 -
 35
35 -
36
-
37
-
38
-
39
-
40
-
41
-
42
-
43
-
44
-
45
-
46
-
47
-
48
-
49
-
50
-
51
-
52
-
53
-
54
-
55
-
56
-
57
-
58
-
59
-
60
-
61
-
62
-
63
-
64
-
65
-
66
-
67
-
68
-
69
-
70
-
71
-
72
-
73
-
74
-
75
-
76
-
77
-
78
-
79
-
80
-
81
-
82
-
83
-
84
-
85
-
86
-
87
-
88
 |
 |

Removal and Replacement Procedures
30
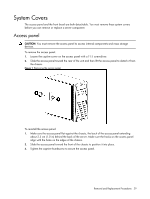
Figure 2
Installing the access panel
Front bezel
CAUTION:
You must remove the front bezel to access the hard drives and optical drives.
To remove the front bezel:
1.
Press in the three bottom tabs on the side of the bezel to release them from the chassis.
2.
Rotate the bezel out slightly.
3.
Pull the bezel away from the front panel.
Figure 3
Removing the front bezel
To replace the front bezel:
1.
Insert the two hooks on the right side of the bezel into the rectangular holes on the chassis.
2.
Rotate the bezel into place so that the three tabs on the left side of the bezel snap into the slots
on the chassis.