HP ML115 HP ProLiant ML115 Generation 5 Server Maintenance and Service Guide - Page 80
BIOS Update, Clear CMOS - g5 bios
 |
UPC - 884962252765
View all HP ML115 manuals
Add to My Manuals
Save this manual to your list of manuals |
Page 80 highlights
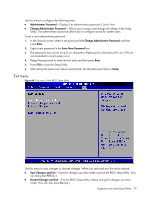
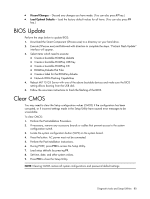
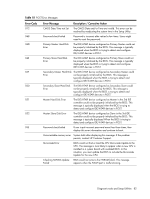
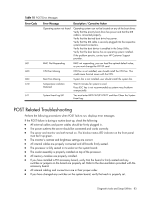
• Discard Changes --- Discard any changes you have made. (You can also press F7 key.) • Load Optimal Defaults --- Load the factory default values for all items. (You can also press F9 key.) BIOS Update Perform the steps below to update BIOS: 1. Download the Smart Component (SPxxxxx.exe) to a directory on your hard drive. 2. Execute (SPxxxxx.exe) and followed with direction to complete the steps. "ProLiant Flash Update" interface will appear. 3. Select items which need to execute: ○ Create a bootable ROMPaq diskette ○ Create a bootable ROMPaq USB Key ○ Create a bootable ROMPaq CD ○ ROMPaq Diskette Flat Files ○ Create a label for the ROMPaq diskette ○ Network ROM Flashing Capabilities 4. Reboot ML115 G5 Server with one of the above bootable devices and make sure the BIOS setting allows booting from the USB disk. 5. Follow the on-screen instructions to finish the flashing of the BIOS. Clear CMOS You may need to clear the Setup configuration values (CMOS) if the configuration has been corrupted, or if incorrect settings made in the Setup Utility have caused error messages to be unreadable. To clear CMOS: 1. Perform the Pre-Installation Procedure. 2. If necessary, remove any accessory boards or cables that prevent access to the system configuration switch. 3. Locate the system configuration button (SW2) on the system board. 4. Press the button. AC power must not be connected. 5. Perform the Post-installation instructions. 6. During POST, press F10 to access the Setup Utility. 7. Load setup defaults by pressing F9. 8. Set time, date, and other system values. 9. Press F10 to close the Setup Utility. NOTE: Clearing CMOS restore all system configurations and password default settings. Diagnostic tools and Setup Utilities 80
-
 1
1 -
2
-
3
-
4
-
5
-
6
-
7
-
8
-
9
-
10
-
11
-
12
-
13
-
14
-
15
-
16
-
17
-
18
-
19
-
20
-
21
-
22
-
23
-
24
-
25
-
26
-
27
-
28
-
29
-
30
-
31
-
32
-
33
-
34
-
35
-
36
-
37
-
38
-
39
-
40
-
41
-
42
-
43
-
44
-
45
-
46
-
47
-
48
-
49
-
50
-
51
-
52
-
53
-
54
-
55
-
56
-
57
-
58
-
59
-
60
-
61
-
62
-
63
-
64
-
65
-
66
-
67
-
68
-
69
-
70
-
71
-
72
-
73
-
74
-
 75
75 -
 76
76 -
 77
77 -
 78
78 -
 79
79 -
 80
80 -
 81
81 -
 82
82 -
 83
83 -
 84
84 -
 85
85 -
86
-
87
-
88
 |
 |
