HP ML115 HP ProLiant ML115 Generation 5 Server Maintenance and Service Guide - Page 38
Hard drives, Fasten the four drive screws two on each side into the hard drive.
 |
UPC - 884962252765
View all HP ML115 manuals
Add to My Manuals
Save this manual to your list of manuals |
Page 38 highlights
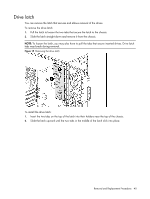
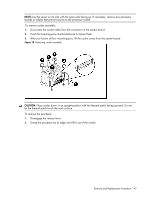
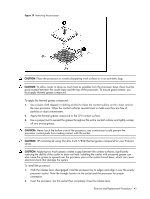
Hard drives The drive bays on the bottom can accommodate up to four hard drives. You can install either SAS hard drives or SATA hard drives in the server. To remove the hard drive: 1. Disconnect the power and data cables from the back of the installed drive. 2. A drive latch with release tabs secures the hard drives in the drive bay. Lift the release tab on the drive latch. 3. Slide the hard drive from the drive bay. NOTE: Remove the four screws from the sides of the drive. You will reuse these screws when you install the new hard drive. Figure 12 Removing a hard drive To install a hard drive: 1. Fasten the four drive screws (two on each side) into the hard drive. 2. Slide the hard drive into the selected bay until it clicks into place. 3. For SATA hard drive, connect the power cable from the power supply and the SATA cable to the back of the hard drive. For SAS hard drive, connect the SAS cable to the back of the hard drive and then connect the power cable to the SAS 4-pin connector. Removal and Replacement Procedures 38
-
 1
1 -
2
-
3
-
4
-
5
-
6
-
7
-
8
-
9
-
10
-
11
-
12
-
13
-
14
-
15
-
16
-
17
-
18
-
19
-
20
-
21
-
22
-
23
-
24
-
25
-
26
-
27
-
28
-
29
-
30
-
31
-
32
-
 33
33 -
 34
34 -
 35
35 -
 36
36 -
 37
37 -
 38
38 -
 39
39 -
 40
40 -
 41
41 -
 42
42 -
 43
43 -
44
-
45
-
46
-
47
-
48
-
49
-
50
-
51
-
52
-
53
-
54
-
55
-
56
-
57
-
58
-
59
-
60
-
61
-
62
-
63
-
64
-
65
-
66
-
67
-
68
-
69
-
70
-
71
-
72
-
73
-
74
-
75
-
76
-
77
-
78
-
79
-
80
-
81
-
82
-
83
-
84
-
85
-
86
-
87
-
88
 |
 |
