HP Officejet Pro 8100 User Guide - Page 43
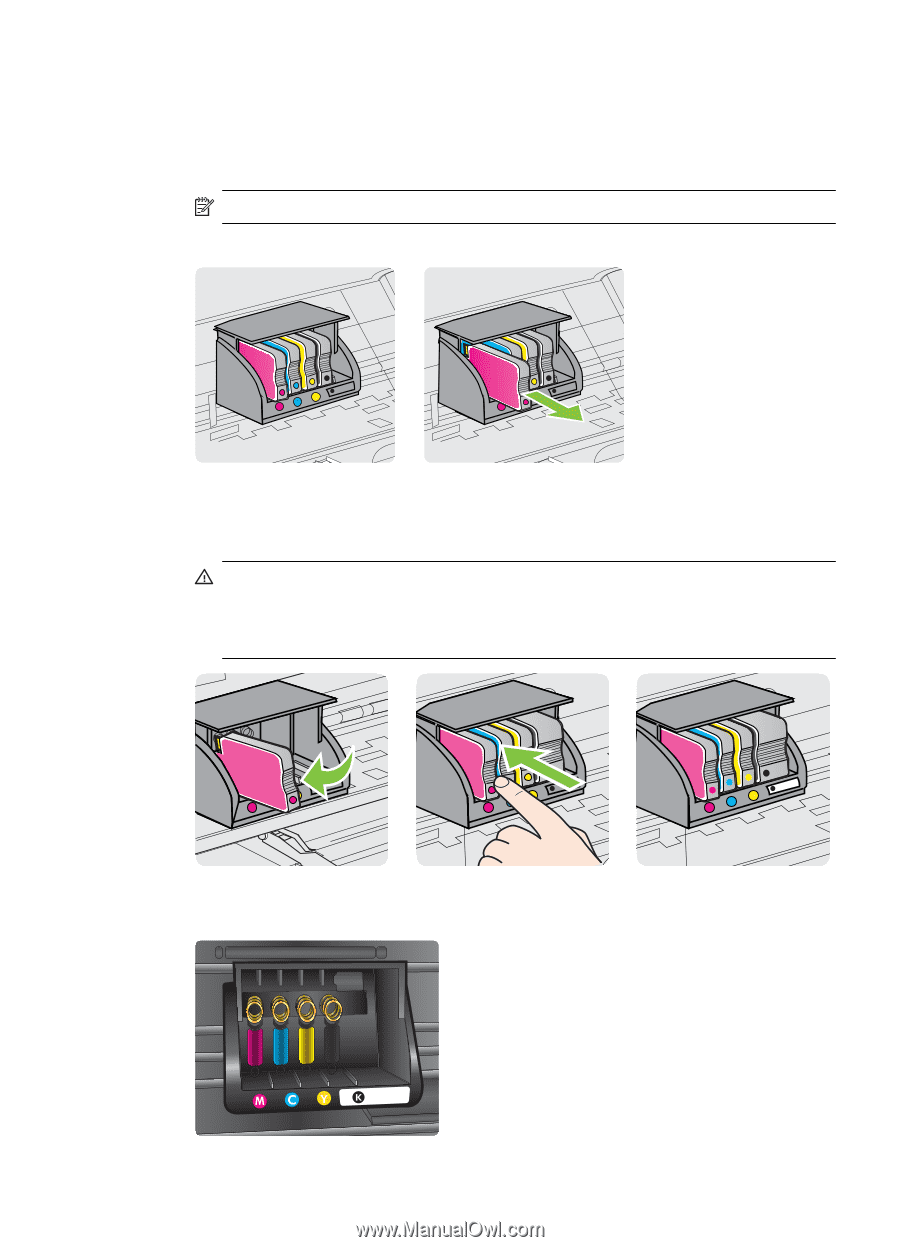
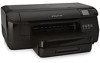
To replace the ink cartridges, CAUTION, incorrectly seated - printhead
 |
View all HP Officejet Pro 8100 manuals
Add to My Manuals
Save this manual to your list of manuals |
Page 43 highlights
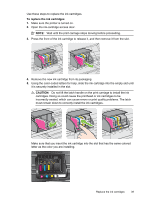
Use these steps to replace the ink cartridges. To replace the ink cartridges 1. Make sure the printer is turned on. 2. Open the ink-cartridge access door. NOTE: Wait until the print carriage stops moving before proceeding. 3. Press the front of the ink cartridge to release it, and then remove it from the slot. 4. Remove the new ink cartridge from its packaging. 5. Using the color-coded letters for help, slide the ink cartridge into the empty slot until it is securely installed in the slot. CAUTION: Do not lift the latch handle on the print carriage to install the ink cartridges. Doing so could cause the printhead or ink cartridges to be incorrectly seated, which can cause errors or print quality problems. The latch must remain down to correctly install the ink cartridges. Make sure that you insert the ink cartridge into the slot that has the same colored letter as the color you are installing. Replace the ink cartridges 39
-
 1
1 -
2
-
3
-
4
-
5
-
6
-
7
-
8
-
9
-
10
-
11
-
12
-
13
-
14
-
15
-
16
-
17
-
18
-
19
-
20
-
21
-
22
-
23
-
24
-
25
-
26
-
27
-
28
-
29
-
30
-
31
-
32
-
33
-
34
-
35
-
36
-
37
-
 38
38 -
 39
39 -
 40
40 -
 41
41 -
 42
42 -
 43
43 -
 44
44 -
 45
45 -
 46
46 -
 47
47 -
 48
48 -
49
-
50
-
51
-
52
-
53
-
54
-
55
-
56
-
57
-
58
-
59
-
60
-
61
-
62
-
63
-
64
-
65
-
66
-
67
-
68
-
69
-
70
-
71
-
72
-
73
-
74
-
75
-
76
-
77
-
78
-
79
-
80
-
81
-
82
-
83
-
84
-
85
-
86
-
87
-
88
-
89
-
90
-
91
-
92
-
93
-
94
-
95
-
96
-
97
-
98
-
99
-
100
-
101
-
102
-
103
-
104
-
105
-
106
-
107
-
108
-
109
-
110
-
111
-
112
-
113
-
114
-
115
-
116
-
117
-
118
-
119
-
120
-
121
-
122
-
123
-
124
-
125
-
126
-
127
-
128
-
129
-
130
-
131
-
132
-
133
-
134
-
135
-
136
-
137
-
138
-
139
-
140
-
141
-
142
-
143
-
144
-
145
-
146
 |
 |