HP StorageWorks MSA1510i HP StorageWorks 1510i Modular Smart Array installatio - Page 97
Removing the hard drive, HP ProLiant servers troubleshooting guide
 |
View all HP StorageWorks MSA1510i manuals
Add to My Manuals
Save this manual to your list of manuals |
Page 97 highlights
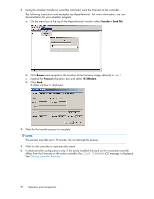
CAUTION: When replacing a hot pluggable hard drive, it is important that you follow the guidelines in this section. Failure to do so could result in data loss and could void your warranty. CAUTION: For more information about replacing hard drives, see the following: • Hard drive LEDs • The HP ProLiant servers troubleshooting guide, available on the Management CD • MSA1510i installation and user guide Removing the hard drive Follow these guidelines when replacing hard drives: • Never remove more than one hard drive at a time (two if using RAID 6). When you replace a hard drive, the controller uses data from the other hard drives in the array to reconstruct data on the replacement hard drive. If you remove more than one hard drive, a complete data set is not available to reconstruct data on the replacement drive(s) and permanent data loss could occur. • Never remove a working hard drive. The amber Drive Failure LED indicates a hard drive that has been failed by the controller. Permanent data loss will occur if a working hard drive is removed while replacing a failed drive. • Never remove a hard drive while another hard drive is being rebuilt. A drive's Online LEDs flash green (once per second) while it is being rebuilt. A replaced hard drive is rebuilt from data stored on the other hard drives. • If the system has an online spare drive, wait for it to complete rebuilding before replacing the failed drive. When a hard drive fails, the online spare becomes active and begins rebuilding as a replacement drive. After the online spare has completed Automatic Data Recovery (the online LEDs will be continuously lit), replace the failed hard drive with a new replacement drive. Do not replace the failed hard drive with the online spare. The system will automatically rebuild the replacement hard drive and reset the spare hard drive to an available state. • If you replace a hard drive while the system is off, it may be necessary to rebuild the replaced hard drive. NOTE: Illustrations in this section demonstrate removing a hard drive from an MSA20 storage enclosure. The procedure for removing a hard drive blank from an MSA30 or other storage enclosure is similar. 1. Review all warnings, cautions, and preparation procedures as detailed in the MSA1510i Maintenance and service guide. 2. Be sure that the Online and Drive Access LEDs are both off and that the Fault LED is on. 3. Press the ejector button (1) and pull the release lever to the full open position (2). IMPORTANT: Wait approximately 10 seconds for the internal disk to stop spinning before pulling the hard drive out of the enclosure. Handling a hard drive while the internal media is spinning can damage the media. 1510i Modular Smart Array installation and user guide 97
-
 1
1 -
2
-
3
-
4
-
5
-
6
-
7
-
8
-
9
-
10
-
11
-
12
-
13
-
14
-
15
-
16
-
17
-
18
-
19
-
20
-
21
-
22
-
23
-
24
-
25
-
26
-
27
-
28
-
29
-
30
-
31
-
32
-
33
-
34
-
35
-
36
-
37
-
38
-
39
-
40
-
41
-
42
-
43
-
44
-
45
-
46
-
47
-
48
-
49
-
50
-
51
-
52
-
53
-
54
-
55
-
56
-
57
-
58
-
59
-
60
-
61
-
62
-
63
-
64
-
65
-
66
-
67
-
68
-
69
-
70
-
71
-
72
-
73
-
74
-
75
-
76
-
77
-
78
-
79
-
80
-
81
-
82
-
83
-
84
-
85
-
86
-
87
-
88
-
89
-
90
-
91
-
 92
92 -
 93
93 -
 94
94 -
 95
95 -
 96
96 -
 97
97 -
 98
98 -
 99
99 -
 100
100 -
 101
101 -
 102
102 -
103
-
104
-
105
-
106
-
107
-
108
-
109
-
110
-
111
-
112
-
113
-
114
-
115
-
116
-
117
-
118
-
119
-
120
-
121
-
122
-
123
-
124
-
125
-
126
-
127
-
128
-
129
-
130
-
131
-
132
-
133
-
134
-
135
-
136
-
137
-
138
-
139
-
140
-
141
-
142
-
143
-
144
-
145
-
146
-
147
-
148
-
149
-
150
-
151
-
152
-
153
-
154
-
155
-
156
-
157
-
158
-
159
-
160
 |
 |
