HP Tc4100 hp server tc4100 operation and maintenance guide (English, 2.1) - Page 108
Removing the Fan Assembly, Thumb, Screw, Fan Assembly, Fan Tray
 |
View all HP Tc4100 manuals
Add to My Manuals
Save this manual to your list of manuals |
Page 108 highlights
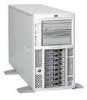
Chapter 7 Replacing Parts Removing the Fan Assembly 1. Power down the HP Server and disconnect the power cord(s) from the back of the server. WARNING The power supplies continue to provide standby voltage to the HP Server until the power cord(s) is/are disconnected. 2. Disconnect any other cables from the back of the server. 3. If applicable, remove the server from the rack. 4. Remove the left access panel (pedistal model) or the top access panel (rack-mount model) by pressing in on the release button with your thumb as you pull the latch out with your fingers. 5. When the latch is fully lifted, the access panel slides back towards the rear of the server. The panel can then be lifted off the server chassis. 6. Remove blue plastic Air Scoop that is attached to the fan cage and the System Board by pulling it straight out. 7. Remove the fan assembly from the fan cage; locate the thumbscrew and loosen it. Pull out on the fan assembly to remove it from the fan cage. Thumb Screw Fan Assembly Fan Tray Removing the Fan Tray Figure 7-4. Fan Assembly Removal NOTE It may be necessary to remove some of the accessory boards (full length accessory boards) before removing the fan tray. Generally, you only need to remove the fan tray to remove the system board or access the cables. 1. Remove the air duct by un-snapping the latch on the top of the air duct and lifting the air duct up. 2. Remove the air baffle by un-snapping a latch at the rear end and pulling up straight 106
-
 1
1 -
2
-
3
-
4
-
5
-
6
-
7
-
8
-
9
-
10
-
11
-
12
-
13
-
14
-
15
-
16
-
17
-
18
-
19
-
20
-
21
-
22
-
23
-
24
-
25
-
26
-
27
-
28
-
29
-
30
-
31
-
32
-
33
-
34
-
35
-
36
-
37
-
38
-
39
-
40
-
41
-
42
-
43
-
44
-
45
-
46
-
47
-
48
-
49
-
50
-
51
-
52
-
53
-
54
-
55
-
56
-
57
-
58
-
59
-
60
-
61
-
62
-
63
-
64
-
65
-
66
-
67
-
68
-
69
-
70
-
71
-
72
-
73
-
74
-
75
-
76
-
77
-
78
-
79
-
80
-
81
-
82
-
83
-
84
-
85
-
86
-
87
-
88
-
89
-
90
-
91
-
92
-
93
-
94
-
95
-
96
-
97
-
98
-
99
-
100
-
101
-
102
-
 103
103 -
 104
104 -
 105
105 -
 106
106 -
 107
107 -
 108
108 -
 109
109 -
 110
110 -
 111
111 -
 112
112 -
 113
113 -
114
-
115
-
116
-
117
-
118
-
119
-
120
-
121
-
122
-
123
-
124
-
125
-
126
-
127
-
128
-
129
-
130
 |
 |
