HP Tc4100 hp server tc4100 operation and maintenance guide (English, 2.1) - Page 37
Installing Hot Swap Hard Drives, Opening the Drive Module
 |
View all HP Tc4100 manuals
Add to My Manuals
Save this manual to your list of manuals |
Page 37 highlights
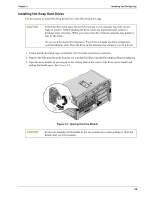
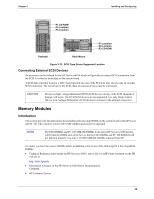
Chapter 3 Installing Hot Swap Hard Drives Use this section to install Hot Swap hard drives in the Hot Swap drive cage. Installing and Configuring CAUTION Protect the drive from static electricity by leaving it in its antistatic bag until you are ready to install it. Before handling the drive, touch any unpainted metal surface to discharge static electricity. When you remove the drive from the antistatic bag, handle it only by the frame. Do not touch the electrical components. If you have to handle electrical components, wear the antistatic strap. Place the drive on the antistatic bag whenever you set it down. 1. Ensure that the hard disk cage is unlocked, if it is locked, use the key to unlock it. 2. Remove the filler panel from the location you want the Hard Drive installed by simply pulling it straight out. 3. Open the drive module by pressing in on the locking latch at the center of the drive ejector handle and pulling the handle open. See Figure 3-9. 2 1 3 CAUTION Figure 3-9. Opening the Drive Module To prevent snapping off the handle do not use extreme force when opening it. Open the handle until you feel resistance. 35
-
 1
1 -
2
-
3
-
4
-
5
-
6
-
7
-
8
-
9
-
10
-
11
-
12
-
13
-
14
-
15
-
16
-
17
-
18
-
19
-
20
-
21
-
22
-
23
-
24
-
25
-
26
-
27
-
28
-
29
-
30
-
31
-
 32
32 -
 33
33 -
 34
34 -
 35
35 -
 36
36 -
 37
37 -
 38
38 -
 39
39 -
 40
40 -
 41
41 -
 42
42 -
43
-
44
-
45
-
46
-
47
-
48
-
49
-
50
-
51
-
52
-
53
-
54
-
55
-
56
-
57
-
58
-
59
-
60
-
61
-
62
-
63
-
64
-
65
-
66
-
67
-
68
-
69
-
70
-
71
-
72
-
73
-
74
-
75
-
76
-
77
-
78
-
79
-
80
-
81
-
82
-
83
-
84
-
85
-
86
-
87
-
88
-
89
-
90
-
91
-
92
-
93
-
94
-
95
-
96
-
97
-
98
-
99
-
100
-
101
-
102
-
103
-
104
-
105
-
106
-
107
-
108
-
109
-
110
-
111
-
112
-
113
-
114
-
115
-
116
-
117
-
118
-
119
-
120
-
121
-
122
-
123
-
124
-
125
-
126
-
127
-
128
-
129
-
130
 |
 |
