HP Tc4100 hp server tc4100 operation and maintenance guide (English, 2.1) - Page 45
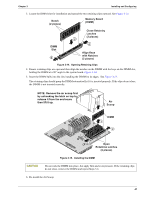
DIMM Removal, Remove the Air Scoop.
 |
View all HP Tc4100 manuals
Add to My Manuals
Save this manual to your list of manuals |
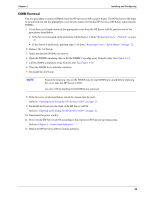
Page 45 highlights
Chapter 3 Installing and Configuring DIMM Removal Use this procedure to remove DIMMs from the HP Server tc4100's system board. The HP Server tc4100 must be powered down and the appropriate cover must be removed from the HP Server tc4100 before removing any DIMMs. 1. If you have not already removed the appropriate cover from the HP Server tc4100, perform one of the procedures listed below. • If the Server is mounted on the pedestal, perform Steps 1-8 from "Removing Covers - Pedestal" on page 25. • If the Server is in the rack, perform steps 1-14 from "Removing Covers - Rack-Mount" on page 21. 2. Remove the Air Scoop. 3. Select the desired DIMM(s) to remove. 4. Open the DIMM's retaining clips to lift the DIMM's top edge away from the clips. See Figure 3-14. 5. Lift the DIMM completely away from the slot. See Figure 3-14. 6. Place the DIMM in its antistatic container. 7. Re-install the Air Scoop. NOTE Ensure the retaining clips on the DIMM slots for each DIMM are closed before replacing the cover onto the HP Server tc4100. An error will be displayed if all DIMMs are removed. 8. If the Server is a rack installation, return the chassis into the rack. Refer to "Opening and Closing the HP Server tc4100" on page 21. 9. Re-install the bezel onto the front of the HP Server tc4100. Refer to "Opening and Closing the HP Server tc4100" on page 21. 10. Reconnect the power cord(s). 11. Power on the HP Server tc4100 according to the respective NOS power-up instructions. Refer to Chapter 1, Control and Indicators. 12. Return the HP Server tc4100 to normal operation. 43
-
 1
1 -
2
-
3
-
4
-
5
-
6
-
7
-
8
-
9
-
10
-
11
-
12
-
13
-
14
-
15
-
16
-
17
-
18
-
19
-
20
-
21
-
22
-
23
-
24
-
25
-
26
-
27
-
28
-
29
-
30
-
31
-
32
-
33
-
34
-
35
-
36
-
37
-
38
-
39
-
 40
40 -
 41
41 -
 42
42 -
 43
43 -
 44
44 -
 45
45 -
 46
46 -
 47
47 -
 48
48 -
 49
49 -
 50
50 -
51
-
52
-
53
-
54
-
55
-
56
-
57
-
58
-
59
-
60
-
61
-
62
-
63
-
64
-
65
-
66
-
67
-
68
-
69
-
70
-
71
-
72
-
73
-
74
-
75
-
76
-
77
-
78
-
79
-
80
-
81
-
82
-
83
-
84
-
85
-
86
-
87
-
88
-
89
-
90
-
91
-
92
-
93
-
94
-
95
-
96
-
97
-
98
-
99
-
100
-
101
-
102
-
103
-
104
-
105
-
106
-
107
-
108
-
109
-
110
-
111
-
112
-
113
-
114
-
115
-
116
-
117
-
118
-
119
-
120
-
121
-
122
-
123
-
124
-
125
-
126
-
127
-
128
-
129
-
130
 |
 |
