HP Vectra VE C/xxx 7 HP Vectra VE C/xxx Series 7 PC - Upgrade and Maintenance - Page 22
do not interfere with any other device nor hinder the PC's cover.
 |
View all HP Vectra VE C/xxx 7 manuals
Add to My Manuals
Save this manual to your list of manuals |
Page 22 highlights
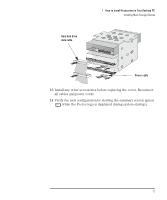
1 How to Install Accessories in Your Desktop PC Installing Mass Storage Devices 7 Connect the power cable and the data cable to the rear of the new hard disk drive. Remember to replace those for the floppy disk drive and the existing hard disk drive also. The connectors are shaped to go in one way only. If you are not sure which connector to use, refer to "Connecting IDE Devices", on page 7. Hard disk drive data cable Power cable 8 Ensure that the data and power cables are neatly routed so that they do not interfere with any other device nor hinder the PC's cover. 9 Install any other accessories before replacing the cover. Reconnect all cables and power cords. 10 Check the new configuration by viewing the summary screen (press while the Vectra logo is displayed during system startup). 12 English
-
 1
1 -
2
-
3
-
4
-
5
-
6
-
7
-
8
-
9
-
10
-
11
-
12
-
13
-
14
-
15
-
16
-
 17
17 -
 18
18 -
 19
19 -
 20
20 -
 21
21 -
 22
22 -
 23
23 -
 24
24 -
 25
25 -
 26
26 -
 27
27 -
28
-
29
-
30
-
31
-
32
-
33
-
34
-
35
-
36
-
37
-
38
-
39
-
40
-
41
-
42
-
43
-
44
-
45
-
46
-
47
-
48
-
49
-
50
-
51
-
52
-
53
-
54
-
55
-
56
-
57
-
58
-
59
-
60
-
61
-
62
-
63
-
64
-
65
-
66
-
67
-
68
-
69
-
70
-
71
-
72
-
73
-
74
-
75
-
76
-
77
-
78
-
79
-
80
-
81
-
82
-
83
-
84
-
85
-
86
-
87
-
88
-
89
-
90
-
91
-
92
-
93
-
94
-
95
-
96
-
97
-
98
-
99
-
100
-
101
-
102
 |
 |
