HP Vectra VE C/xxx 7 HP Vectra VE C/xxx Series 7 PC - Upgrade and Maintenance - Page 23
Installing a CD-ROM, Tape or Zip Drive in a Front Shelf
 |
View all HP Vectra VE C/xxx 7 manuals
Add to My Manuals
Save this manual to your list of manuals |
Page 23 highlights
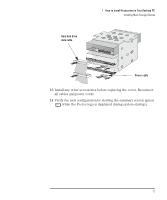
WARNING 1 How to Install Accessories in Your Desktop PC Installing Mass Storage Devices Installing a CD-ROM, Tape or Zip Drive in a Front Shelf To avoid electric shock and harm to your eyes by laser light, do not open the laser module. The laser module should be serviced by service personnel only. Do not attempt to make any adjustment to the laser unit. Refer to the label on the CD-ROM drive for power requirements and wavelength. This product is a class 1 laser product. The PC has an integrated Ultra ATA IDE controller which supports up to four IDE devices. Removable media IDE devices, such as CD-ROM drives, tape drives and Zip drives, require front access. In addition to the floppy disk drive, your PC supports two front-access 5.25-inch devices. Note that one front-access shelf may already have a CD-ROM drive installed in it. Refer to the drive's manual to see if you must set jumpers or if there is a special installation procedure to follow. To install a front-access device: 1 Disconnect the computer's power supply cord and any connection to a telecommunications network. 2 Remove the computer's cover. 3 Disconnect the power and data cables from the rear of the floppy disk drive and hard disk drive(s). 4 Remove the two retaining screws from the floppy disk/hard disk drive tray, and then carefully lift the tray from the PC. Place the tray on a table/desk top. 5 Unclip the front bezel and gently remove it from the chassis. English 13
-
 1
1 -
2
-
3
-
4
-
5
-
6
-
7
-
8
-
9
-
10
-
11
-
12
-
13
-
14
-
15
-
16
-
17
-
 18
18 -
 19
19 -
 20
20 -
 21
21 -
 22
22 -
 23
23 -
 24
24 -
 25
25 -
 26
26 -
 27
27 -
 28
28 -
29
-
30
-
31
-
32
-
33
-
34
-
35
-
36
-
37
-
38
-
39
-
40
-
41
-
42
-
43
-
44
-
45
-
46
-
47
-
48
-
49
-
50
-
51
-
52
-
53
-
54
-
55
-
56
-
57
-
58
-
59
-
60
-
61
-
62
-
63
-
64
-
65
-
66
-
67
-
68
-
69
-
70
-
71
-
72
-
73
-
74
-
75
-
76
-
77
-
78
-
79
-
80
-
81
-
82
-
83
-
84
-
85
-
86
-
87
-
88
-
89
-
90
-
91
-
92
-
93
-
94
-
95
-
96
-
97
-
98
-
99
-
100
-
101
-
102
 |
 |
