HP Vectra VE C/xxx 7 HP Vectra VE C/xxx Series 7 PC - Upgrade and Maintenance - Page 41
Removing and Replacing the Power Supply Unit
 |
View all HP Vectra VE C/xxx 7 manuals
Add to My Manuals
Save this manual to your list of manuals |
Page 41 highlights
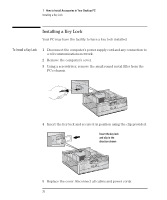
2 How to Install Accessories in Your Minitower PC Removing and Replacing the Power Supply Unit Removing and Replacing the Power Supply Unit To improve access to the system board you may need to remove the power supply unit. To do this: 1 Disconnect the PC's power supply cord and any connection to a telecommunications network. 2 Remove the PC's cover. 3 While supporting the power supply unit with one hand, remove its retaining screw and unclip the unit from the top of the PC chassis. Unclip the power supply unit here 4 Gently place the power supply unit next to the PC. Take care not to put any strain on any of the cables. 5 Install any accessories that you need to. 6 Secure the power supply unit back in position before replacing the cover. Reconnect all cables and power cords. English 31
-
 1
1 -
2
-
3
-
4
-
5
-
6
-
7
-
8
-
9
-
10
-
11
-
12
-
13
-
14
-
15
-
16
-
17
-
18
-
19
-
20
-
21
-
22
-
23
-
24
-
25
-
26
-
27
-
28
-
29
-
30
-
31
-
32
-
33
-
34
-
35
-
 36
36 -
 37
37 -
 38
38 -
 39
39 -
 40
40 -
 41
41 -
 42
42 -
 43
43 -
 44
44 -
 45
45 -
 46
46 -
47
-
48
-
49
-
50
-
51
-
52
-
53
-
54
-
55
-
56
-
57
-
58
-
59
-
60
-
61
-
62
-
63
-
64
-
65
-
66
-
67
-
68
-
69
-
70
-
71
-
72
-
73
-
74
-
75
-
76
-
77
-
78
-
79
-
80
-
81
-
82
-
83
-
84
-
85
-
86
-
87
-
88
-
89
-
90
-
91
-
92
-
93
-
94
-
95
-
96
-
97
-
98
-
99
-
100
-
101
-
102
 |
 |
