HP Vectra VE C/xxx 7 HP Vectra VE C/xxx Series 7 PC - Upgrade and Maintenance - Page 30
Network cable to the WOL Wake On LAN connector.
 |
View all HP Vectra VE C/xxx 7 manuals
Add to My Manuals
Save this manual to your list of manuals |
Page 30 highlights
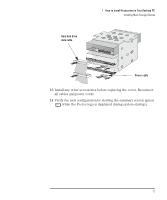
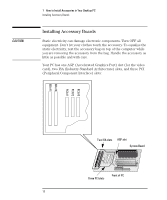
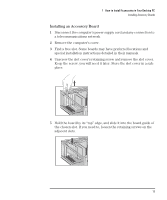
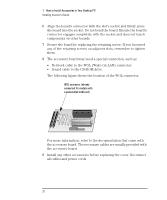
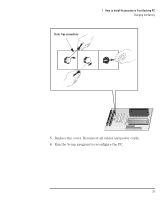
1 How to Install Accessories in Your Desktop PC Installing Accessory Boards 6 Align the board's connector with the slot's socket and firmly press the board into the socket. Do not bend the board. Ensure the board's connector engages completely with the socket and does not touch components on other boards. 7 Secure the board by replacing the retaining screw. If you loosened any of the retaining screws on adjacent slots, remember to tighten them. 8 The accessory board may need a special connection, such as: • Network cable to the WOL (Wake On LAN) connector. • Sound cable to the CD-ROM drive. The following figure shows the location of the WOL connector. WOL connector (already connected for models with a preinstalled LAN card) For more information, refer to the documentation that came with the accessory board. The necessary cables are usually provided with the accessory board. 9 Install any other accessories before replacing the cover. Reconnect all cables and power cords. 20 English
-
 1
1 -
2
-
3
-
4
-
5
-
6
-
7
-
8
-
9
-
10
-
11
-
12
-
13
-
14
-
15
-
16
-
17
-
18
-
19
-
20
-
21
-
22
-
23
-
24
-
 25
25 -
 26
26 -
 27
27 -
 28
28 -
 29
29 -
 30
30 -
 31
31 -
 32
32 -
 33
33 -
 34
34 -
 35
35 -
36
-
37
-
38
-
39
-
40
-
41
-
42
-
43
-
44
-
45
-
46
-
47
-
48
-
49
-
50
-
51
-
52
-
53
-
54
-
55
-
56
-
57
-
58
-
59
-
60
-
61
-
62
-
63
-
64
-
65
-
66
-
67
-
68
-
69
-
70
-
71
-
72
-
73
-
74
-
75
-
76
-
77
-
78
-
79
-
80
-
81
-
82
-
83
-
84
-
85
-
86
-
87
-
88
-
89
-
90
-
91
-
92
-
93
-
94
-
95
-
96
-
97
-
98
-
99
-
100
-
101
-
102
 |
 |
