HP Vectra VE C/xxx 7 HP Vectra VE C/xxx Series 7 PC - Upgrade and Maintenance - Page 24
to help you to unlatch the plate.
 |
View all HP Vectra VE C/xxx 7 manuals
Add to My Manuals
Save this manual to your list of manuals |
Page 24 highlights
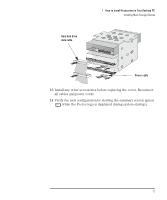
1 How to Install Accessories in Your Desktop PC Installing Mass Storage Devices Step 4 Step 5 Step 3 6 Carefully remove the metal filler plate from the PC chassis. Unlatch the filler first from one side, and then pull it out. Be very careful not to hurt your fingers when you do this. You need to use a screwdriver to help you to unlatch the plate. 7 If the new drive has a tray, attach the drive to the tray. Many devices, such as the HP Zip drive, require an HP-supplied tray before they can be installed. CD-ROM drives do not require a tray. 14 English
-
 1
1 -
2
-
3
-
4
-
5
-
6
-
7
-
8
-
9
-
10
-
11
-
12
-
13
-
14
-
15
-
16
-
17
-
18
-
 19
19 -
 20
20 -
 21
21 -
 22
22 -
 23
23 -
 24
24 -
 25
25 -
 26
26 -
 27
27 -
 28
28 -
 29
29 -
30
-
31
-
32
-
33
-
34
-
35
-
36
-
37
-
38
-
39
-
40
-
41
-
42
-
43
-
44
-
45
-
46
-
47
-
48
-
49
-
50
-
51
-
52
-
53
-
54
-
55
-
56
-
57
-
58
-
59
-
60
-
61
-
62
-
63
-
64
-
65
-
66
-
67
-
68
-
69
-
70
-
71
-
72
-
73
-
74
-
75
-
76
-
77
-
78
-
79
-
80
-
81
-
82
-
83
-
84
-
85
-
86
-
87
-
88
-
89
-
90
-
91
-
92
-
93
-
94
-
95
-
96
-
97
-
98
-
99
-
100
-
101
-
102
 |
 |

1
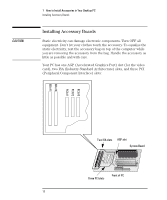
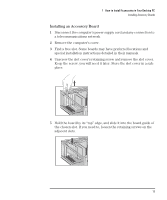
How to Install Accessories in Your Desktop PC
Installing Mass Storage Devices
14
English
6
Carefully remove the metal filler plate from the PC chassis. Unlatch
the filler first from one side, and then pull it out. Be very careful not
to hurt your fingers when you do this. You need to use a screwdriver
to help you to unlatch the plate.
7
If the new drive has a tray, attach the drive to the tray. Many devices,
such as the HP Zip drive, require an HP-supplied tray before they can
be installed. CD-ROM drives do not require a tray.
Step 3
Step 4
Step 5