HP d248 HP Compaq Business Desktop d200 Series Personal Computers Service Refe - Page 61
Processor and Heatsink
 |
View all HP d248 manuals
Add to My Manuals
Save this manual to your list of manuals |
Page 61 highlights
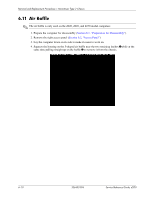
Removal and Replacement Procedures- Microtower Type 2 Chassis 6.13 Processor and Heatsink 1. Prepare the computer for disassembly (Section 6.1, "Preparation for Disassembly"). 2. Remove the right access panels (Section 6.2, "Access Panel"). 3. Lay the computer down on its side to make it easier to work on. 4. Remove the J-shaped air baffle if applicable (Section 6.11, "Air Baffle"). 5. Disconnect the fan control cable from the system board. 6. Use a long, slender screwdriver to unscrew the four processor retaining screws 1. ✎ The spring-loaded retaining screws are captive to the heatsink. 7. Twist the heatsink to break the bond between it and the processor and lift the heatsink from the processor 2. 8. Raise the handle on the ZIF socket to the full-open position 3. 9. Grasp the processor by the edges and pull it straight up from the socket 4. To install the processor and heatsink, reverse the removal procedures making sure that you hold the processor in place while locking the ZIF socket handle. Ä CAUTION: When installing the heatsink, insert all four screw loosely and then tighten them in a X pattern to ensure the heatsink is properly seated. Service Reference Guide, d200 336493-004 6-21
-
 1
1 -
2
-
3
-
4
-
5
-
6
-
7
-
8
-
9
-
10
-
11
-
12
-
13
-
14
-
15
-
16
-
17
-
18
-
19
-
20
-
21
-
22
-
23
-
24
-
25
-
26
-
27
-
28
-
29
-
30
-
31
-
32
-
33
-
34
-
35
-
36
-
37
-
38
-
39
-
40
-
41
-
42
-
43
-
44
-
45
-
46
-
47
-
48
-
49
-
50
-
51
-
52
-
53
-
54
-
55
-
 56
56 -
 57
57 -
 58
58 -
 59
59 -
 60
60 -
 61
61 -
 62
62 -
 63
63 -
 64
64 -
 65
65 -
 66
66 -
67
-
68
-
69
-
70
-
71
-
72
-
73
-
74
-
75
-
76
-
77
-
78
-
79
-
80
-
81
-
82
-
83
-
84
-
85
-
86
-
87
-
88
-
89
-
90
-
91
-
92
-
93
-
94
-
95
-
96
-
97
-
98
-
99
-
100
-
101
-
102
-
103
-
104
-
105
-
106
-
107
-
108
-
109
-
110
 |
 |
