IBM 26K6477 User Guide - Page 56
SNMPv3, configuration
 |
View all IBM 26K6477 manuals
Add to My Manuals
Save this manual to your list of manuals |
Page 56 highlights
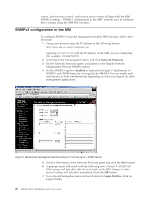
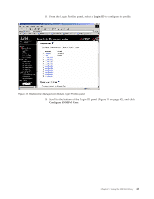
context, authentication_protocol, and privacy_protocol must all align with the MM SNMPv3 settings. "SNMPv3 configuration in the MM" explains how to configure these settings using the MM Web interface. SNMPv3 configuration in the MM To configure SNMPv3 using the management module Web interface, follow these directions: 1. Using your browser, type the IP address in the following format: http://xxx.xxx.xx.xxx/private/main.ssi replacing xxx.xxx.xx.xxx with the IP address of the MM you are configuring (for example, 192.168.70.125). 2. Scroll down the left navigation menu, and click Network Protocols. 3. On the Network Protocols panel, scroll down to the Simple Network Management Protocol (SNMP) section. 4. Set the SNMPv3 agent to Enabled as indicated in Figure 9. Enablement of SNMPv1 and SNMP traps are not required by SMASH. You can enable each individually or both simultaneously depending on what you require for other management applications. Figure 9. BladeCenter Management Module Network Protocols panel - SNMP section 5. Scroll to the bottom of the Network Protocols panel and click the Save button. 6. A pop-up screen will result with the following note: Changes to SNMP and DNS settings will take effect after the next restart of the MM. Changes to other protocol settings will take effect immediately. Click the OK button. 7. Go to the left navigation menu and scroll down to Login Profiles. Click on Login Profiles. 40 SMASH Proxy Installation and User's Guide
-
 1
1 -
2
-
3
-
4
-
5
-
6
-
7
-
8
-
9
-
10
-
11
-
12
-
13
-
14
-
15
-
16
-
17
-
18
-
19
-
20
-
21
-
22
-
23
-
24
-
25
-
26
-
27
-
28
-
29
-
30
-
31
-
32
-
33
-
34
-
35
-
36
-
37
-
38
-
39
-
40
-
41
-
42
-
43
-
44
-
45
-
46
-
47
-
48
-
49
-
50
-
 51
51 -
 52
52 -
 53
53 -
 54
54 -
 55
55 -
 56
56 -
 57
57 -
 58
58 -
 59
59 -
 60
60 -
 61
61 -
62
-
63
-
64
-
65
-
66
-
67
-
68
-
69
-
70
-
71
-
72
-
73
-
74
-
75
-
76
-
77
-
78
-
79
-
80
-
81
-
82
-
83
-
84
-
85
-
86
-
87
-
88
-
89
-
90
-
91
-
92
-
93
-
94
-
95
-
96
-
97
-
98
-
99
-
100
-
101
-
102
-
103
-
104
-
105
-
106
-
107
-
108
-
109
-
110
-
111
-
112
-
113
-
114
-
115
-
116
-
117
-
118
-
119
-
120
-
121
-
122
-
123
-
124
-
125
-
126
-
127
-
128
-
129
-
130
-
131
-
132
-
133
-
134
-
135
-
136
-
137
-
138
-
139
-
140
 |
 |
