Intel S2600IP Service Guide - Page 41
Installing Processor, Open the Socket Lever, Installing Processor, Open
 |
View all Intel S2600IP manuals
Add to My Manuals
Save this manual to your list of manuals |
Page 41 highlights
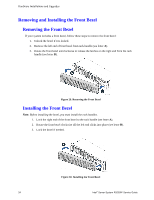
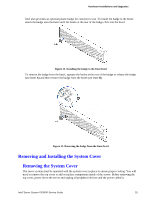
Hardware Installations and Upgrades or server board. Keep part of your body in contact with the metal chassis to dissipate the static charge while handling the processor. (2) Avoid moving around unnecessarily. Caution: Protective socket cover needs to be removed for proper cooling of the processor; failure to remove the cover could result in damage to the system. 1. Open the Socket Lever. Push down the lever handle on the OPEN 1st side and away from the socket to release it (see letter A). Repeat the steps to release the lever on the other side (see letter B). Figure 38. Installing Processor - Open the Socket Lever 2. Open the Load Plate. Press the locking lever slightly to raise the load plate (see letter A). Open the load plate all the way (see letter B). Figure 39. Installing Processor - Open the Load Plate 3. Install the Processor. Take the processor out of the box and remove the protective shipping cover (see letter A). Orient the processor with the socket so that the processor cutouts match the four orientation posts on the socket (see letter B). Note location of gold key at corner of processor (see letter C). Intel® Server System R2000IP Service Guide 29
-
 1
1 -
2
-
3
-
4
-
5
-
6
-
7
-
8
-
9
-
10
-
11
-
12
-
13
-
14
-
15
-
16
-
17
-
18
-
19
-
20
-
21
-
22
-
23
-
24
-
25
-
26
-
27
-
28
-
29
-
30
-
31
-
32
-
33
-
34
-
35
-
 36
36 -
 37
37 -
 38
38 -
 39
39 -
 40
40 -
 41
41 -
 42
42 -
 43
43 -
 44
44 -
 45
45 -
 46
46 -
47
-
48
-
49
-
50
-
51
-
52
-
53
-
54
-
55
-
56
-
57
-
58
-
59
-
60
-
61
-
62
-
63
-
64
-
65
-
66
-
67
-
68
-
69
-
70
-
71
-
72
-
73
-
74
-
75
-
76
-
77
-
78
-
79
-
80
-
81
-
82
-
83
-
84
-
85
-
86
-
87
-
88
-
89
-
90
-
91
-
92
-
93
-
94
-
95
-
96
-
97
-
98
-
99
-
100
-
101
-
102
-
103
-
104
-
105
-
106
-
107
-
108
-
109
-
110
-
111
-
112
-
113
-
114
-
115
-
116
-
117
-
118
-
119
-
120
-
121
-
122
-
123
-
124
-
125
-
126
-
127
-
128
-
129
-
130
-
131
-
132
-
133
-
134
-
135
-
136
-
137
-
138
-
139
-
140
-
141
-
142
-
143
-
144
-
145
-
146
-
147
-
148
-
149
-
150
-
151
-
152
-
153
-
154
-
155
-
156
-
157
-
158
-
159
-
160
-
161
-
162
-
163
-
164
-
165
-
166
-
167
-
168
-
169
-
170
-
171
-
172
-
173
-
174
-
175
-
176
-
177
-
178
-
179
-
180
-
181
-
182
-
183
-
184
-
185
-
186
-
187
-
188
-
189
-
190
-
191
-
192
 |
 |
