Intel SR1670HV Service Guide - Page 38
Hard Disk Drives
 |
UPC - 735858210034
View all Intel SR1670HV manuals
Add to My Manuals
Save this manual to your list of manuals |
Page 38 highlights
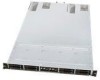
Hardware Setup 2.6 Hard Disk Drives The system supports up to eight hot-swap 2.5-inch SATAII/SAS hard disk drives-four for each installed server node. Each installed hard disk is mounted to a drive tray. When inserted into a drive bay, the hard drive is blind-mated to a matching connector on a backplane, which is either cabled to SATA ports on each server node (default) or can be routed to add-in SAS/SAS RAID cards. The hard drives for each server node are numbered as follows: 3 4 2 1 Figure 31. Hard Disk Drives Each drive number corresponds to a matching SATA port number on the server board. To install a hard drive: 1. Release the drive tray by pushing the spring lock to the right, and then pulling the tray lever outward. The drive tray ejects slightly after you pull out the lever. 2. Firmly hold the tray lever and pull the drive tray out of the bay. Figure 32. Releasing the Drive Tray 3. Place a SATAII/SAS hard disk drive on the tray, and then secure it with its four screws. Figure 33. Placing a SATAII/SAS Hard Disk Drive on the Tray 4. Carefully insert the drive assembly into a drive bay until contact is made with the backplane. 5. Push the tray lever in until it clicks and secures the drive tray in place. The drive tray is correctly placed when its front edge aligns with the bay edge. Intel® Server System SR1670HV Service Guide 23
-
 1
1 -
2
-
3
-
4
-
5
-
6
-
7
-
8
-
9
-
10
-
11
-
12
-
13
-
14
-
15
-
16
-
17
-
18
-
19
-
20
-
21
-
22
-
23
-
24
-
25
-
26
-
27
-
28
-
29
-
30
-
31
-
32
-
 33
33 -
 34
34 -
 35
35 -
 36
36 -
 37
37 -
 38
38 -
 39
39 -
 40
40 -
 41
41 -
 42
42 -
 43
43 -
44
-
45
-
46
-
47
-
48
-
49
-
50
-
51
-
52
-
53
-
54
-
55
-
56
-
57
-
58
-
59
-
60
-
61
-
62
-
63
-
64
-
65
-
66
-
67
-
68
-
69
-
70
-
71
-
72
-
73
-
74
-
75
-
76
-
77
-
78
-
79
-
80
-
81
-
82
-
83
-
84
-
85
-
86
-
87
-
88
-
89
-
90
-
91
-
92
-
93
-
94
-
95
-
96
-
97
-
98
-
99
-
100
-
101
-
102
-
103
-
104
-
105
-
106
-
107
-
108
-
109
-
110
-
111
-
112
-
113
-
114
-
115
-
116
-
117
-
118
-
119
-
120
-
121
-
122
-
123
-
124
-
125
-
126
-
127
-
128
-
129
-
130
-
131
-
132
-
133
-
134
-
135
-
136
-
137
-
138
-
139
-
140
-
141
-
142
-
143
-
144
-
145
-
146
-
147
-
148
-
149
-
150
-
151
-
152
-
153
-
154
-
155
-
156
-
157
 |
 |
