Intel SR1670HV Service Guide - Page 49
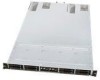
Control Panel Module Top view, Detached Control Panel Module
 |
UPC - 735858210034
View all Intel SR1670HV manuals
Add to My Manuals
Save this manual to your list of manuals |
Page 49 highlights
System Service Figure 57 Control Panel Module Top view 4. Carefully detach each cable pair from both control panel boards. 5. Place the detached Control Panel module onto an anti-static surface. Figure 58 Detached Control Panel Module 6. Take out the faulty Control Panel board by removing the three screws that attach it to the module tray. 7. Unpack the replacement Control Panel board and place it onto the module tray, making sure the Control Panel buttons protrude out of the faceplate holes and screw holes are in alignment with the screw mounts. 8. Using the three screws, fasten the Control Panel board to the module tray. Be careful not to overtighten them. 9. Turn over the Control Panel Module and place it in front of the Module bay at the front of the system. 10. Reattach each cable pair to the appropriate Control Panel board. 11. Carefully slide the Control Panel Module back into the module bay until the screw holes are in alignment. 12. Using the single screw, fasten the Control Panel module to the chassis. 34 Intel® Server System SR1670HV Service Guide
-
 1
1 -
2
-
3
-
4
-
5
-
6
-
7
-
8
-
9
-
10
-
11
-
12
-
13
-
14
-
15
-
16
-
17
-
18
-
19
-
20
-
21
-
22
-
23
-
24
-
25
-
26
-
27
-
28
-
29
-
30
-
31
-
32
-
33
-
34
-
35
-
36
-
37
-
38
-
39
-
40
-
41
-
42
-
43
-
 44
44 -
 45
45 -
 46
46 -
 47
47 -
 48
48 -
 49
49 -
 50
50 -
 51
51 -
 52
52 -
 53
53 -
 54
54 -
55
-
56
-
57
-
58
-
59
-
60
-
61
-
62
-
63
-
64
-
65
-
66
-
67
-
68
-
69
-
70
-
71
-
72
-
73
-
74
-
75
-
76
-
77
-
78
-
79
-
80
-
81
-
82
-
83
-
84
-
85
-
86
-
87
-
88
-
89
-
90
-
91
-
92
-
93
-
94
-
95
-
96
-
97
-
98
-
99
-
100
-
101
-
102
-
103
-
104
-
105
-
106
-
107
-
108
-
109
-
110
-
111
-
112
-
113
-
114
-
115
-
116
-
117
-
118
-
119
-
120
-
121
-
122
-
123
-
124
-
125
-
126
-
127
-
128
-
129
-
130
-
131
-
132
-
133
-
134
-
135
-
136
-
137
-
138
-
139
-
140
-
141
-
142
-
143
-
144
-
145
-
146
-
147
-
148
-
149
-
150
-
151
-
152
-
153
-
154
-
155
-
156
-
157
 |
 |
