Konica Minolta bizhub C654 bizhub C654/C754 PC-Fax Operations User Guide
Konica Minolta bizhub C654 Manual
 |
View all Konica Minolta bizhub C654 manuals
Add to My Manuals
Save this manual to your list of manuals |
Konica Minolta bizhub C654 manual content summary:
- Konica Minolta bizhub C654 | bizhub C654/C754 PC-Fax Operations User Guide - Page 1
User's Guide PC-FAX Operations - Konica Minolta bizhub C654 | bizhub C654/C754 PC-Fax Operations User Guide - Page 2
OS) version that supports the fax driver 3-3 Changing the installation settings (Windows 7 or Windows Server 2008 R2 3-3 Installation procedure ...3-4 3.3 Initialize the fax driver...3-8 Set the optional operating environment of this machine 3-8 Change the default print settings...3-9 4 PC - Konica Minolta bizhub C654 | bizhub C654/C754 PC-Fax Operations User Guide - Page 3
transmission for authentication setup 5-8 Operations required to use this function 5-8 How to Send ...5-9 6 Fax Driver Settings 6.1 The [Properties] screen of the fax driver 6-2 How to display the [Properties] screen 6-2 Tabs provided by Windows ...6-4 6.2 Available Operations with the - Konica Minolta bizhub C654 | bizhub C654/C754 PC-Fax Operations User Guide - Page 4
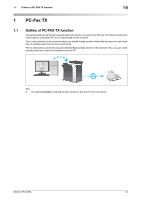
1 PC-Fax TX - Konica Minolta bizhub C654 | bizhub C654/C754 PC-Fax Operations User Guide - Page 5
paper documents. In contrast, the PC-Fax TX function sends a document data on a Windows PC as if it was printed on this machine. This is well suited for an create a phone book and control the destinations on the PC. Tips - The optional Fax Kit is required on this machine to use the PC-Fax TX - Konica Minolta bizhub C654 | bizhub C654/C754 PC-Fax Operations User Guide - Page 6
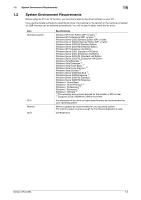
Windows 7 Home Basic Windows 7 Home Premium *2 Windows 7 Professional *2 Windows 7 Enterprise *2 Windows 7 Ultimate *2 *1 The operating environment required for the installer is SP2 or later. *2 Supports 32-bit (e86)/64-bit (e64) environment. Any processor of the same or higher specifications - Konica Minolta bizhub C654 | bizhub C654/C754 PC-Fax Operations User Guide - Page 7
the 1000Base-T, 100Base-TX and 10Base-T protocols. The TCP/IP (LPD/LPR, IPP and SMB) protocols and Web services are supported. Use a USB interface cable for USB connection. Use a type A (4-pin, male) or type B (4-pin, male) USB cable. A USB cable measuring three meters or less is - Konica Minolta bizhub C654 | bizhub C654/C754 PC-Fax Operations User Guide - Page 8
2 Preparation for PC-Fax TX (via network connection) - Konica Minolta bizhub C654 | bizhub C654/C754 PC-Fax Operations User Guide - Page 9
(IPP) Check the IPP operating environment. (Usually, you can use the default settings.) % When using the Secure Print (IPPS) Set up the IPPS operating environment. Establish the communication with SSL encryption between this machine and the PC. 3 Preparation has finished. bizhub C754/C654 2-2 - Konica Minolta bizhub C654 | bizhub C654/C754 PC-Fax Operations User Guide - Page 10
the default settings.) If device information collection from the fax driver is enabled, the fax driver automatically collects the information such as optional device attachment and authentication settings. For details on how to setup, refer to [User's Guide: Print Operations]. bizhub C754/C654 2-3 - Konica Minolta bizhub C654 | bizhub C654/C754 PC-Fax Operations User Guide - Page 11
a password to restrict the ability to obtain device information from the printer driver (default: [No]). For details, refer to [User's Guide: Print Operations]. To configure settings, select [Utility] - [Administrator Settings] - [Printer Settings] - [Assign Account to Acquire Device Info]. bizhub - Konica Minolta bizhub C654 | bizhub C654/C754 PC-Fax Operations User Guide - Page 12
and screen fonts. Contains the printer driver (XPS) for Windows, printer driver for the Mac OS, screen fonts, and TWAIN driver. Contains application software that operates with this machine and manuals. Contains the User's Guide. Tips - In User's Guide manuals, location paths of folders or files - Konica Minolta bizhub C654 | bizhub C654/C754 PC-Fax Operations User Guide - Page 13
open the printer driver folder on the CD-ROM, double-click [Set- up.exe], and then go to Step 3. % If the [User Account Control] screen appears, [Normal Printing] (Port 9100) unless otherwise specified by the administrator. % As a printing method, you can select [Normal Printing bizhub C754/C654 2-6 - Konica Minolta bizhub C654 | bizhub C654/C754 PC-Fax Operations User Guide - Page 14
. In such a case, select [Specify the Printer/MFP Except for the Above.(IP Address, Host Name...)], and manually specify the IP address and host name of this machine. 6 Select the fax driver box, then click [Next]. 7 Check the components to be installed, then click [Install]. bizhub C754/C654 2-7 - Konica Minolta bizhub C654 | bizhub C654/C754 PC-Fax Operations User Guide - Page 15
Changes the default print settings of this machine if necessary. For details, refer to page 2-10. Prints a test page to check the normal data transfer if necessary. d Reference Be sure to initialize the fax driver after you have installed it. For details, refer to page 2-9. bizhub C754/C654 2-8 - Konica Minolta bizhub C654 | bizhub C654/C754 PC-Fax Operations User Guide - Page 16
driver. % For details on how to open the [Properties] screen, refer to page 6-2. 2 Open the [Configure] tab, and check the optional device installation and authentication settings on this machine. % Because the [Auto] of [Obtain Settings...] is enabled by default manually. Select an item to change from - Konica Minolta bizhub C654 | bizhub C654/C754 PC-Fax Operations User Guide - Page 17
. We recommend that you change the default settings to suit your environment. 1 Open the [Printing Preferences] screen of the fax driver. % For details on how to software. d Reference The fax driver has the function to save favorite settings. For details, refer to page 4-11. bizhub C754/C654 2-10 - Konica Minolta bizhub C654 | bizhub C654/C754 PC-Fax Operations User Guide - Page 18
3 Preparation for PC-Fax TX (via USB connection) - Konica Minolta bizhub C654 | bizhub C654/C754 PC-Fax Operations User Guide - Page 19
3.1 Overview 3 3 Preparation for PC-Fax TX (via USB connection) 3.1 Overview Before using the PC-Fax TX function, you must install the fax driver software on your PC. This section explains how to prepare PC-Fax TX, using the installer supplied with this machine. bizhub C754/C654 3-2 - Konica Minolta bizhub C654 | bizhub C654/C754 PC-Fax Operations User Guide - Page 20
and screen fonts. Contains the printer driver (XPS) for Windows, printer driver for the Mac OS, screen fonts, and TWAIN driver. Contains application software that operates with this machine and manuals. Contains the User's Guide. Tips - In User's Guide manuals, location paths of folders or files - Konica Minolta bizhub C654 | bizhub C654/C754 PC-Fax Operations User Guide - Page 21
the fax driver on the PC by using the installer. 0 You need to have the administrator privileges to perform this task. 0 Use the "Driver CD-ROM Vol. 1". 1 Connect a USB cable to the USB port of this machine. % If a wizard screen appears to add new hardware, click [Cancel]. bizhub C754/C654 3-4 - Konica Minolta bizhub C654 | bizhub C654/C754 PC-Fax Operations User Guide - Page 22
starts, then go to Step 3. % If the installer does not start, open the printer driver folder on the CD-ROM, double-click [Set- up.exe], then go to Step 4. % If the [User Account Control] screen appears, click [Continue] or [Yes]. 3 Click [Printer Install]. 4 Read the license agreement, then - Konica Minolta bizhub C654 | bizhub C654/C754 PC-Fax Operations User Guide - Page 23
installation of the fax driver 3 7 Select the fax driver box, then click [Next]. 8 Check the components to be installed, then click [Install]. 9 Change the printer name or print a test page if necessary, then click [Finish]. The fax driver has been installed on the PC. bizhub C754/C654 3-6 - Konica Minolta bizhub C654 | bizhub C654/C754 PC-Fax Operations User Guide - Page 24
Changes the default print settings of this machine if necessary. For details, refer to page 3-9. Prints a test page to check the normal data transfer if necessary. d Reference Be sure to initialize the fax driver after you have installed it. For details, refer to page 3-8. bizhub C754/C654 3-7 - Konica Minolta bizhub C654 | bizhub C654/C754 PC-Fax Operations User Guide - Page 25
settings to the fax driver. 1 Open the [Properties] screen of the fax driver. % For details on Windows Vista/7/Server 2008/Server 2008 R2, [Auto] under [Obtain Settings...] is enabled by default % If you are using Windows XP/Server 2003, set the option manually using [Device Option]. Select - Konica Minolta bizhub C654 | bizhub C654/C754 PC-Fax Operations User Guide - Page 26
destination. We recommend that you change the default settings to suit your environment. 1 Open the [Printing Preferences] screen of the fax driver. % For details on how to d Reference The fax driver has the function to save favorite settings. For details, refer to page 4-11. bizhub C754/C654 3-9 - Konica Minolta bizhub C654 | bizhub C654/C754 PC-Fax Operations User Guide - Page 27
4 PC-Fax TX - Konica Minolta bizhub C654 | bizhub C654/C754 PC-Fax Operations User Guide - Page 28
. For details how to change the default print settings, refer to page 2-10. % The fax driver provides Favorite Setting to enable quick selection of frequently used print settings. For details, refer to page 4-11. 5 Click [Print]. The [FAX Transmission Popup] screen opens. bizhub C754/C654 4-2 - Konica Minolta bizhub C654 | bizhub C654/C754 PC-Fax Operations User Guide - Page 29
register up to 100 recipients. % To cancel a recipient, select it, then click [Delete From List]. 8 Click [OK]. The document data are faxed via the machine. bizhub C754/C654 4-3 - Konica Minolta bizhub C654 | bizhub C654/C754 PC-Fax Operations User Guide - Page 30
Transmission Popup] screen as follows: 1 Open document data using the application software. From the [File] menu, select [Print]. 2 Check that the fax driver of this machine is selected in [Printer Name] (or [Select Printer]). % The [Print] dialog box differs depending on the application. 3 Click - Konica Minolta bizhub C654 | bizhub C654/C754 PC-Fax Operations User Guide - Page 31
country, enter the country code before the fax number. Uncheck the ECM box to cancel the Error Correction Mode (ECM). The ECM is an error correction mode defined by the ITU-T (International Telecommunication Union - Telecommunication Standardization Sector). If fax machines support the ECM, they - Konica Minolta bizhub C654 | bizhub C654/C754 PC-Fax Operations User Guide - Page 32
Mode Setting Details...] [FAX Cover Sheet] Description Click this button to set the fax TX functions such as timer transmission and F-code PC-Fax recipient from the Phone Book being controlled on your PC. 0 The recipient registration is required in advance. For details on how to bizhub C754/C654 4-6 - Konica Minolta bizhub C654 | bizhub C654/C754 PC-Fax Operations User Guide - Page 33
be registered in the Address Book in advance. For details on how to register it, refer to [User's Guide: Fax Operations]. 1 From the [FAX Transmission Popup] screen, select [Add from Address Book...]. 2 4 Click [OK]. The screen returns to the [FAX Transmission Popup] screen. bizhub C754/C654 4-7 - Konica Minolta bizhub C654 | bizhub C654/C754 PC-Fax Operations User Guide - Page 34
for a recipient from LDAP Server. If you are using the LDAP server or the Active Directory of Windows Server, you can search for a recipient on the server. 0 The LDAP server must be registered meet any of search conditions. Enter characters to search, then click [Search Now]. bizhub C754/C654 4-8 - Konica Minolta bizhub C654 | bizhub C654/C754 PC-Fax Operations User Guide - Page 35
functions. From the [FAX Transmission Popup] screen, select [Fax Mode Setting Details...] and you can set up the Fax transmission functions. using the [FAX] tab of [Printing Preferences] screen. When you use the F-code TX function, select this box and enter the destination box number (using up to - Konica Minolta bizhub C654 | bizhub C654/C754 PC-Fax Operations User Guide - Page 36
F-code TX function, select this box and enter the password Windows Vista x64, Windows 7 x64, Windows Server 2008 x64, or Windows Server 2008 Revision 2, you cannot change the cover sheet from the [FAX Transmission Popup] screen. Use the [FAX] tab of the fax driver for the change. bizhub C754/C654 - Konica Minolta bizhub C654 | bizhub C654/C754 PC-Fax Operations User Guide - Page 37
if necessary. Select this check box to share the favorite settings with other users. Enter a comment to the favorite settings if necessary. The comment is call the favorite settings, these options are not set by default. However, you can define these options in the favorite settings if necessary. - Konica Minolta bizhub C654 | bizhub C654/C754 PC-Fax Operations User Guide - Page 38
4.3 Call the frequently used settings. 4 4 Click [OK]. The favorite print settings are registered. You can select the favorite settings from the [Favorite Setting] list when sending the fax. bizhub C754/C654 4-12 - Konica Minolta bizhub C654 | bizhub C654/C754 PC-Fax Operations User Guide - Page 39
Book, you can quickly call the recipient when sending a fax. Use the [FAX] tab of the fax driver to add recipients to a phone book. When you use the Phone Book for the first time, create a Entry...]. 2 Select [Personal List] from the list at left, then click [Add New...]. bizhub C754/C654 4-13 - Konica Minolta bizhub C654 | bizhub C654/C754 PC-Fax Operations User Guide - Page 40
code support the ECM, they check for fax data errors while communicating with each other. Image disturbances due to telephone line noise can be suppressed. This machine uses the ECM based communication by default. However, if the noise is high, the communication may take mode bizhub C754/C654 4-14 - Konica Minolta bizhub C654 | bizhub C654/C754 PC-Fax Operations User Guide - Page 41
operations are the same when you open the Phone Book to send a fax and when you open the Phone Book to add a recipient to it. bizhub C754/C654 4-15 - Konica Minolta bizhub C654 | bizhub C654/C754 PC-Fax Operations User Guide - Page 42
. Select the [Search Item] and [Condition]. Then, enter characters to search, then click [Add Condition]. Specify multiple search conditions if necessary, then click [Search Now]. bizhub C754/C654 4-16 - Konica Minolta bizhub C654 | bizhub C654/C754 PC-Fax Operations User Guide - Page 43
] to a group. However, you cannot delete the recipient from the group by dragging the name. - You can register up to 100 recipients to one group. bizhub C754/C654 4-17 - Konica Minolta bizhub C654 | bizhub C654/C754 PC-Fax Operations User Guide - Page 44
...] from the [Edit] menu. Rename the group in the displayed screen. Control the recipients using folders. You can control the recipients compositely by combining a folder and a group. Select [Personal List 40 characters. - You can create folders up to three hierarchy levels. bizhub C754/C654 4-18 - Konica Minolta bizhub C654 | bizhub C654/C754 PC-Fax Operations User Guide - Page 45
5 Sending options - Konica Minolta bizhub C654 | bizhub C654/C754 PC-Fax Operations User Guide - Page 46
the Fax cover sheet in the [FAX] tab of the fax driver in advance. 1 Open the [FAX Transmission Popup] screen, and select the [FAX Cover Sheet] check box. 2 Click [Settings...]. The [FAX Cover Sheet Settings] screen opens. 3 Select a size of cover sheet from the [Cover Size]. bizhub C754/C654 5-2 - Konica Minolta bizhub C654 | bizhub C654/C754 PC-Fax Operations User Guide - Page 47
When you send a comment to the destination, enter it using up to 640 characters. (A New Line code is considered to be two characters long.) 5 Open the [Recipient] tab, and select the [Standard] or line of [Recipient List] of the [FAX Transmission Popup] screen is reflected. bizhub C754/C654 5-3 - Konica Minolta bizhub C654 | bizhub C654/C754 PC-Fax Operations User Guide - Page 48
layout image. % When you click [Add...], the cover sheet image is saved and you can recall it later by selecting [Cover Sheet Settings]. 9 Click [OK]. bizhub C754/C654 5-4 - Konica Minolta bizhub C654 | bizhub C654/C754 PC-Fax Operations User Guide - Page 49
the Timer TX time, the fax is sent in the next day. How to Send 1 From the [FAX Transmission Popup] screen, select [Fax Mode Setting Details...]. The [Fax Mode Details] screen opens. 2 Select the [Timer Send] check box, and set the [Send Time]. % When you click [Reflect Current Time], the current - Konica Minolta bizhub C654 | bizhub C654/C754 PC-Fax Operations User Guide - Page 50
[Fax Mode Setting Details...]. The [Fax Mode Details] screen opens. 2 Specify the recipient's Confidential User Box. % [SUB Address]: Enter the Confidential User Box number of the recipient. % [Sender ID]: Enter the password for the recipient's Confidential User Box. 3 Click [OK]. bizhub C754/C654 - Konica Minolta bizhub C654 | bizhub C654/C754 PC-Fax Operations User Guide - Page 51
, select [Fax Mode Setting Details...]. The [Fax Mode Details] screen opens. 2 Specify the recipient's Confidential User Box. % [SUB Address]: Enter the Relay User Box number of the recipient. % [Sender ID]: Enter the password for the recipient's Relay User Box. 3 Click [OK]. bizhub C754/C654 5-7 - Konica Minolta bizhub C654 | bizhub C654/C754 PC-Fax Operations User Guide - Page 52
user authentication and account track have already been employed, each user needs to send his/her authentication information (the user name and password the fax driver. Operations required to use this function Open the [Configure] tab of the fax driver, and ensure that the user authentication or - Konica Minolta bizhub C654 | bizhub C654/C754 PC-Fax Operations User Guide - Page 53
User], then enter the user name and password. % If access to this machine by public users (unregistered users) is allowed, you can select [Public User] and send a fax without entering the user name and password user name and password, password. % If you always use the same account name and password - Konica Minolta bizhub C654 | bizhub C654/C754 PC-Fax Operations User Guide - Page 54
the PC can communicate with this machine, you can click [Verify] to check the entered authentication information. Also, you can check the authentication information for errors before printing it. 5 Send a fax. If the authentication information is correct, the fax is sent - Konica Minolta bizhub C654 | bizhub C654/C754 PC-Fax Operations User Guide - Page 55
6 Fax Driver Settings - Konica Minolta bizhub C654 | bizhub C654/C754 PC-Fax Operations User Guide - Page 56
[Control Panel] - [Hardware and Sound], and click [View devices and printers]. % In Windows Vista/Server 2008, click the Start menu, and select [Control Panel] - [Hardware and Sound] - [Printer]. When [Control Panel] is displayed in Classic View, double-click [Printers]. bizhub C754/C654 6-2 - Konica Minolta bizhub C654 | bizhub C654/C754 PC-Fax Operations User Guide - Page 57
The [Properties] screen of the fax driver 6 % In Windows XP/Server 2003, click the Start menu, then select [Printers and Faxes]. If [Printers and Faxes] is not displayed, select [Control Panel] - [Printers and Other Hardware] [Printers and Faxes]. When [Control Panel] is displayed in Classic View - Konica Minolta bizhub C654 | bizhub C654/C754 PC-Fax Operations User Guide - Page 58
appears. Tabs provided by Windows The [General], [Sharing], [Port], [Advanced], [color management], and [Security] tabs are provided by Windows. You can print a test page, configure printer sharing, configure printer ports, etc. For details, refer to the Windows manuals. bizhub C754/C654 6-4 - Konica Minolta bizhub C654 | bizhub C654/C754 PC-Fax Operations User Guide - Page 59
encryption passphrase when necessary. To change the encryption passphrase, change the settings of this machine, then enter the preset encryption passphrase for the fax driver. For details on how to change the encryption passphrase, refer to [User's Guide: Print Operations]. bizhub C754/C654 6-5 - Konica Minolta bizhub C654 | bizhub C654/C754 PC-Fax Operations User Guide - Page 60
from a Windows XP/Server 2003 PC via USB connection, [Obtain Device Information] cannot be used. Related setting (for the administrator) - You can use a password to restrict the ability to obtain device information from the printer driver (de- fault: [No]). For details, refer to [User's Guide: Print - Konica Minolta bizhub C654 | bizhub C654/C754 PC-Fax Operations User Guide - Page 61
, then click [Print Server Properties]. - If the Windows Vista or Windows Server 2008 is running, place the cursor pointer in an empty area of the [Printers] screen, then click the mouse right button. From the shortcut menu, select [Run as administrator] - [Server Properties]. bizhub C754/C654 6-7 - Konica Minolta bizhub C654 | bizhub C654/C754 PC-Fax Operations User Guide - Page 62
Windows XP or Windows Server 2003 is running, click the [File] menu and select [Server Properties]. - You can set the following types of papers in the Server Properties of the fax driver. Custom sizes available in fax driver Banner sizes available in fax driver: Width: 8-1/4 to driver. However, the paper - Konica Minolta bizhub C654 | bizhub C654/C754 PC-Fax Operations User Guide - Page 63
in the fax driver. 6 6.4 Register an LDAP server in the fax driver. If you are using the LDAP server or the Active Directory of Windows Server, you can register a server on the fax driver and you can search LDAP Server List]. Use names that can easily identify the servers. bizhub C754/C654 6-9 - Konica Minolta bizhub C654 | bizhub C654/C754 PC-Fax Operations User Guide - Page 64
6.4 Register an LDAP server in the fax driver. 6 Settings [Connection] tab [Authentication Type] [Port number of the LDAP server if necessary. Usually, you can use the default settings. Select the [Use SSL] check box to use the SSL LDAP server, refer to page 4-8. bizhub C754/C654 6-10 - Konica Minolta bizhub C654 | bizhub C654/C754 PC-Fax Operations User Guide - Page 65
[Control Panel] - [Hardware and Sound], then click [View devices and printers]. % In Windows Vista/Server 2008, click the Start menu, and select [Control Panel] - [Hardware and Sound] - [Printer]. When [Control Panel] is displayed in Classic View, double-click [Printers]. bizhub C754/C654 6-11 - Konica Minolta bizhub C654 | bizhub C654/C754 PC-Fax Operations User Guide - Page 66
[Printing Preferences] screen of the fax driver 6 % In Windows XP/Server 2003, click the Start menu, then select [Printers and Faxes]. If [Printers and Faxes] is not displayed, select [Control Panel] - [Printers and Other Hardware] [Printers and Faxes]. When [Control Panel] is displayed in Classic - Konica Minolta bizhub C654 | bizhub C654/C754 PC-Fax Operations User Guide - Page 67
[Printing Preferences] screen of the fax driver 6 The [Printing Preferences] screen is opened. Tips - The print settings changed here are registered as default values. To temporarily change settings when a help of each item of the screen. Initializes the current settings. bizhub C754/C654 6-13 - Konica Minolta bizhub C654 | bizhub C654/C754 PC-Fax Operations User Guide - Page 68
fax. If the resolution is high, a large amount of information is scanned and the communication time increases. Select this check box to send a the [Fax Mode Setting Details...] of [FAX Transmission Popup] screen. When you use the F-code TX function, enter the password for the bizhub C754/C654 6-14 - Konica Minolta bizhub C654 | bizhub C654/C754 PC-Fax Operations User Guide - Page 69
user driver differs from that specified in the application software, correct the setting. When scanning Manual]: The image is enlarged or reduced by the specified ratio (25 to 400%). When user authentication or account track is employed, enter the user name or account name and the password [Default - Konica Minolta bizhub C654 | bizhub C654/C754 PC-Fax Operations User Guide - Page 70
box if you want to create overlap margins. Select this check box to exclude blank pages in the original from the pages to be send. bizhub C754/C654 6-16 - Konica Minolta bizhub C654 | bizhub C654/C754 PC-Fax Operations User Guide - Page 71
stamp) on the original. Also, select a watermark for composition from the list. Click [Edit...] and you can enter and edit a watermark. For details, refer to [User's Guide: Print Operations]. bizhub C754/C654 6-17 - Konica Minolta bizhub C654 | bizhub C654/C754 PC-Fax Operations User Guide - Page 72
it is sent by fax. Settings [Font Settings] Description Specify how to process texts. Select the type (bitmap or outline) of the fonts to be downloaded from the computer to this machine. Also specify whether to replace the TrueType fonts by printer fonts when sending by fax - Konica Minolta bizhub C654 | bizhub C654/C754 PC-Fax Operations User Guide - Page 73
6.11 Available Operations with the [About] tab 6 6.11 Available Operations with the [About] tab Open the [About] tab, and you can check the fax driver version. bizhub C754/C654 6-19 - Konica Minolta bizhub C654 | bizhub C654/C754 PC-Fax Operations User Guide - Page 74
7 Delete the fax driver. - Konica Minolta bizhub C654 | bizhub C654/C754 PC-Fax Operations User Guide - Page 75
click [Uninstall]. % Follow the subsequent on-screen instructions. 6 If a restart prompt appears, click [OK] to restart the PC. Now, the fax driver has been deleted. d Reference For details on how to delete the fax driver manually, refer to [User's Guide: Print Operations]. bizhub C754/C654 7-2 - Konica Minolta bizhub C654 | bizhub C654/C754 PC-Fax Operations User Guide - Page 76
http://konicaminolta.com A2X0-9603PF-00 2011 Copyright 2011.10
-
 1
1 -
 2
2 -
 3
3 -
 4
4 -
 5
5 -
 6
6 -
 7
7 -
8
-
9
-
10
-
11
-
12
-
13
-
14
-
15
-
16
-
17
-
18
-
19
-
20
-
21
-
22
-
23
-
24
-
25
-
26
-
27
-
28
-
29
-
30
-
31
-
32
-
33
-
34
-
35
-
36
-
37
-
38
-
39
-
40
-
41
-
42
-
43
-
44
-
45
-
46
-
47
-
48
-
49
-
50
-
51
-
52
-
53
-
54
-
55
-
56
-
57
-
58
-
59
-
60
-
61
-
62
-
63
-
64
-
65
-
66
-
67
-
68
-
69
-
70
-
71
-
72
-
73
-
74
-
75
-
76
 |
 |

User’s Guide
PC-FAX Operations