Konica Minolta bizhub C654 bizhub C654/C754 PC-Fax Operations User Guide - Page 20
Quick installation of the fax driver, Installation flow, Prepare the fax driver CD-ROM disk. - driver mac
 |
View all Konica Minolta bizhub C654 manuals
Add to My Manuals
Save this manual to your list of manuals |
Page 20 highlights
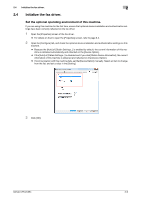
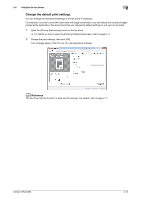
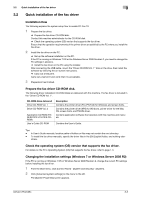
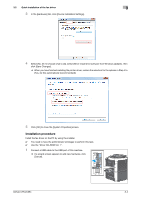
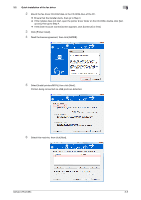
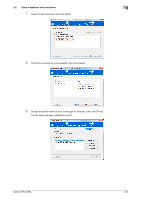
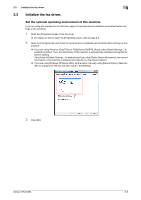
3.2 Quick installation of the fax driver 3 3.2 Quick installation of the fax driver Installation flow The following explains the system setup flow to enable PC-Fax TX. 1 Prepare the fax driver. % Prepare the fax driver CD-ROM disk. Contact this machine administrator for the CD-ROM disk. % Check the operating system (OS) version that supports the fax driver. Ensure that the operation requirements of the printer driver are satisfied by the PC where you install the fax driver. 2 Install the fax driver on the PC. % Set up the software installation on the PC. If the PC is running on Windows 7 OS or the Windows Server 2008 Revision 2, you need to change the PC settings in advance. % Install the fax driver on the PC using the installer. After connecting the USB cable, mount the "Driver CD-ROM Vol. 1" disk on the drive, then install the software by following the on-screen instructions. % Carry out a test print. Carry out a test print and verify that it is acceptable. 3 Preparation has finished. Prepare the fax driver CD-ROM disk. The following driver installation CD-ROM disks are delivered with this machine. The fax driver is included in the "Driver CD-ROM Vol. 1". CD-ROM disks delivered Driver CD-ROM Vol. 1 Driver CD-ROM Vol. 2 Application CD-ROM (PAGESCOPE UTILITIES CDROM) User's Guide CD-ROM Description Contains the printer driver (PCL/PS/FAX) for Windows and screen fonts. Contains the printer driver (XPS) for Windows, printer driver for the Mac OS, screen fonts, and TWAIN driver. Contains application software that operates with this machine and manuals. Contains the User's Guide. Tips - In User's Guide manuals, location paths of folders or files may not contain the root directory. - To install the fax driver manually, specify the driver files in the EN (English) folder, and nothing else- where. Check the operating system (OS) version that supports the fax driver. For details on the PC's Operating System (OS) that supports the fax driver, refer to page 1-3. Changing the installation settings (Windows 7 or Windows Server 2008 R2) If the PC is running on Windows 7 OS or Windows Server 2008 Revision 2, change the current PC settings before installing the fax driver. 1 From the Start menu, click [Control Panel] - [System and Security] - [System]. 2 Click [Advanced system settings] on the menu to the left. The [System Properties] screen appears. bizhub C754/C654 3-3
-
 1
1 -
2
-
3
-
4
-
5
-
6
-
7
-
8
-
9
-
10
-
11
-
12
-
13
-
14
-
 15
15 -
 16
16 -
 17
17 -
 18
18 -
 19
19 -
 20
20 -
 21
21 -
 22
22 -
 23
23 -
 24
24 -
 25
25 -
26
-
27
-
28
-
29
-
30
-
31
-
32
-
33
-
34
-
35
-
36
-
37
-
38
-
39
-
40
-
41
-
42
-
43
-
44
-
45
-
46
-
47
-
48
-
49
-
50
-
51
-
52
-
53
-
54
-
55
-
56
-
57
-
58
-
59
-
60
-
61
-
62
-
63
-
64
-
65
-
66
-
67
-
68
-
69
-
70
-
71
-
72
-
73
-
74
-
75
-
76
 |
 |
