Konica Minolta bizhub C654 bizhub C654/C754 Print Operations User Guide - Page 121
Installation using an LPR/Port 9100 connection
 |
View all Konica Minolta bizhub C654 manuals
Add to My Manuals
Save this manual to your list of manuals |
Page 121 highlights
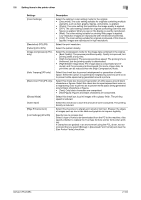
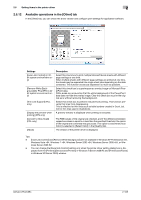
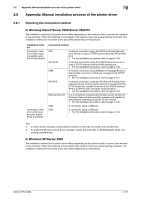
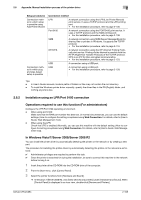
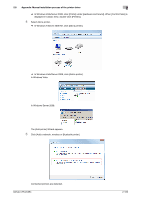
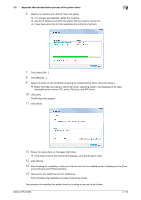
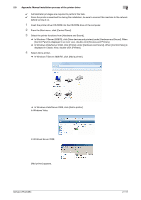
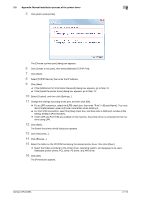
2.8 Appendix: Manual installation process of the printer driver 2 Setup procedures Connection method in which setup is possible using Add Printer Wizard Connection method in which plug and play-based setup is possible Connection method LPR A network connection using the LPR (Line Printer Remote) print service. It uses a TCP/IP protocol and the LPR printing port. • For the installation procedure, refer to page 2-108. Port 9100 A network connection using the PORT9100 print service. It uses a TCP/IP protocol and the RAW printing port. • For the installation procedure, refer to page 2-108. SMB A network connection using SMB (Server Message Block) for sharing files or printers in Windows. It supports the TCP/IP protocol. • For the installation procedure, refer to page 2-116. IPP/IPPS A network connection using the IPP (Internet Printing Protocol) print service. Printing via the Internet is possible with the HTTP (HyperText Transfer Protocol) of the TCP/IP protocol. IPPS is an IPP for SSL encrypted communication. • For the installation procedure, refer to page 2-123. USB A connection using a USB port. USB A connection using a USB port. • For the installation procedure, refer to page 2-129. Tips - In User's Guide manuals, location paths of folders or files may not contain the root directory. - To install the Windows printer driver manually, specify the driver files in the EN (English) folder, and nothing anywhere else. 2.8.2 Installation using an LPR/Port 9100 connection Operations required to use this function (For administrators) Configure the LPR/Port 9100 operating environment. - When using port 9100: Make sure that the RAW port number has been set. (In normal circumstances, you can use the default settings.) How to configure the setting is explained using Web Connection. For details, refer to [User's Guide: Web Management Tool]. - When using the LPR: Check that LPD is enabled. (Normally, you can use this machine with the default setting.) How to configure the setting is explained using Web Connection. For details, refer to [User's Guide: Web Management Tool]. In Windows Vista/7/Server 2008/Server 2008 R2 You can install the printer driver by automatically detecting the printer on the network or by creating a new port. The procedure for installing the printer driver by automatically detecting the printer on the network is as follows: 0 Administrator privileges are required to perform this task. 0 Since the printer is searched for during the installation, be sure to connect this machine to the network before turning it on. 1 Insert the printer driver CD-ROM into the CD-ROM drive of the computer. 2 From the Start menu, click [Control Panel]. 3 Select the printer functions from [Hardware and Sound]. % In Windows 7/Server 2008 R2, click [View devices and printers] under [Hardware and Sound]. When [Control Panel] is displayed in an icon view, double-click [Devices and Printers]. bizhub C754/C654 2-108
-
 1
1 -
2
-
3
-
4
-
5
-
6
-
7
-
8
-
9
-
10
-
11
-
12
-
13
-
14
-
15
-
16
-
17
-
18
-
19
-
20
-
21
-
22
-
23
-
24
-
25
-
26
-
27
-
28
-
29
-
30
-
31
-
32
-
33
-
34
-
35
-
36
-
37
-
38
-
39
-
40
-
41
-
42
-
43
-
44
-
45
-
46
-
47
-
48
-
49
-
50
-
51
-
52
-
53
-
54
-
55
-
56
-
57
-
58
-
59
-
60
-
61
-
62
-
63
-
64
-
65
-
66
-
67
-
68
-
69
-
70
-
71
-
72
-
73
-
74
-
75
-
76
-
77
-
78
-
79
-
80
-
81
-
82
-
83
-
84
-
85
-
86
-
87
-
88
-
89
-
90
-
91
-
92
-
93
-
94
-
95
-
96
-
97
-
98
-
99
-
100
-
101
-
102
-
103
-
104
-
105
-
106
-
107
-
108
-
109
-
110
-
111
-
112
-
113
-
114
-
115
-
 116
116 -
 117
117 -
 118
118 -
 119
119 -
 120
120 -
 121
121 -
 122
122 -
 123
123 -
 124
124 -
 125
125 -
 126
126 -
127
-
128
-
129
-
130
-
131
-
132
-
133
-
134
-
135
-
136
-
137
-
138
-
139
-
140
-
141
-
142
-
143
-
144
-
145
-
146
-
147
-
148
-
149
-
150
-
151
-
152
-
153
-
154
-
155
-
156
-
157
-
158
-
159
-
160
-
161
-
162
-
163
-
164
-
165
-
166
-
167
-
168
-
169
-
170
-
171
-
172
-
173
-
174
-
175
-
176
-
177
-
178
-
179
-
180
-
181
-
182
-
183
-
184
-
185
-
186
-
187
-
188
-
189
-
190
-
191
-
192
-
193
-
194
-
195
-
196
-
197
-
198
-
199
-
200
-
201
-
202
-
203
-
204
-
205
-
206
-
207
-
208
-
209
-
210
-
211
-
212
-
213
-
214
-
215
-
216
-
217
-
218
-
219
-
220
-
221
-
222
-
223
-
224
-
225
-
226
-
227
-
228
-
229
-
230
-
231
-
232
-
233
-
234
-
235
-
236
-
237
-
238
-
239
-
240
-
241
-
242
-
243
-
244
-
245
-
246
-
247
-
248
-
249
-
250
-
251
-
252
-
253
-
254
-
255
-
256
-
257
-
258
-
259
-
260
-
261
-
262
-
263
-
264
-
265
-
266
-
267
-
268
-
269
 |
 |
