Konica Minolta bizhub C654 bizhub C654/C754 Print Operations User Guide - Page 19
Preparation for Printing Network Connection, As a printing method, you can select [Normal Printing]
 |
View all Konica Minolta bizhub C654 manuals
Add to My Manuals
Save this manual to your list of manuals |
Page 19 highlights
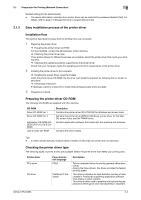
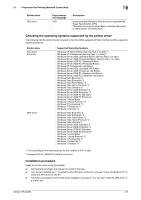
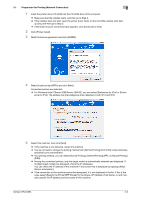
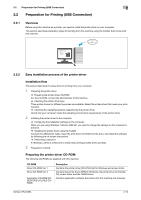
2.1 Preparation for Printing (Network Connection) 2 1 Insert the printer driver CD-ROM into the CD-ROM drive of the computer. % Make sure that the installer starts, and then go to Step 2. % If the installer does not start, open the printer driver folder on the CD-ROM, double-click [Set- up.exe], and then go to Step 3. % If the [User Account Control] window appears, click [Continue] or [Yes]. 2 Click [Printer Install]. 3 Read the license agreement and click [AGREE]. 4 Select [Install printers/MFPs] and click [Next]. Connected printers are detected. % For Windows Vista/7/Server 2008/Server 2008 R2, you can select [Preference for IPv4] or [Prefer- ence for IPv6]. The address has the preference when detected in both IPv4 and IPv6. 5 Select this machine, then click [Next]. % If this machine is not detected, restart this machine. % You do not need to change the printing method from [Normal Printing] (Port 9100) unless otherwise specified by the administrator. % As a printing method, you can select [Normal Printing], [Internet Printing] (IPP), or [Secure Printing] (IPPS). % Among the connected printers, only the target model is automatically detected and displayed. If multiple target models are displayed, check the IP addresses. You can check the IP address of this machine in the screen that is displayed by tapping [Utility] [Device Information]. % If the connection to this machine cannot be recognized, it is not displayed in the list. If this is the case, select [Specify the Printer/MFP Except for the Above. (IP Address, Host Name...)], and manually specify the IP address and host name of this machine. bizhub C754/C654 2-6
-
 1
1 -
2
-
3
-
4
-
5
-
6
-
7
-
8
-
9
-
10
-
11
-
12
-
13
-
 14
14 -
 15
15 -
 16
16 -
 17
17 -
 18
18 -
 19
19 -
 20
20 -
 21
21 -
 22
22 -
 23
23 -
 24
24 -
25
-
26
-
27
-
28
-
29
-
30
-
31
-
32
-
33
-
34
-
35
-
36
-
37
-
38
-
39
-
40
-
41
-
42
-
43
-
44
-
45
-
46
-
47
-
48
-
49
-
50
-
51
-
52
-
53
-
54
-
55
-
56
-
57
-
58
-
59
-
60
-
61
-
62
-
63
-
64
-
65
-
66
-
67
-
68
-
69
-
70
-
71
-
72
-
73
-
74
-
75
-
76
-
77
-
78
-
79
-
80
-
81
-
82
-
83
-
84
-
85
-
86
-
87
-
88
-
89
-
90
-
91
-
92
-
93
-
94
-
95
-
96
-
97
-
98
-
99
-
100
-
101
-
102
-
103
-
104
-
105
-
106
-
107
-
108
-
109
-
110
-
111
-
112
-
113
-
114
-
115
-
116
-
117
-
118
-
119
-
120
-
121
-
122
-
123
-
124
-
125
-
126
-
127
-
128
-
129
-
130
-
131
-
132
-
133
-
134
-
135
-
136
-
137
-
138
-
139
-
140
-
141
-
142
-
143
-
144
-
145
-
146
-
147
-
148
-
149
-
150
-
151
-
152
-
153
-
154
-
155
-
156
-
157
-
158
-
159
-
160
-
161
-
162
-
163
-
164
-
165
-
166
-
167
-
168
-
169
-
170
-
171
-
172
-
173
-
174
-
175
-
176
-
177
-
178
-
179
-
180
-
181
-
182
-
183
-
184
-
185
-
186
-
187
-
188
-
189
-
190
-
191
-
192
-
193
-
194
-
195
-
196
-
197
-
198
-
199
-
200
-
201
-
202
-
203
-
204
-
205
-
206
-
207
-
208
-
209
-
210
-
211
-
212
-
213
-
214
-
215
-
216
-
217
-
218
-
219
-
220
-
221
-
222
-
223
-
224
-
225
-
226
-
227
-
228
-
229
-
230
-
231
-
232
-
233
-
234
-
235
-
236
-
237
-
238
-
239
-
240
-
241
-
242
-
243
-
244
-
245
-
246
-
247
-
248
-
249
-
250
-
251
-
252
-
253
-
254
-
255
-
256
-
257
-
258
-
259
-
260
-
261
-
262
-
263
-
264
-
265
-
266
-
267
-
268
-
269
 |
 |
