Lexmark MC2325 Users Guide PDF - Page 22
Setting up Scan Center, Setting up Card Copy, Running a slide show from a flash drive
 |
View all Lexmark MC2325 manuals
Add to My Manuals
Save this manual to your list of manuals |
Page 22 highlights
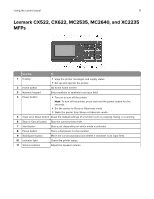
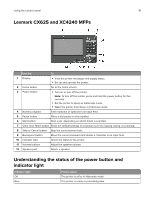
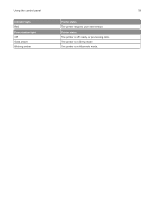
Setting up and using the home screen applications 22 Running a slide show from a flash drive 1 Insert a flash drive into the USB port. 2 From the home screen, touch Slideshow. Images appear in alphabetical order. Note: You can remove the flash drive after the slide show starts, but the images are not stored in the printer. If the slide show stops, then insert the flash drive again to view the images. Setting up Scan Center 1 From the home screen, touch Scan Center. 2 Select and create a destination, and then configure the settings. Notes: • When creating a network destination, make sure to validate and adjust the settings until no errors occur. • Only destinations created from the Embedded Web Server are saved. For more information, see the documentation that came with the solution. 3 Apply the changes. Setting up Card Copy 1 Open a web browser, and then type the printer IP address in the address field. Notes: • View the printer IP address on the printer home screen. The IP address appears as four sets of numbers separated by periods, such as 123.123.123.123. • If you are using a proxy server, then temporarily disable it to load the web page correctly. 2 Click Apps > Card Copy > Configure. Notes: • Make sure that Display Icon is enabled. • Make sure that E‑mail Settings and Network Share Settings are configured. • When scanning a card, make sure that the scan resolution does not exceed 200 dpi for color and 400 dpi for black and white. • When scanning multiple cards, make sure that the scan resolution does not exceed 150 dpi for color and 300 dpi for black and white. 3 Apply the changes. Note: You need a printer hard disk to scan multiple cards.
-
 1
1 -
2
-
3
-
4
-
5
-
6
-
7
-
8
-
9
-
10
-
11
-
12
-
13
-
14
-
15
-
16
-
 17
17 -
 18
18 -
 19
19 -
 20
20 -
 21
21 -
 22
22 -
 23
23 -
 24
24 -
 25
25 -
 26
26 -
 27
27 -
28
-
29
-
30
-
31
-
32
-
33
-
34
-
35
-
36
-
37
-
38
-
39
-
40
-
41
-
42
-
43
-
44
-
45
-
46
-
47
-
48
-
49
-
50
-
51
-
52
-
53
-
54
-
55
-
56
-
57
-
58
-
59
-
60
-
61
-
62
-
63
-
64
-
65
-
66
-
67
-
68
-
69
-
70
-
71
-
72
-
73
-
74
-
75
-
76
-
77
-
78
-
79
-
80
-
81
-
82
-
83
-
84
-
85
-
86
-
87
-
88
-
89
-
90
-
91
-
92
-
93
-
94
-
95
-
96
-
97
-
98
-
99
-
100
-
101
-
102
-
103
-
104
-
105
-
106
-
107
-
108
-
109
-
110
-
111
-
112
-
113
-
114
-
115
-
116
-
117
-
118
-
119
-
120
-
121
-
122
-
123
-
124
-
125
-
126
-
127
-
128
-
129
-
130
-
131
-
132
-
133
-
134
-
135
-
136
-
137
-
138
-
139
-
140
-
141
-
142
-
143
-
144
-
145
-
146
-
147
-
148
-
149
-
150
-
151
-
152
-
153
-
154
-
155
-
156
-
157
-
158
-
159
-
160
-
161
-
162
-
163
-
164
-
165
-
166
-
167
-
168
-
169
-
170
-
171
-
172
-
173
-
174
-
175
-
176
-
177
-
178
-
179
-
180
-
181
-
182
-
183
-
184
-
185
-
186
-
187
-
188
-
189
-
190
-
191
-
192
-
193
-
194
-
195
-
196
-
197
-
198
-
199
-
200
-
201
-
202
-
203
-
204
-
205
-
206
-
207
-
208
-
209
-
210
-
211
-
212
-
213
-
214
-
215
-
216
-
217
-
218
-
219
-
220
-
221
-
222
-
223
-
224
-
225
-
226
-
227
-
228
-
229
-
230
-
231
-
232
-
233
-
234
-
235
-
236
-
237
-
238
-
239
-
240
-
241
-
242
-
243
-
244
-
245
-
246
-
247
-
248
-
249
-
250
-
251
-
252
-
253
-
254
-
255
-
256
-
257
-
258
-
259
-
260
-
261
-
262
-
263
-
264
-
265
-
266
-
267
-
268
-
269
-
270
 |
 |