Lexmark X5150 X5150 All-In-One Series User's Guide - Page 9
Select a copy quality: Quick, Normal, Better, or Best., Number of Copies - will not turn on
 |
UPC - 734646570039
View all Lexmark X5150 manuals
Add to My Manuals
Save this manual to your list of manuals |
Page 9 highlights
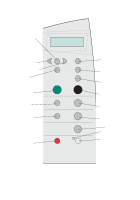
Press: Black Copy Color Copy Copy Quality E-mail, File, Software Left arrow When you want to: Make a black and white copy using the current copy settings. For help, see page 20. Make a color copy of a color image using the current copy settings. For help, see page 20. Select a copy quality: Quick, Normal, Better, or Best. Select a new scan destination. For help, see page 22. Note: Use this button when the All-In-One is attached to a computer. Decrease a menu number or scroll backward through a list of options on the display. Right arrow Increase a menu number or scroll forward through a list of options on the display. Number of Copies Options Photo Copy Photo Options Power Reduce/Enlarge Select Start Fax Start Scan Stop/Clear Specify the number (1-99) of copies to make. Scroll through the menu headings. For help, see page 6. Begin a photo copy job using current Photo Options settings (the highest quality scan and print resolutions). Select the quantity and size of photograph reprints. Turn your All-In-One on or off. Note: If your All-In-One is on, you can turn it off, and then enter the state of lowest power. To do this, hold the Power button for at least 5 seconds. Reduce or enlarge your original document by percentage, to Fit to Page, or to poster size. Choose the option currently shown on the display. Scan and send a document to the fax software. Note: The All-In-One must be attached to a computer with a modem. Scan an image using the current scan settings, and then send it to a program. Note: The All-In-One must be attached to a computer. • Cancel a scan, print, or copy job in progress. • Exit a menu and return to the default settings. 5
-
 1
1 -
2
-
3
-
 4
4 -
 5
5 -
 6
6 -
 7
7 -
 8
8 -
 9
9 -
 10
10 -
 11
11 -
 12
12 -
 13
13 -
 14
14 -
15
-
16
-
17
-
18
-
19
-
20
-
21
-
22
-
23
-
24
-
25
-
26
-
27
-
28
-
29
-
30
-
31
-
32
-
33
-
34
-
35
-
36
-
37
-
38
-
39
-
40
-
41
-
42
-
43
-
44
-
45
-
46
-
47
-
48
-
49
-
50
-
51
-
52
-
53
-
54
-
55
-
56
-
57
-
58
-
59
-
60
-
61
-
62
-
63
-
64
-
65
-
66
-
67
-
68
-
69
-
70
-
71
-
72
-
73
-
74
-
75
-
76
-
77
 |
 |