Lexmark X7500 Service Manual - Page 124
Mount the DADF platen glass., Move the full rate carriage to check for smooth motion.
 |
UPC - 734646391306
View all Lexmark X7500 manuals
Add to My Manuals
Save this manual to your list of manuals |
Page 124 highlights
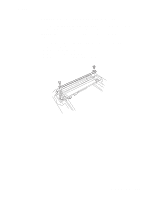
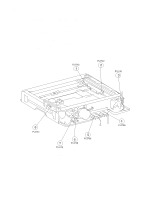
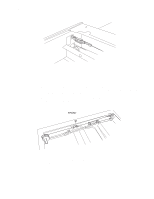
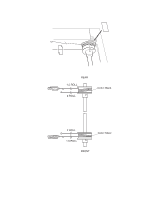
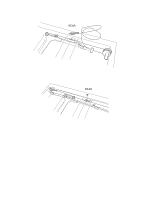
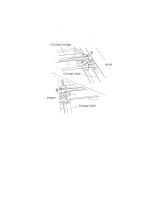
4036-501 18. Engage the cable assembly-scan, rear to the pulley-idler. 19. Engage the pulley on the right side of the half rate carriage. 20. Engage the spring-exit and auxiliary part of the cable assembly-scan, rear to the hook on the frame. 21. Secure the cable assembly-scan, rear to the full rate carriage. 22. Peel off the gum tape used. 23. Adjust the position and parallelism of the full rate carriage and half rate carriage. 24. Move the full rate carriage to check for smooth motion. 25. Mount the DADF platen glass. 26. Mount the cover assembly. 27. Mount the flatbed center platen glass plate. 28. Mount the user interface. 29. Mount the DADF assembly. 4-70 Service Manual
-
 1
1 -
2
-
3
-
4
-
5
-
6
-
7
-
8
-
9
-
10
-
11
-
12
-
13
-
14
-
15
-
16
-
17
-
18
-
19
-
20
-
21
-
22
-
23
-
24
-
25
-
26
-
27
-
28
-
29
-
30
-
31
-
32
-
33
-
34
-
35
-
36
-
37
-
38
-
39
-
40
-
41
-
42
-
43
-
44
-
45
-
46
-
47
-
48
-
49
-
50
-
51
-
52
-
53
-
54
-
55
-
56
-
57
-
58
-
59
-
60
-
61
-
62
-
63
-
64
-
65
-
66
-
67
-
68
-
69
-
70
-
71
-
72
-
73
-
74
-
75
-
76
-
77
-
78
-
79
-
80
-
81
-
82
-
83
-
84
-
85
-
86
-
87
-
88
-
89
-
90
-
91
-
92
-
93
-
94
-
95
-
96
-
97
-
98
-
99
-
100
-
101
-
102
-
103
-
104
-
105
-
106
-
107
-
108
-
109
-
110
-
111
-
112
-
113
-
114
-
115
-
116
-
117
-
118
-
 119
119 -
 120
120 -
 121
121 -
 122
122 -
 123
123 -
 124
124 -
 125
125 -
 126
126 -
 127
127 -
 128
128 -
 129
129 -
130
-
131
-
132
-
133
-
134
-
135
-
136
-
137
-
138
-
139
-
140
-
141
-
142
-
143
-
144
-
145
-
146
-
147
-
148
-
149
-
150
-
151
-
152
-
153
-
154
-
155
-
156
-
157
-
158
-
159
-
160
-
161
-
162
-
163
-
164
-
165
-
166
-
167
-
168
-
169
-
170
-
171
-
172
-
173
-
174
-
175
-
176
-
177
-
178
-
179
-
180
-
181
-
182
-
183
-
184
-
185
-
186
-
187
-
188
-
189
-
190
-
191
-
192
-
193
-
194
-
195
-
196
 |
 |

4-70
Service Manual
4036-501
18.
Engage the cable assembly-scan, rear to the pulley-idler.
19.
Engage the pulley on the right side of the half rate carriage.
20.
Engage the spring-exit and auxiliary part of the cable assembly-scan, rear to the
hook on the frame.
21.
Secure the cable assembly-scan, rear to the full rate carriage.
22.
Peel off the gum tape used.
23.
Adjust the position and parallelism of the full rate carriage and half rate carriage.
24.
Move the full rate carriage to check for smooth motion.
25.
Mount the DADF platen glass.
26.
Mount the cover assembly.
27.
Mount the flatbed center platen glass plate.
28.
Mount the user interface.
29.
Mount the DADF assembly.