Lexmark X7500 Service Manual - Page 81
Remove the E-ring., drive motor assembly.
 |
UPC - 734646391306
View all Lexmark X7500 manuals
Add to My Manuals
Save this manual to your list of manuals |
Page 81 highlights
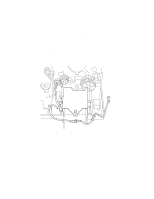
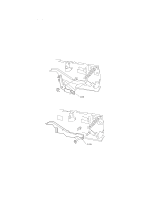
4036-501 7. Disconnect the sensor connector (P/J25). 8. Disconnect the motor connector (P/J27). 9. Disconnect the clutch connector (P/J18). 10. Release all harnesses from the clamps on the DADF registration roll drive motor assembly. 11. Remove three (3) screws from the DADF assembly to the DADF registration roll drive motor assembly. 12. Remove the DADF registration roll drive motor assembly. 13. Remove the E-ring. 14. Remove the (DADF #2) gear. 15. Remove the (DADF #1) gear. DADF Repair Procedures 4-27
-
 1
1 -
2
-
3
-
4
-
5
-
6
-
7
-
8
-
9
-
10
-
11
-
12
-
13
-
14
-
15
-
16
-
17
-
18
-
19
-
20
-
21
-
22
-
23
-
24
-
25
-
26
-
27
-
28
-
29
-
30
-
31
-
32
-
33
-
34
-
35
-
36
-
37
-
38
-
39
-
40
-
41
-
42
-
43
-
44
-
45
-
46
-
47
-
48
-
49
-
50
-
51
-
52
-
53
-
54
-
55
-
56
-
57
-
58
-
59
-
60
-
61
-
62
-
63
-
64
-
65
-
66
-
67
-
68
-
69
-
70
-
71
-
72
-
73
-
74
-
75
-
 76
76 -
 77
77 -
 78
78 -
 79
79 -
 80
80 -
 81
81 -
 82
82 -
 83
83 -
 84
84 -
 85
85 -
 86
86 -
87
-
88
-
89
-
90
-
91
-
92
-
93
-
94
-
95
-
96
-
97
-
98
-
99
-
100
-
101
-
102
-
103
-
104
-
105
-
106
-
107
-
108
-
109
-
110
-
111
-
112
-
113
-
114
-
115
-
116
-
117
-
118
-
119
-
120
-
121
-
122
-
123
-
124
-
125
-
126
-
127
-
128
-
129
-
130
-
131
-
132
-
133
-
134
-
135
-
136
-
137
-
138
-
139
-
140
-
141
-
142
-
143
-
144
-
145
-
146
-
147
-
148
-
149
-
150
-
151
-
152
-
153
-
154
-
155
-
156
-
157
-
158
-
159
-
160
-
161
-
162
-
163
-
164
-
165
-
166
-
167
-
168
-
169
-
170
-
171
-
172
-
173
-
174
-
175
-
176
-
177
-
178
-
179
-
180
-
181
-
182
-
183
-
184
-
185
-
186
-
187
-
188
-
189
-
190
-
191
-
192
-
193
-
194
-
195
-
196
 |
 |

DADF Repair Procedures
4-27
4036-501
7.
Disconnect the sensor connector (P/J25).
8.
Disconnect the motor connector (P/J27).
9.
Disconnect the clutch connector (P/J18).
10.
Release all harnesses from the clamps on the DADF registration roll drive motor
assembly.
11.
Remove three (3) screws from the DADF assembly to the DADF registration roll
drive motor assembly.
12.
Remove the DADF registration roll drive motor assembly.
13.
Remove the E-ring.
14.
Remove the (DADF #2) gear.
15.
Remove the (DADF #1) gear.