LiftMaster 61LM Owners Manual - Page 137
Indoor/outdoor Light Control - Series 71 - remote replacement
 |
View all LiftMaster 61LM manuals
Add to My Manuals
Save this manual to your list of manuals |
Page 137 highlights
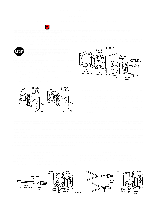
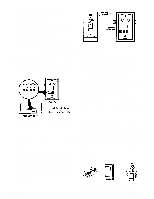
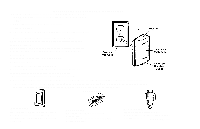
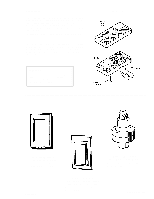
INDOOR/OUTDOOR LIGHT CONTROL - SERIES 71 The Indoor/Outdoor Light Control Is designed to operate only incandescent lamps of 150 Watts maximum. It can be used both indoors and outdoors in locations affording protection from direct exposure to rain. Please read the Instructions carefully to insure proper use and maximum safety. The Light Control Devices can be operated by any Series 50, 51, 52, 53 or 73 Transmitter. DO NOT INSTALL THE LIGHT CONTROL IN AN OUTDOOR LOCATION WHERE DIRECT EXPOSURE TO RAIN CAN OCCUR SETTING OR CHANGING THE CODE The Light Control receiver and transmitter which operates it must be set with matching codes. Be sure the Control is unscrewed from fixture before setting (or changing the code). Follow instructions below. 1. The receiver code switch block is located under the rubber cover on upper rim of Control, as shown. Pry off cover and set aside until code is set. 2. Remove transmitter cover screw. Carefully turn the case over (push button side up). Remove case top. CAUTION: Be careful not to move circuit board components. 3. Set or change code in receiver and transmitter according to transmitter instruction sheet. 4. Replace code switch cover on Control and snap in place. Reassemble transmitter. _____ INSTALLATION AND OPERATION INSTRUCTIONS Remove light bulb from the fixture. Screw top of Control into socket. Place washer over neck of bulb. Screw into bottom of Control, compressing washer slightly. Turn on any manual switch which would normally control the light and leave it in the ON POSITION. Press transmitter push button. Light should turn on. Press again and light will turn off. NOTE: Allow a 1-second Interval between transmitter operations. If light does not operate, check to to be sure: 1. All manual switches are turned on. 2. Control and lamp are firmly screwed in. 3. There is power to circuit (check fuse box or circuit breakers). 4. The bulb works. If transmitter does not or operate, check to be sure: 1. Receiver and transmitter have matching codes. 2. You are pressing the push button selected to operate the Control NOTE: If two or more Light Products are installed, they must be (on 2-channel or 3-channel transmitter). located at least 10 feet apart to prevent electronic interference. 3. Transmitter battery has power. NOTE: Test light on the ____t_ra_n_s_m_i_tt_e_r _s_h_o_ul_d_g_l_o_w_w_h_e_n__p_u_sh__b_u_tt_o_n_i_s_p_re_s_s_e_d N_O_T_E_:_N_o_u_s_e_r_s_e_r_vi_c_e_ab_l_e_p_a_r_ts ACCESSORIES Series 53 Multifunction Remote Control Transmitter 114A1055 Series 72 Indoor/Outdoor Wire-in Light Control © 1988, The Chamberlain Group, Inc. All Rights Reserved Series 74 Plug-in Appliance/Ught Control Printed in Mexico
-
 1
1 -
2
-
3
-
4
-
5
-
6
-
7
-
8
-
9
-
10
-
11
-
12
-
13
-
14
-
15
-
16
-
17
-
18
-
19
-
20
-
21
-
22
-
23
-
24
-
25
-
26
-
27
-
28
-
29
-
30
-
31
-
32
-
33
-
34
-
35
-
36
-
37
-
38
-
39
-
40
-
41
-
42
-
43
-
44
-
45
-
46
-
47
-
48
-
49
-
50
-
51
-
52
-
53
-
54
-
55
-
56
-
57
-
58
-
59
-
60
-
61
-
62
-
63
-
64
-
65
-
66
-
67
-
68
-
69
-
70
-
71
-
72
-
73
-
74
-
75
-
76
-
77
-
78
-
79
-
80
-
81
-
82
-
83
-
84
-
85
-
86
-
87
-
88
-
89
-
90
-
91
-
92
-
93
-
94
-
95
-
96
-
97
-
98
-
99
-
100
-
101
-
102
-
103
-
104
-
105
-
106
-
107
-
108
-
109
-
110
-
111
-
112
-
113
-
114
-
115
-
116
-
117
-
118
-
119
-
120
-
121
-
122
-
123
-
124
-
125
-
126
-
127
-
128
-
129
-
130
-
131
-
 132
132 -
 133
133 -
 134
134 -
 135
135 -
 136
136 -
 137
137 -
 138
138 -
 139
139 -
 140
140 -
 141
141 -
 142
142 -
143
-
144
-
145
-
146
-
147
-
148
-
149
-
150
-
151
-
152
-
153
-
154
-
155
-
156
-
157
-
158
-
159
-
160
-
161
-
162
-
163
-
164
-
165
-
166
-
167
-
168
-
169
-
170
-
171
-
172
-
173
-
174
-
175
-
176
-
177
-
178
-
179
-
180
-
181
-
182
-
183
-
184
-
185
-
186
-
187
-
188
-
189
-
190
-
191
-
192
-
193
-
194
-
195
-
196
-
197
-
198
-
199
-
200
-
201
-
202
-
203
-
204
-
205
-
206
-
207
-
208
-
209
-
210
-
211
-
212
-
213
-
214
-
215
-
216
-
217
-
218
-
219
-
220
-
221
-
222
-
223
-
224
-
225
-
226
-
227
-
228
-
229
-
230
-
231
-
232
-
233
-
234
-
235
-
236
-
237
-
238
-
239
-
240
-
241
-
242
-
243
-
244
-
245
-
246
-
247
-
248
-
249
-
250
-
251
-
252
-
253
-
254
-
255
-
256
-
257
-
258
-
259
-
260
-
261
-
262
-
263
-
264
-
265
-
266
-
267
-
268
-
269
-
270
-
271
-
272
-
273
-
274
-
275
-
276
-
277
-
278
-
279
-
280
-
281
-
282
-
283
-
284
-
285
-
286
 |
 |
