LiftMaster 61LM Owners Manual - Page 160
Model Series 874, Plug-In Light Control
 |
View all LiftMaster 61LM manuals
Add to My Manuals
Save this manual to your list of manuals |
Page 160 highlights
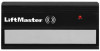
Model Series 874 Plug-In Light Control The Plug-In Light Control is designed to operate lights according to the Rating Chart shown below. Please read the instructions and power limitations carefully to ensure proper use and maximum safety. NOT recommended for use with toasters, coffee pots, or halogen lighting systems. Light Control products can be operated by portable remote control Model Series 50, 60, 70 and 80 by Model Series 740 Keyless Entry. There are no user serviceable parts. WARNING The Light Control is for indoor use only. Exposure to moisture can cause electric shock or fire. Unplug receiver before opening cover to set/change code. RATING Resistive Load 1200 Watts Motor Load 1/3 HP Incandescent Lamp 600 Watts The Plug-In Light Control receiver needs to learn the remote control code. Follow the instructions below: • Select a remote control push button to operate the light control. • Pry up the lower edge of the actuator with a coin or screwdriver as shown. • Plug the light control into a 120 Vac polarized outlet. The plug contacts are designed for polarized outlets only. The green power indicator light will turn on if there is power to the outlet. • Press and hold the remote control push button you chose to activate the light control. • Then press and release the "SMART" button on the receiver with a pen or pencil tip. The adjacent green indicator light will FLASH once. • Release the remote control push button. Code setting is now complete. Snap actuator back on light control. If the remote control push button is not held down until the receiver indicator light flashes, the light control has not accepted the remote's code. If the receiver "SMART" button is pressed and held until the green indicator light alongside goes out (in about 6 seconds), all memorized codes will be erased. Actuator Representative Remote Control Power Indicator Light 120VAC Polarized Wall Outlet Select a Remote Control push button to operate the light control Green Indicator Light "SMART" Button OPERATING INSTRUCTIONS • First, plug the lamp into a wall outlet and turn it ON. • With the lamp still in the ON position, plug it into polarized outlet on the light control. The bulb will not light. • TO TEST: Press and release the light control actuator. The light should turn ON. Press the remote control push button. The light should turn OFF. If two or more light products are installed, the receivers must be located at least 10 feet apart to prevent electronic interference. If the remote control does not activate the light, check to be sure: • You are pressing the remote control push button selected to operate the light control. • The remote control battery has power. The test light on the remote control should glow when the push button is pressed. Refer to the remote control instructions for battery changing information. 114A1568D © 1993 The Chamberlain Group, Inc. All Rights Reserved Printed in Mexico
-
 1
1 -
2
-
3
-
4
-
5
-
6
-
7
-
8
-
9
-
10
-
11
-
12
-
13
-
14
-
15
-
16
-
17
-
18
-
19
-
20
-
21
-
22
-
23
-
24
-
25
-
26
-
27
-
28
-
29
-
30
-
31
-
32
-
33
-
34
-
35
-
36
-
37
-
38
-
39
-
40
-
41
-
42
-
43
-
44
-
45
-
46
-
47
-
48
-
49
-
50
-
51
-
52
-
53
-
54
-
55
-
56
-
57
-
58
-
59
-
60
-
61
-
62
-
63
-
64
-
65
-
66
-
67
-
68
-
69
-
70
-
71
-
72
-
73
-
74
-
75
-
76
-
77
-
78
-
79
-
80
-
81
-
82
-
83
-
84
-
85
-
86
-
87
-
88
-
89
-
90
-
91
-
92
-
93
-
94
-
95
-
96
-
97
-
98
-
99
-
100
-
101
-
102
-
103
-
104
-
105
-
106
-
107
-
108
-
109
-
110
-
111
-
112
-
113
-
114
-
115
-
116
-
117
-
118
-
119
-
120
-
121
-
122
-
123
-
124
-
125
-
126
-
127
-
128
-
129
-
130
-
131
-
132
-
133
-
134
-
135
-
136
-
137
-
138
-
139
-
140
-
141
-
142
-
143
-
144
-
145
-
146
-
147
-
148
-
149
-
150
-
151
-
152
-
153
-
154
-
 155
155 -
 156
156 -
 157
157 -
 158
158 -
 159
159 -
 160
160 -
 161
161 -
 162
162 -
 163
163 -
 164
164 -
 165
165 -
166
-
167
-
168
-
169
-
170
-
171
-
172
-
173
-
174
-
175
-
176
-
177
-
178
-
179
-
180
-
181
-
182
-
183
-
184
-
185
-
186
-
187
-
188
-
189
-
190
-
191
-
192
-
193
-
194
-
195
-
196
-
197
-
198
-
199
-
200
-
201
-
202
-
203
-
204
-
205
-
206
-
207
-
208
-
209
-
210
-
211
-
212
-
213
-
214
-
215
-
216
-
217
-
218
-
219
-
220
-
221
-
222
-
223
-
224
-
225
-
226
-
227
-
228
-
229
-
230
-
231
-
232
-
233
-
234
-
235
-
236
-
237
-
238
-
239
-
240
-
241
-
242
-
243
-
244
-
245
-
246
-
247
-
248
-
249
-
250
-
251
-
252
-
253
-
254
-
255
-
256
-
257
-
258
-
259
-
260
-
261
-
262
-
263
-
264
-
265
-
266
-
267
-
268
-
269
-
270
-
271
-
272
-
273
-
274
-
275
-
276
-
277
-
278
-
279
-
280
-
281
-
282
-
283
-
284
-
285
-
286
 |
 |
