LiftMaster 61LM Owners Manual - Page 151
Indoor/outdoor Screw-in Light Control- Model 771cb
 |
View all LiftMaster 61LM manuals
Add to My Manuals
Save this manual to your list of manuals |
Page 151 highlights
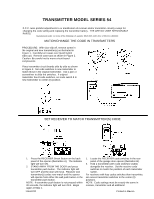
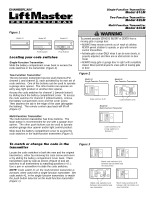
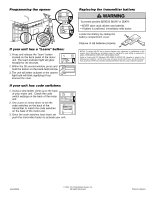
INDOOR/OUTDOOR SCREW-IN LIGHT CONTROL- MODEL 771CB The Screw-In Light Control is designed to operate indoors with incandescent or fluorescent lamps of 150 Watts maximum. It can be used outdoors with incandescent bulbs only, in locations affording protection from direct exposure to rain. Please read the instructions carefully to insure proper use and maximum safety. The Light Control Devices can be or operated by remote control transmitters: Models 73. 750. 753. 756 and Series 50. DO NOT INSTALL THE LIGHT CONTROL IN AN OUTDOOR LOCATION WHERE DIRECT EXPOSURE TO RAIN CAN OCCUR SETTING OR CHANGING THE CODE The Light Control receiver and remote control which operates it must be set with matching codes. Be sure the Control is unscrewed from fixture before setting (or changing the code). Follow instructions below. 1. The receiver code switches are located under the rubber cover on upper rim of Control, as shown. Pry off cover and set aside until code is set. 2. Locate remote control code switches, either by sliding the battery compartment cover back or by removing the cover screw. 3. With a Single or 2-channel remote, set code switches 1 through 9 in both receiver and remote to matching positions. With a Multi-Function remote, set receiver code switch #1 to match the remote push button selected (large button (-), center button (0), or end button (+). Set switches 2 through 9 to same positions as remote. Code switch #1 in a Multi Function remote is neutral. Set it to any position. Refer to your remote control instruction sheet, if necessary. 4. Replace code switch cover on Control and snap in place. Reassemble remote control.
-
 1
1 -
2
-
3
-
4
-
5
-
6
-
7
-
8
-
9
-
10
-
11
-
12
-
13
-
14
-
15
-
16
-
17
-
18
-
19
-
20
-
21
-
22
-
23
-
24
-
25
-
26
-
27
-
28
-
29
-
30
-
31
-
32
-
33
-
34
-
35
-
36
-
37
-
38
-
39
-
40
-
41
-
42
-
43
-
44
-
45
-
46
-
47
-
48
-
49
-
50
-
51
-
52
-
53
-
54
-
55
-
56
-
57
-
58
-
59
-
60
-
61
-
62
-
63
-
64
-
65
-
66
-
67
-
68
-
69
-
70
-
71
-
72
-
73
-
74
-
75
-
76
-
77
-
78
-
79
-
80
-
81
-
82
-
83
-
84
-
85
-
86
-
87
-
88
-
89
-
90
-
91
-
92
-
93
-
94
-
95
-
96
-
97
-
98
-
99
-
100
-
101
-
102
-
103
-
104
-
105
-
106
-
107
-
108
-
109
-
110
-
111
-
112
-
113
-
114
-
115
-
116
-
117
-
118
-
119
-
120
-
121
-
122
-
123
-
124
-
125
-
126
-
127
-
128
-
129
-
130
-
131
-
132
-
133
-
134
-
135
-
136
-
137
-
138
-
139
-
140
-
141
-
142
-
143
-
144
-
145
-
 146
146 -
 147
147 -
 148
148 -
 149
149 -
 150
150 -
 151
151 -
 152
152 -
 153
153 -
 154
154 -
 155
155 -
 156
156 -
157
-
158
-
159
-
160
-
161
-
162
-
163
-
164
-
165
-
166
-
167
-
168
-
169
-
170
-
171
-
172
-
173
-
174
-
175
-
176
-
177
-
178
-
179
-
180
-
181
-
182
-
183
-
184
-
185
-
186
-
187
-
188
-
189
-
190
-
191
-
192
-
193
-
194
-
195
-
196
-
197
-
198
-
199
-
200
-
201
-
202
-
203
-
204
-
205
-
206
-
207
-
208
-
209
-
210
-
211
-
212
-
213
-
214
-
215
-
216
-
217
-
218
-
219
-
220
-
221
-
222
-
223
-
224
-
225
-
226
-
227
-
228
-
229
-
230
-
231
-
232
-
233
-
234
-
235
-
236
-
237
-
238
-
239
-
240
-
241
-
242
-
243
-
244
-
245
-
246
-
247
-
248
-
249
-
250
-
251
-
252
-
253
-
254
-
255
-
256
-
257
-
258
-
259
-
260
-
261
-
262
-
263
-
264
-
265
-
266
-
267
-
268
-
269
-
270
-
271
-
272
-
273
-
274
-
275
-
276
-
277
-
278
-
279
-
280
-
281
-
282
-
283
-
284
-
285
-
286
 |
 |
